

Introduction: How to Make a Wooden Toy Truck


In this video I build a gift for my Girlfriends nephew. Instead of making the typical box, or blanket chest. I give this two year old the worlds coolest Wooden Toy Truck!
With the holidays right around the corner, i felt this would be a good time to get ahead on some gifts. When talking to my Girlfriend, I wanted to make something timeless for her two year old nephew. Understandably, she wanted to do some timeless furniture piece. My mind quickly went to absurdity, and landed here. On a wooden toy truck. So i decided to make him my own version of a Monster Truck.
If you want to see how I built it, check out the full video HERE!
Step 1: Cutting a Template

Layout the shape of the side of the truck on a piece of 1/4" plywood or cardboard. Use a bandsaw or jigsaw to cut the template.
Step 2: Preparing & Milling Materials

Prepare the stock you want to use for the build. For mine, I chose a large chunk of white oak I have had sitting in the shop. This is because I knew I could basically get every part i needed out of this piece and the wood color would be matching. But you could use a long piece already planed to your desired thickness, and have no need for re-sawing.
Step 3: Cutting the Body Parts


Using your template, layout and cut the side panels for the truck. Cut outside the lines using your bandsaw, being sure to leave some room to sand the piece to final dimensions. Once cut, then shape your two sides on a spindle sander, and then begin cutting the interior parts to your desired width.
Step 4: Cutting, Shaping, and Assembling the Wheels


- Rough cut the wheels from the piece of stock you choose. My wheels are roughly 2" wide, and re-sawed from a piece of 2" stock. This isn't necessary, if i was to make this again I would cut 8 total wheel parts from flat stock at 1"
- Once cut to final dimensions, use a straight edge to align 8 lines through your wheel, intersecting the center. Then continuing onto the edge. Using your table saw and miter gauge, align the gauge to 60*. Then where the blade meets your extension fence on the gauge, drill a hole for a dowel and the tire to rotate around. create a mark on the back of the extension, and use the marks on the wheel to turn wheel and cut the treads.
- Glue up the wheels using the center hole for alignment. Then clean up the outside of the wheels using your hand plane and sander, and cut the center recess for the hub using a forestner bit.
Step 5: Glue Up Body & Adding Details


Glue up the truck body using CA and regular wood glues. Once dried, sand and shape the truck to the look you want and begin adding details. I added a bumper, side step, headlights, and smoke stacks all using CA glue.
Step 6: Sanding & Finish


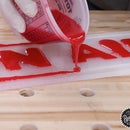
- Once assembled, final sand the piece and apply finish to each part before final assembly. Remember to leave the areas that will need glue, unfinished.
- For this project i chose to use Minwax stains and Minwax Water-Based Poly Acrylic for finish. Both are products I enjoy and have been using for years. I know they will provide a high quality finish, and hold up well over yeas of abuse from a young little truck driver!
Check out the Minwax products I Used HERE
If you like these projects, Check out more on my Youtube Channel Here
Step 7:

Participated in the
Big and Small Contest


