

Introduction: How to Use DHT11 Temperature Sensor With Arduino and Print Temperature Heat and Humidity


The DHT11 sensor is used to measure temperature and humidity. They are very popular electronics hobbyists.
The DHT11 humidity and temperature sensor makes it really easy to add humidity and temperature data to your DIY electronics projects. It’s perfect for remote weather stations, home environmental control systems, and farm or garden monitoring systems.
So in this tutorial we will see how to use DHT11 Temperature sensor with Arduino and print the temperature humidity & heat on the serial monitor of arduino ide.
Step 1: Things You Need


So for this project you need following things :
1x Arduino uno : https://www.utsource.net/itm/p/9221687.html
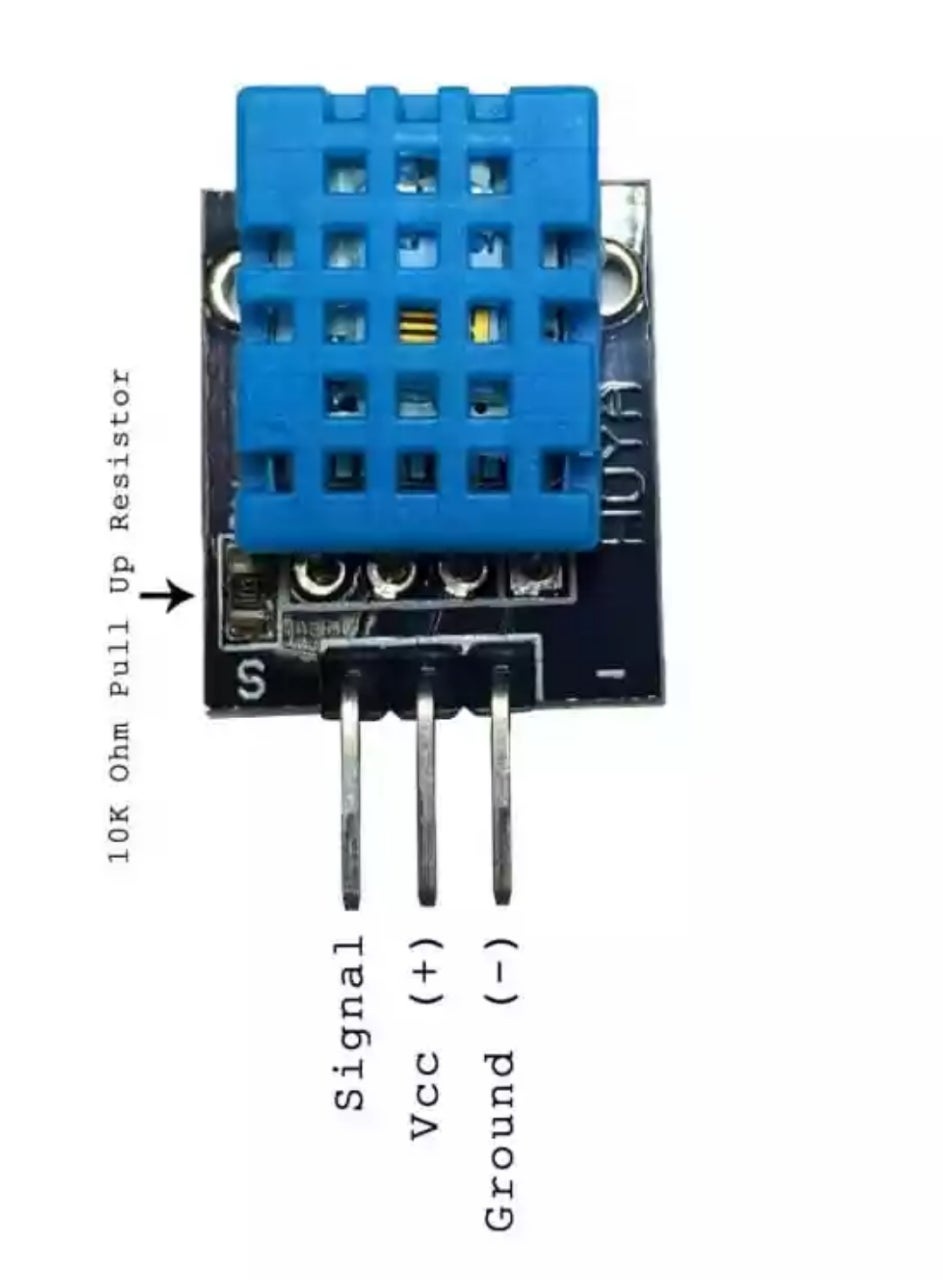
1x DHT11 Temperature sensor : https://www.utsource.net/itm/p/9221601.html
Breadboard & few jumpers
Step 2: Connections

Please connect everything According to as shown in the provided image and proceed to next step.
Step 3: Install Arduino Library


go to your Arduino IDE then go to Sketch > Include Library > Manage Libraries. The Library Manager will be shown.
Then Search for “DHT” in the Search box and install these DHT library in Arduino ide.
After installing these DHT library, type “Adafruit Unified Sensor” in the search box & Scroll all the way down to find the library and install it and you are ready to code.
Step 4: Upload the Code to Arduino Ide
After all doing above things just copy the code given below & upload it to your Arduino uno :
#include "DHT.h"
#define DHTPIN 7 // what pin we're connected to
// Uncomment whatever type you're using!
#define DHTTYPE DHT11 // DHT 11
//#define DHTTYPE DHT22 // DHT 22 (AM2302)
//#define DHTTYPE DHT21 // DHT 21 (AM2301)
// Initialize DHT sensor for normal 16mhz Arduino
DHT dht(DHTPIN, DHTTYPE);
void setup() {
Serial.begin(9600);
Serial.println("DHTxx test!");
dht.begin();
}
void loop() {
// Wait a few seconds between measurements.
delay(2000);
// Reading temperature or humidity takes about 250 milliseconds!
// Sensor readings may also be up to 2 seconds 'old' (its a very slow sensor)
float h = dht.readHumidity();
// Read temperature as Celsius
float t = dht.readTemperature();
// Read temperature as Fahrenheit
float f = dht.readTemperature(true);
// Check if any reads failed and exit early (to try again).
if (isnan(h) || isnan(t) || isnan(f)) {
Serial.println("Failed to read from DHT sensor!");
return;
}
// Compute heat index
// Must send in temp in Fahrenheit!
float hi = dht.computeHeatIndex(f, h);
Serial.print("Humidity: ");
Serial.print(h);
Serial.print(" %\t");
Serial.print("Temperature: ");
Serial.print(t);
Serial.print(" *C ");
Serial.print(f);
Serial.print(" *F\t");
Serial.print("Heat index: ");
Serial.print(hi);
Serial.println(" *F");
}
Step 5: Get the Temperature & Humidity in Serial Monitor

After uploading the code open the serial monitor present in arduino ide and you can see the temperature, humidity & heat index of your environment (which your sensor is currently present in ) on your serial monitor as mine and you can make take this a little further as well you can use these temperature/humidity values in your projects like weather station, environment monitoring etc.


