

Introduction: How to Use Nixie Tube Module on Arduino


NIXIE-module-Q30-1 module is designed to work with nixie tube QS30-1/SZ-8. Combined with classic nixie tube, ceramic tube socket, gold plated PCB, RGB background LED, QS30 module can be used for a variety of applications, to fulfill your requirements to display numbers with colorful effects. It is a compact design in a minimal footprint, packed with voltage boost circuit, display driver and user-friendly tube sockets. Multiple modules can be daisy chained in sequence for more imaginative needs.
This nixie tube module extends the power of Arduino, allowing users to easily integrate nixie tubes into their own Arduino projects, or any projects using similar open source platforms. Users can focus on implementing their ideas with no need to worry about the power management or display driving.
Step 1: Features
Features:
Vintage nixie tube, model QS30-1/SZ-8/SW3-1 (made in Chinain 1961-1989)
Open source library for Arduino
Hassle-free voltage boost circuit integrated.
Easily expandable
Gold-plated PCB
Ceramic tube socket
RGB LED backlighting
1.5V DC :5V DC power in
2.GND:Ground
3.DIN (Pin side) /DOUT (Socket side):Serial data input (Pin side)/Serial data output (Socket side)
4.OE:Output enable (active LOW), brightness control
5.STCP:Storage register clock input
6.SHCP:Shift register clock input
Step 2: Parts List
1 x Arduino Uno
1 x Nixie Tube Module V2.0
6 x Female to male jumper wires
Step 3:
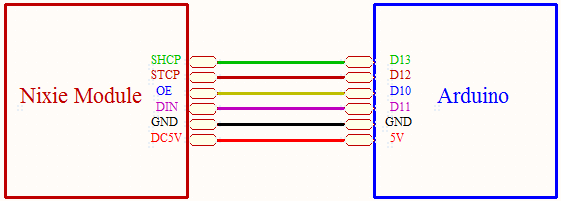
We connect the tube module to Arduino Uno in the following way:
1.Nixie Tube Module SHCP -> Arduino D13
2.Nixie Tube Module STCP -> Arduino D12
3.Nixie Tube Module OE -> Arduino D10
4.Nixie Tube Module DIN -> Arduino D11
5.Nixie Tube Module GND -> Arduino GND
6.Nixie Tube Module DC5V -> Arduino 5v
Step 4: Sample Code
#include ”NixieTube.h”
#define COUNT 1 // define how many modules in serial NixieTube tube(11, 12, 13, 10, COUNT); // pin_ds, pin_st. pin_sh, pin_oe(pwm pin is preferred), COUNT void setup() { tube.setBackgroundColor(0, (Color)5); // set different background color for each module tube.setBrightness(0xff); // brightness control, 0×00(off)-0xff tube.display(); } void loop() { for(int i;i<7;i++) { tube.setNumber(0,i); tube.setBackgroundColor(0, (Color)i); tube.display(); delay(500); } }
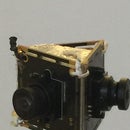
Step 5: Test Enviroment


1. Picture of the setup:
2. Download the Arduino library to under ‘arduino-1.0/libraries’:
3. Launch Arduino IDE, copy and paste the test code, and download to Arduino Uno:
4. Running effect:
In a chain,
Step 6: Appendix

We can download the libraries and datasheet here:
1. Arduino library: NixieTubev2
2. User manual:NIXIE Module QS30-1 Manual EN v2.0.0


