

Introduction: How to Control TV Functions Using Analog Input and Arduino


Have you ever wanted to use a good old knob to control your TV volume instead of repeated button pushing? Or make it controlled by light? Do you want your remote to be replaced by an awesome arduino and let it do the hard work of using a remote for you? Well this instructable is for you!
Also if you just want to learn how to use IR to control your TV with your arduino this will help you gain some understanding. Or maybe inspire some awesome project and instructable ideas!
In this instructable we will be using a 10k potentiometer, IR LED, and an Arduino to control the volume (or anything else you want) on a TV.
Here is a materials list
NOTE: "*" means optional
Arduino (or clone, but the arduino Leonardo has not worked for me)
10k potentiometer
IR LED http://www.radioshack.com/product/index.jsp?productId=2062565
100 ohm resistor
IR receiver http://www.radioshack.com/product/index.jsp?productId=2049727
*NPN transistor and 1k resistor (if you want to amplify power to IR LED)
*pushbutton
*regular LED and 470 ohm resistor
You will also need to download the IRremote library from this site:
http://www.arcfn.com/2009/08/multi-protocol-infrared-remote-library.html
and make shure to make it arduino 1.0/1.0.1 compatible by changing
#include
to
#include
in IRRemoteInt.h.
Now Lets Begin!
Step 1: Get the IR Remote Library, Learn About It, and Get Some Remote Codes.


To get the really handy IR remote library that Ken Shirriff made
go to http://www.arcfn.com/2009/08/multi-protocol-infrared-remote-library.html
and download and install the library
make sure to change
#include <WProgram.h>
to
#include <Arduino.h>
in IRRemoteInt.h. (to open IRRemoteInt.h and edit it, use Notepad on Windows, or Text Editor on Mac, but don't open with arduino IDE because it won't open with it.)
to make it arduino 1.0/1.0.1 compatable
On the page make sure to read about how to use the library and find the correct protocol for your device
check out the sending example and test it to make sure it works on your arduino
NOTE: picture 1 shows the sending code, and picture 2 shows the hardware setup for it.
then do the receiving test on your arduino to find out your remote hexadecimal codes by pointing your remote at the receiver and pressing the buttons you want the codes for, the see the codes in the Serial monitor.
make sure to write down the codes or store them somewhere for future use.
NOTE: picture 3 shows the receiving code, and picture 4 shows the hardware setup for the receiving code.
If you get all these to work then you are set to continue!
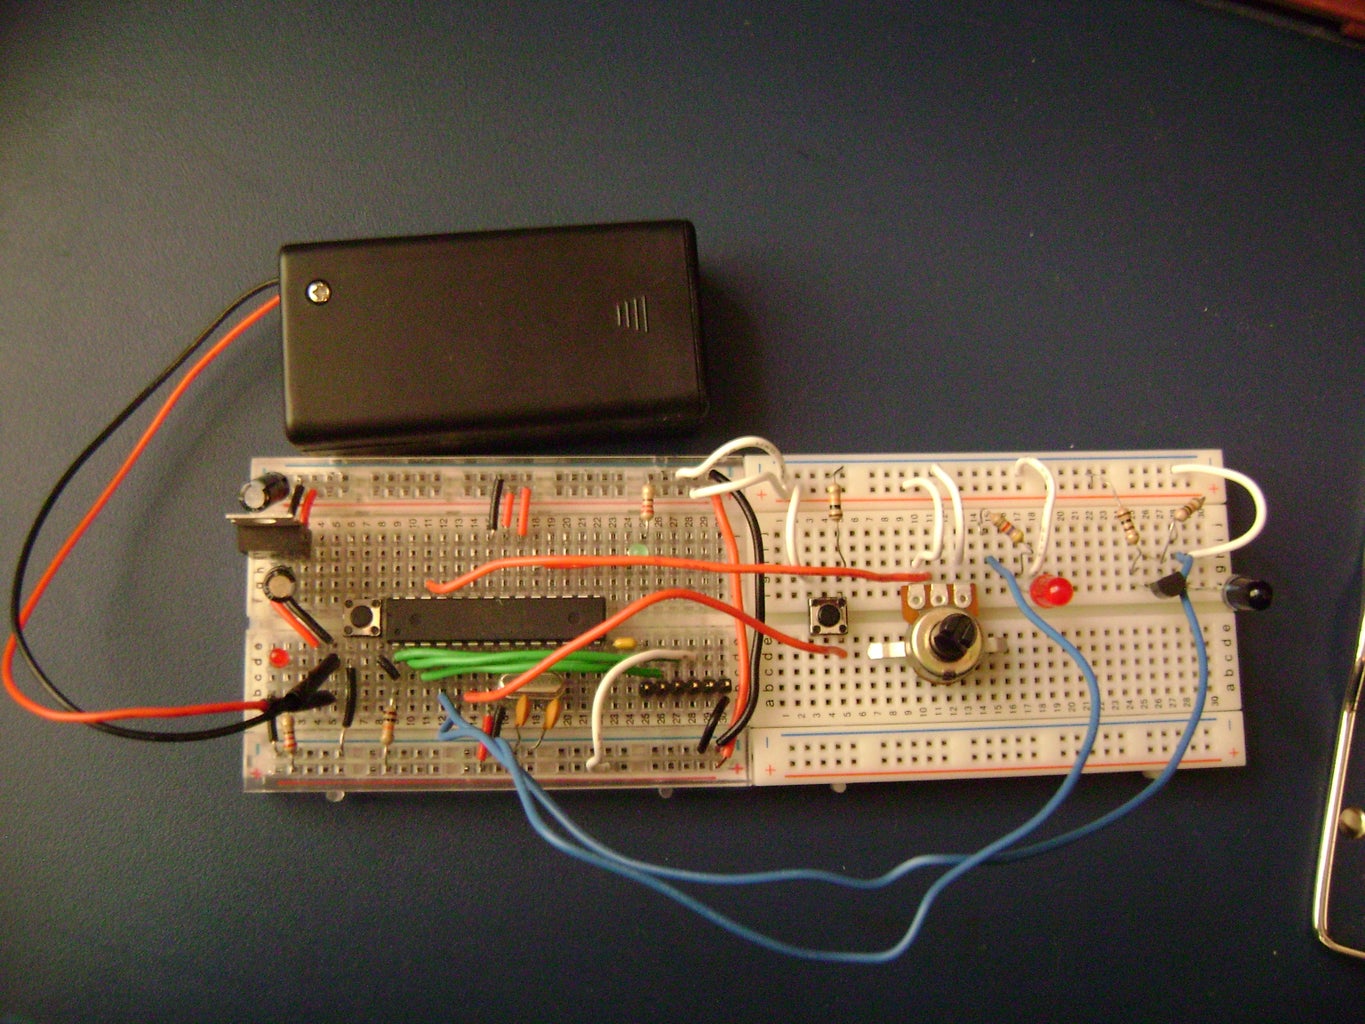
Step 2: Set Up Your Hardware!


Here are the steps to building the arduino remote:
hookup a pushbutton to pin 4 on your arduino, 5V, and ground with a 10k resistor
connect the center pin of your potentiometer to analog pin 3 on your arduino, and the side pins to 5V and ground
connect the long lead ("+") of the indicator LED to pin 2 of your arduino with a 470 ohm (or whatever resistor works) resistor, and the short ("-") lead to ground
connect the long lead ("+") of the IR LED to pin 3 of your arduino with a 100 ohm resistor, and the short lead ("-") to ground
NOTE: the first picture shows this basic circuit, and the ones after it show the steps listed above.
(OPTIONAL) if you want to use a transistor to amplify the IR LED's power do this:
connect the long lead ("+") of the IR LED to the emitter of the NPN transistor you have, the short lead ("-") to ground, a 100 ohm resistor from the collector pin of the NPN transistor to 5V, and connect the base pin of the NPN transistor to pin 3 of your arduino with a 1k resistor.
NOTE: the last three pictures show this circuit with transistor and how to set it up
Step 3: Program It!


Now we will program this remote killer!!!!
Here is the program I wrote. It sends a volume up signal whenever the knob is turned up, a volume down when the knob is turned down, a volume down signal every few milliseconds as long as the volume down button is pressed, and lights the indicator LED when it is sending signals.
I am still a beginner at arduino programming, so any improvements would be nice.
Remember to change the codes according to your remote control codes!!!
Here is a arduino file and a .txt file that you can copy and paste.
CODE (it is best to not copy it from here, copy from .txt or download the arduino code instead):
#include <IRremote.h>
#include <IRremoteInt.h>
//enable IR signal sending ability (only works on digital pin 3!!!)
IRsend irsend;
//these pins can be changed if you like
//pin from center of potentiometer
int potpin = 3;
int val = 0;
int old_val = 0;
int level = 0;
int old_level = 0;
//pin from volume down pushbutton
int downVolpin = 4;
int downVolVal = 0;
//led to indicate changes in volume (for debugging) you can change pin
int indicatorLED = 2;
//volume up 490
//volume down c90
void setup()
{
Serial.begin(9600);
pinMode(downVolpin, INPUT);
pinMode(indicatorLED, OUTPUT);
}
void loop() {
downVolVal = digitalRead(downVolpin); //state of volume down button
val = analogRead(potpin); // analog value of pot, between 0-1023
level = map(val, 0, 1023, 0, 100); //changes values from 0-1023 to 0-100
delay(10);
if (downVolVal == HIGH) { // if down volume button is pressed
digitalWrite(indicatorLED, HIGH);
for (int i = 0; i < 3; i++) {
irsend.sendSony(0xc90, 12); // Sony TV down volume (change for your device)
delay(100);
}
}
else if (level > old_level) { //if knob is turned up
digitalWrite(indicatorLED, HIGH);
for (int i = 0; i < 3; i++) {
irsend.sendSony(0x490, 12); // Sony TV up volume (change for your device)
delay(100);
}
}
else if (level < old_level) { //if knob is turned down
digitalWrite(indicatorLED, HIGH);
for (int i = 0; i < 3; i++) {
irsend.sendSony(0xc90, 12); // Sony TV down volume (change for your device)
delay(100);
}
} else { //if neither action is done
digitalWrite(indicatorLED, LOW);
}
old_val = val; //the value is now old
old_level = level; //the mapped value is now old
}

Step 4: Test It Out and Think of More Ways to Use Your IR Remote Powers!

Make sure all the codes are correct and that you made all your connections secure.
Turn on your arduino and make sure the IR LED is pointing at the TV IR receiver (make sure it is in line of sight)
Press or hold down the pushbutton to turn down your volume to the lowest level, and make sure the potentiometer is turned all the way down to sync it with the TV volume.
Now gently turn the potentiometer up and see if the volume on your TV goes up with it, and then turn it the other way and see if the volume goes down.
Also see if the indicator LED is lighting up whenever a change in volume is made.
If everything works, GREAT!
if not:
TROUBLESHOOTING:
check to see if you connected everything to the correct pins on your arduino
make sure connections are correct and secure
make sure the remote codes in the sketch are the ones that are for your TV and use the right protocol.
make sure the TV is in the line of sight of the IR LED
try putting the IR right in front of the TV receiver to see if it works, if it does, it means that you were to far away for the IR LED to reach the TV receiver. To improve range use a NPN transistor to amplify power to the IR LED as shown in the extra part of step #2.
Also look at the troubleshooting area of the IR Library page

Participated in the
Remote Control Challenge


