

Introduction: How to Crochet a Plarn Planter for Healthy Roots


Lots of people use plarn to make sturdy tote bags and market bags. This is a great idea – turning a lot of plastic bags which would have ended up in landfill and converting them into something which has the same purpose, but is stronger and can be used again and again, which cuts down on needing new plastic bags – recycling, re-using and reducing ![]()
I’ve started gardening on my balcony recently, and came across the ‘air-pot’ system. Air pots are a kind of planter with an egg-box-like surface and lots of holes. Normally in a potted plant, when a root hits the side of the pot it is deflected and roots start to grow in a spiral round the pot. Over time, these roots grow into a dense mat which does not absorb water and nutrients very well, and may be prone to rotting and disease. The design of the airpot directs roots, when they reach the edge of the pot, to poke through the holes, where of course they dry out and are ‘pruned’ by the air. This encourages new roots to grow from the base of the plant, so instead of a thick unhealthy coil of roots at the bottom of the pot you end up with a mesh of new healthy roots spreading throughout the soil. Unfortunately the air-pots are rather expensive, especially if I wanted some shipped to Japan.
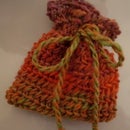
It occurred to me that crocheted plastic bags would have a similar effect – the rounded bumps of the stitches would encourage root tips to grow through the holes between the stitches, while the holes would give really good drainage and the layers of plastic, with air trapped both in and between the stitches, would insulate the roots from extremes of hot and cold. And best of all, it would be practically free and environmentally friendly - so I give you, the crocheted plarn planter!
Step 1: Materials
You’ll need:
- plastic grocery bags – I made a pot 5in in diameter and about 4in tall, which took 10 bags. It doesn't matter if you have a mix of different thicknesses and sizes, you can adjust the width of your strips to get a consistent yarn
- scissors
- crochet hook – plarn is tough on the hands so a hook with a chunky handle will be better
Step 2: Make Your Plarn

To make plarn, fold a plastic bag and cut into strips around 1 inch wide (you can cut thick bags a little narrower and thin bags a little wider to get a fairly consistent gauge). You are cutting your bag side-to-side, so each strip will actually be a loop. Thread one loop through the previous loop and through itself to attach them together.
You don’t need to make all your yarn at once – you can just add on new loops as you go. If you find yourself running out of yarn, it's easy to add a few more loops.
Step 3: How to Crochet
Crochet the plarn as you would any other yarn. You will find it is rather hard on the hands and wrists, so take regular breaks, and use a hook with a chunky grip (I improvised one from a strip of scrap fabric and some tape). If you are having trouble catching the plarn with your hook, twist it a little to make the strips more yarn-like.
Though the video below is about amigurumi, it shows you exactly the techniques you need for this project. Magic ring, single crochet stitch, and how to make an increase.
Step 4: Crochet Your Pot

You'll notice that you're using exactly the same technique as in the video from step 3, only making 8 increases per round instead of 6.
To make a 5in pot:
Round 1: Make a magic ring, chain 1, single crochet 7 times in ring, join to the first stitch with a slipstitch and pull the ring tight. Be careful not to stretch or snap the ring as you pull it closed.
Round 2: Chain 1, single crochet 1 in the same stitch, single crochet 2 stitches in each stitch all round, join with slipstitch
Round 3: Chain 1, single crochet 1 in the same stitch, single crochet 1 in next stitch, (single crochet 2 stitches in next stitch, single crochet 1) 7 times, join with slipstitch
Round 4: Chain 1, single crochet 1 in the same stitch, single crochet 1 in each of next 2 stitches, (single crochet 2 stitches in next stitch, single crochet 1 in each of next 2 stitches) 7 times, join with slipstitch
Round 5: Chain 1, single crochet 1 in the same stitch, single crochet 1 in each of next 3 stitches, (single crochet 2 stitches in next stitch, single crochet 1 in each of next 3 stitches) 7 times, join with slipstitch
Round 6: Chain 1, single crochet 1 in the same stitch, single crochet 1 in each of next 4 stitches, (single crochet 2 stitches in next stitch, single crochet 1 in each of next 4 stitches) 7 times, join with slipstitch
Round 7: Chain 1, single crochet 1 in the same stitch, single crochet 1 in each of next 5 stitches, (single crochet 2 stitches in next stitch, single crochet 1 in each of next 5 stitches) 7 times, join with slipstitch
Round 8 onward: Work in plain single crochet until your pot is the desired height. Join with slipstitch and weave in loose end.
To make a bigger pot, work more increase rounds before switching to plain single crochet – you need to make eight increases per round to make the bottom of the planter flat.
Step 5: Plant and Enjoy

Use a moisture-retaining compost mix so the pot doesn't dry out too fast. You can plant directly into the pot - no need to add any kind of liner or drainage aid such as pebbles.
Because it's so light, this pot works great as a hanging basket or tied to a balcony railing. You'll also get the full benefit of the holes that way!
Participated in the
Garden Contest


