

Introduction: How to Do Bodywork


This set of instructions will properly take you through step by step and show you how to replace a rusted out panel on your car or truck.
This is just basic bodywork being performed here, following these instructions will enable you to fix minor/major imperfections on your vehicle.
Although this procedure is done on a specific vehicle, it’s basically the same for all others.
Danger
This process is heavily tool involved (welding, cutting, drilling ext.), so only those who are comfortable with working with these tools are recommended to attempt this procedure. Serious injuries or death could result.
There is a high risk of injury possible when attempting to complete this work.
Certain safety precautions must be taken in order to complete this safely and correctly.
All actions that need be taken will be addressed in these directions.
Step 1: Gather Tools Needed/Recommended
Step 2: Preporation
1.)Before doing any work make sure all materials and tools are gathered and organized.
2.)Have a clean and well lit workspace.
3.)Be sure to be wearing protective clothing when necissary. (work gloves, steel toe boots, long sleeve shirt, pants).
4.) Read through instructions prior to doing the work, will make work easier and more understandable.
Step 3: Selecting Area to Cut

1.)Take replacement piece of metal and size it up against the car. Making sure its flush against the car.
2.)Trace the outline of this piece onto the car. Grab your Chalk/Sharpie or Pencil and make a line on the body of where you want to cut. ( the area inside the cut will be removed and replaced).
Step 4: Cutting Out the Area to Be Replaced
Using Acetylene Torch(wear hand and eye protection)
1.)Get electric angle grinder out.
2.)Make sure its equiped with the cut off wheel.
3.)Cut out selected area on car.
4.) After the area is cut out, using the angle grinder remove any access paint from the area you are working on, this clean metal surface will allow welding to occur later on.
Step 5: Fitting Replacement Piece

1.)The replacement piece should be the same size as the piece you just cut out.
2.)When adding the new piece, make sure it be flush with the original body. (see picture below)
Step 6: Adding Replacement Piece
1.)With the new panels now in place, its time to permanetly join them to the car.
2.)First start with the first of the two replacement panels, the one located closer to the front of the car.
3.)Position this piece percisely where you want it, trying to match the original position of the old piece on the car.
4.)When you are satisfied with the position of the panel, use a few pairs of vice grips and lock the new panel in place.
5.)After the piece is in place be certain to check that everything is lined up correctly; making sure all body lines and moldings are correct.
6.) Now it is time to permanatly attach the replacement panel. This can be accomplished using a MIG welder or Arc welder, Drill, Drill bits, Rivet gun, and Rivets.
Step 7: Welding


1.)Since most replacement panels on cars are thin sheet metal, we will be using a MIG welder for this.
2.)Set up your MIG welder close to the area of the care that you are working on.
3.)Attach the ground of MIG welder to a clean area on the cars bodywork near the area of welding.
4.)If your MIG welder has a gas additive such as Argon, now would be the time to open the valve to 12 psi.
5.)Before beginning welding make sure you are wearing the proper protective clothes for welding, Pants, long sleeves, welding gloves, and eye/face protection.
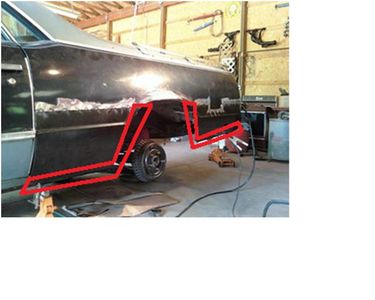
6.)You are going to want to make these welds along the top edge of the replacement panels. As shown in the red area in the photo (1st picture below)
7.)These welds will be tack welds; which means they are to be spaced 1” to 2” away from each other and low penetrating. As shown in the photo (2nd picture below).
8.)Go ahead and make your welds along that top edge, making sure to control speed, spacing, tip movement, and penetration.
9.)After successfully completing your welds, go ahead and grind the welds down with your angle grinder; this should make the welds flush with the body. (3rd Picture below)
Step 8: Riveting
1.)Now it’s time to rivet the remaining edges of the new panels to the car. This method is done because some of the areas of the car cannot be welded on successfully. If yours is feel free to weld those areas and skip this step.
2.)For this you will need your Drill, Drill bits, Rivet gun, and rivets.
3.)Rivets will be spaced 2” away from each other.
4.)They will run along the bottom edge of the replacement panel, and in the inner wheel well area of the panel. As shown the picture (below).
5.)First mark where u want the rivets to be.
6.)Equip your drill with a 3/16” Drill bit.
7.)Pre-drill every place you want a rivet to be at.
8.)After this is complete load your Rivet gun with a 3/16” rivet and begin to fill all the newly drilled holes with rivets.
9.)The entire replacement panel should now be completely attached to the car.
Step 9: Body Filler


1.)Now with the panel intact completely it is now time to make it blend in with the original panels of the car.
2.)This next step is something that has to be done in a timely manner. Typically 4 to 5 minutes. So fully read through this next part before attempting it.
3.)Get your tack rag, body filler w/ reactor, wood stirrer, a clean working/mixing surface and plastic applicator ready.
4.)Open your body filler and put a golf ball size amount onto your clean mixing surface. (shown below)
5.)With your wooden mixing stick ready, open up your reactor and squeeze an inch’s worth of reactor onto the body filler. (shown below)
6.)Immediately after doing so start mixing the two together using the mixing stick. (Don’t ‘whip’ together, but rather a folding motion of the material). (shown below)
7.)Mix until a uniform color is reached. At this point you have about 3-5 minutes of time with the material before it’s no good to use.
8.) Apply with your Plastic applicator evenly over welds on the panel. Trying your best to blend the two panels together evenly. Only go over the body filler once or twice after applying it onto the car. (Shown below) Repeat these steps until a good buildup of material is on the car
Step 10: Sanding


1.)Now with a good buildup of material on the car, it’s now time to sand it down to make it fully blend in.
2.)Go ahead and grab a various amount of sandpapers, ranging from 36 grit to 1600 grit.
3.)Also it might be necessary to use pneumatic sanders, block and hand sanders. For this particular job the sanding will be done in that order.
4.)Using an air compressor with the capability of reaching 150 psi, you can attach your Pneumatic bar air sander.
5.)With the air compressor turned on and at 150 psi, attach your lowest grit sandpaper to the Pneumatic bar air sander.
6.)While using the pneumatic bar air sander apply a horizontal force pushing the sander into the car. Move the sander in mini X motions while doing the sanding.
7.)Repeat this step using higher grit sandpaper.
8.)After each pass with higher grit sandpapers the surface should be getting smoother and smoother.
9.)Continue doing the same motion using the Pneumatic bar air sander, Block sander, and any hand sanding that needs to be done.
10.)Continue doing all three types of sanding until a completely smooth and uniform surface is left.
11.) Now would be the time for a coat of primer and then paint and a clear coat. You have now successfully replaced a rusted out panel on your car/truck.


