

Introduction: How to Fix a Plastic Kayak or Canoe


This is an instructable describing a really easy and cheap way of effectively repairing cracks in your kayak or canoe, using nothing more than a drill, cloth tape and a hair dryer.
I was given a kayak but it had six cracks in the hull and would eventually take on lots of water.
I had two options: scrap it or repair it. It didn't cost me anything, so I thought I'd try to repair it.
Is it possible to make a permanent repair using a drill, cloth tape and a hair dryer? Yes - it really does work!
I've made a few river trips in my repaired kayak and there are no leaks.
Step 1: Materials Needed
- A drill with a very fine drill-bit
- A reel of fabric tape - this is also known as duct tape, cloth tape or gaffer tape. It's a flexible self-adhesive tape reinforced with a cloth mesh. It's quite cheap and easily available.
- A hair dryer or hot air gun.
- A marker pen
Step 2: Drill the End of the Crack
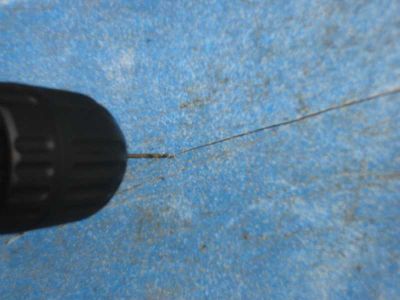
The first thing we have to do is to stop the crack getting any longer.
This work is done on the outside of the kayak.
Get a drill and drill a very small hole at both ends of the crack. This will stop the crack getting any bigger.
Step 3: Mark the Extent of the Crack Inside the Kayak

We need to know where the crack is, from inside the kayak or canoe.
This can be tricky, so use a pin to poke through the hull so you can mark the hole using a marker pen.
When you have marked the holes, you will then know where the ends of the crack are.
Step 4: Heat the Area to Be Repaired

ALL THE FOLLOWING STEPS ARE DONE ON THE INSIDE OF THE KAYAK OR CANOE.
Heat the repair area.
Use a hair dryer or heat gun to heat the kayak (or canoe) plastic so that it is hot to the touch. If you are using a powerful heat gun, be very careful not to heat the plastic too much.
Step 5: Add a Layer of Fabric Tape


ALL THE FOLLOWING STEPS ARE DONE ON THE INSIDE OF THE KAYAK OR CANOE.
Apply a layer of fabric tape to the heated area of the kayak or canoe.
With your fingers (or a spoon), press down HARD so that the tape really sticks to the kayak plastic.
Step 6: Heat the Tape

ALL THE FOLLOWING STEPS ARE DONE ON THE INSIDE OF THE KAYAK OR CANOE.
At this stage, we have applied a strip of fabric tape to the heated plastic of the kayak.
We now need to heat the fabric tape with the hair dryer. This will melt the tape's glue so that we will end up with an excellent bond.
Keep the hair dryer over the tape for a minute or two so that the glue gets hot.
Step 7: Apply Several More Layers of Tape
ALL THE FOLLOWING STEPS ARE DONE ON THE INSIDE OF THE KAYAK OR CANOE.
Apply several more layers of fabric tape.
Make sure that each layer is applied slightly offset to the previous layer.
After each strip, heat the tape with the hair dryer and press down, as before.
For a good repair, you should use about five or six strips of tape, each one slightly offset, and each one heated and pressed into the kayak.
Step 8: Enjoy Your Repaired Kayak!

Well done - you have repaired your kayak!
Remember these points:
It is very important that you use heat to make the adhesive melt. This makes an excellent bond.
Heat the tape so that it's really hot.
Press the tape into the previous strips so that they make a good bond.


