

Introduction: How to Get Into Robotics, Programming, Arduino Electronics


Robotics integrate all STEM fields and always make each kid crazy. It can help kids get hands-on experience on mechanics, electronics, control system and computer science.
However, all robots on the market seem to be expensive, hard to assemble, trouble to wire and complex to program. Our goal is to create an affordable, easy-to-use and open source robot for per kid. That is the mBot, which is crowfunding on Kickstarter.
What is the mBot?
mBot is a cost-effective, easy to build and run robot kit for kids, it can help kid to grasp hands-on experience quickly of graphical programming, electronics and robotics.
It is said to have features below:
- All-in-one solution for robotic learning designed for STEM education
- This graphical programming environment mBlock is based on Scratch 2.0 developed by MIT Media Lab. 15+ improvements and 50+ new script blocks have been developed for easy teaching and learning. Try here.
- Electronics are designed based on open source platform Arduino. 10+ improvements are made for easy teaching and learning.
- The easy-to-assemble mechanical parts (about 10 mins) are well compatible with Makeblock and Lego parts.
- Two colors available : Blue/Pink
- Two Versions: 1. Bluetooth Version for individual usage or team working; 2.4G Version for classroom.
Step 1: Part List

there are almost 40 pieces in the mBot kit include the mechanic modules and electronic modules, everyone can assemble all parts within 10 mins.
the list is shown below:
1*Metal Base Plate
2*TT Gear Motor
2*Wheel
2*Tyre
1*Plastic Universal Wheel
1*Magic Tape 20*30mm
6*Brass Stud M4*25
14*Socket Cap Screw M4*8
6*Nut M4
4*Nut M3
4*Philip's Head Screw M3*25
2*Tapping Screw M2.2*9.5
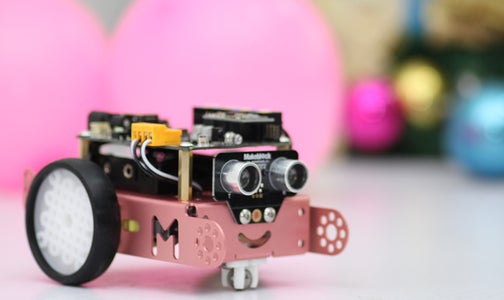
1*Arduino Based Control Board
1*Me Ultrasonic Sensor V3.0
1*Me Line Follower V2.2
1*Me Infrared Controller
1*Bluetooth
1*Battery Holder for (4)AA
4*RJ25 Cable
1*USB A-Male to B-Male Cable
Step 2: Introducing to the Electronics of MBot


we designed mBot's electronics based on Arduino platform , which is easy for kids to use and extend , and bring their every idea to life.
With intuitional color labels and easy-to-use RJ25 connectors, the board could get wired within a few seconds, so students could get more time to focus on creating all kinds of interactive stories and projects.
You can see more from Kickstarter page.
Step 3: Assemble All Parts


Cute shape with easy assembly is our goal. mBot contains only about 45 pieces in total, so it is easy to have a sense of achievement for kids to assemble in 10 mins quickly.
Step 4: Introducing to Graphical Programming Tool-mBlock


mBlock is a free graphical programming environment (based on Scratch 2.0) with new features of allowing you to program Arduino and robotics. Users can download from herehttp://mblock.cc/download/.
For now, 15+ improvements and 50+ hardware-related script blocks have been made for kids to program easily. Here are some features may interest you:
- Based on scratch 2.0 developed by MIT Media Lab, beautiful interface and easy for everyone.
- Free & source code: the software is free and support Window & Mac system. We will also open the source code later.
- Support wireless communication: Bluetooth, 2.4GHz wireless serial and WIFI are supported.
- Easy to use: No extension file! No plug-in! The easiest way to program your Arduino and robots.
- Arduino mode: perfect for every beginner to transition from graphical programming to text-based programming.
Step 5: Drag&drop Programming (run a Wall Avoidance Robot)

Step 6: Generate the Source Code and Upload


With mblock, users can generate Arduino source code from graphical blocks. So it will be perfect for every beginner to switch from graphical programming to text-based programming. We do like this function very much!
Step 7: More...


You not only can do this simple project, but also can do more because it is based on Arduino open source platfrom.
Two online courses to help teachers or kids get started easier. People can get a preview of contents about two books here.
If you are interested in this project, you can get more information from Kickstarter page.


