

Introduction: How to Make Spider Silk Thread


I have also encountered many abandoned webs, which gave me the idea of harvesting these out-of-use webs for their silk. Having walked into so many webs, I know how unbelievably strong and stretchy their threads are. Spider silk, in fact, is the strongest fiber ever discovered. Spider silk is stronger than steel, for its diameter; that is, a thread of steel would be weaker than a thread of spider silk of the same size.
Scientists have been working on how to entirely artificially duplicate spider silk in the lab for a while, but have not yet been able to make the silk entirely without spiders. I have included some websites of some recent research on the subject at the end of the instructable.
In this instructable, I will show I how I harvested abandoned webs and turned them into threads that I could use to sew.
Step 1: Understand Which Species Make the Right Webs


1) golden orb spider,
2) black and yellow orb spider,
3) crab orb spider,
4)
All of these build large, regular orb shaped webs, with strong fibers. None of these spiders are dangerous, but I recommend avoiding their bites anyway, because it could be painful, and there may be those who are allergic to their bites. I have never heard of anyone being allergic to orb spiders, but it's not impossible. Also, if you got close enough to one of these spiders to actually get bit by it, you were probably seriously annoying it (I have actually poked a
Before collecting webs from any spider, please make sure you know what kind of spider it is. There are poisonous spiders in the USA. Outside the USA, I cannot speak with authority about the kinds of spiders, so you should do you own research about spiders before collecting their webs. Especially in Australia (home of the most poisonous spider in the world)! In the USA there are two web building spiders that have a deadly venom, and should be avoided at all costs:
1) The black widow (and brown widow) spider
2)The brown recluse
I have not seen these in my yard, but I have avoided their habitats on purpose. The picture I have of them are not mine, because I did not want to stick my face in them to take their pictures. Luckily, these spider's webs look completely different than the four spiders I mentioned earlier. While the four spiders I mentioned all build webs in the open, above ground, and in regular orb shapes,the poisonous spiders build irregular webs in piles of wood, rocks, bricks, and other things. These spiders are often found in garages, for instance, or firewood piles. I will say it again that these spiders are very dangerous! If you are bit by one ever, go to the emergency room!
I have included pictures of the spiders I mentioned, and their webs.
Step 2: Find Abandoned Webs


Its not that hard to tell if a web is abandoned -- there is no spider in the web. Be careful, though, because it could be hiding off to the side where you don't see it at first.
Step 3: Collect Webs


I then wound the length of silk on a smooth stick (the stalk of a lily) temporarily, while I gathered more silk.
Step 4: Clean and Untangle the Silk


The silk from old spider webs will inevitably have things such as leaves, twigs, dust, and most often, leftover insect parts. These will need to be cleaned out of the silk. To do this, use a pair of tweezers and extract the debris and insects, all while trying not to break any of the fibers.
Next, in order to keep the length of the thread as even in thickness as possible, untangle the fibers and try to distribute the fibers from thicker parts of the length to the thinner parts of the length.
Step 5: Combine Fibers


In order to combine the all the lengths of thread into two long lengths, I placed the lengths next to each other, overlapping by 2 to 3 inches on the ends, depending on how thick the fibers were. I then twisted them together in the same way that I twisted the fibers when I collected the silk.
I ended up with two lengths of silk thread, that I wound together in the next step.
Step 6: Twist Thread


Next, in order to make the thread stronger, I twisted together the two long fibers I had twisted. I did this not in the same way I collected the fibers, as in the last step. I did this by winding the threads around each other individually. That is, first I crossed one fiber over the other, and then crossed the other fiber over the first fiber, and so on. This has to be done this way in order to keep the already twisted fibers together.
After twisting the whole length, I folded the length in half and twisted it again. It was too thin and weak otherwise. While spider silk is very strong for its width, it is incredibly thin, and needs to be strengthened by making it wider.
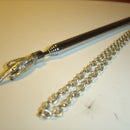
Step 7: Wind Onto Spool
I had many many empty spools around, because my grandmother was an obsessive seamstress who had a house full (truly FULL) of sewing materials. If you don't have a spool, winding the thread around a piece of cardboard, or even a folded piece of paper will work as well.
As you can see, I have very little thread from this whole process. The reason for making spider silk thread is not for making a lot of thread, but is instead for having thread out of making the strongest, stretchiest material on earth.
Your seams could be stronger than the fabric itself!
Step 8: Others Who Have Used Spider Silk, and Some of the Research Done on It


This is an exhibit on a piece of textile made entirely out of spider silk:
http://www.amnh.org/exhibitions/spidersilk/
These are all scientific articles on spider silk:
http://www.sciencentral.com/articles/view.php3?article_id=218392167&language=english
http://www.accessexcellence.org/WN/SU/spider.php
http://www.sciencedaily.com/releases/2010/05/100514151853.htm
This is also a scientific article on spider silk, but its about how scientist have combined metallic thread with spider silk. This could make the perfect conductive thread:
http://www.reuters.com/article/idUSTRE53M5OG20090423
Participated in the
Summer Sewing Contest


