

Introduction: How to Make a Double Barrel Glove Gun


Have a look at this video for a look at a basic glove gun in action using small lead fishing sinkers as ammo...
Have a look at this video to see the double barreled version using darts.
Glove guns have probably been around for as long as there have been rubber gloves and naughty boys, but I only met my first one last weekend. I was very impressed and had to make one. It ties in nicely with the Duct Tape Competition too.
I had better warn everyone that glove guns could be a very very dangerous. They could do serious damage to eyes and pretty much anything else they hit. Always be sensible and please keep the things out of reach of youngsters. Supervise children closely - as if it was an air rifle or fire arm.
Step 1: What You Will Need


Gun Barrels - I used 1/2" poly riser pipe. Any pipe about that size will do.
A Rubber Glove - You only need the fingers. They need to be pretty heavy duty and stretchy.
Duct Tape - If you don't have some duct tape around go and get some now. You should always have some duct tape handy.
Gun Stock - I used some plywood I had left over from something. Use your imagination here.
Ammo - Small round pebbles, shot, sinkers, darts (I'll show these later). Trial and error will show what works best for you.
Step 2: Build a Basic Glove Gun


First cut your barrel to the right length. I made mine about 400mm and that worked fine.
Clean any loose bits from the cuts, and carefully bevel the inside edge at the breach end to prevent your projectile catching on its way into the barrel. I learned this the hard way.
Cut a finger off the rubber glove. Make it as long as you can. Remember you will need as much rubber as possible to anchor the finger to the barrel.
Using duct tape securely fasten the finger to the barrel. Leave about 40-50mm of finger protruding past the end. This is what will be stretching to power the gun. I folded the cut end back over the tape and then taped that down to give it more purchase.
Keep tightly applying tape until you think you have enough. Don't be shy.
Congratulations. You now have a basic Glove Gun.
Get some ammo and start shooting. Yee-Haa.
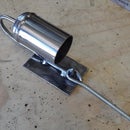
Step 3: Lock, Stock and Barrels.


To make the double barrel glove gun all you need is two basic glove guns, a simple gun stock, and a way of fastening the barrels to the stock.
This is where imagination comes in. My philosophy is to make things from whatever happens to be at hand, so with that in mind, there is no point in making templates for people to follow. Just use you imagination and whatever materials you have available. You will probably come up with something way better than what I've done anyway.
Basically I cut a simple gun stock shape from some plywood, shaped the top bit to let the barrels fit nicely, and then fastened them with a couple of strips of stainless (steel from a tin can would do - or even duct tape for that matter). See the pictures for more detail.
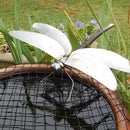
Step 4: Advanced Ammo


Just for fun I decided to try making some darts for the glove gun. The two I made were very rough, but they worked brilliantly. In fact they made me a bit nervous about public safety they worked so well.
Don't do this if you don't have any common sense. You might hurt someone.
All you need to make a dart is:
- A shaft. I used a splinter of soft wood about 200mm long and 4mm thick.
- Flights. Made from duct tape. Each flight is a fold of tape trimmed into shape with scissors.
- A point. Made from a nail and some more duct tape.
See the picture to see how to put the dart together.
Step 5: And Then...

I would like to thank Sid and Jeremy from Pumpmaster in Queensland for the idea and the inspiration for this Ible, and for their hospitality last week.

Participated in the
Halloween Props Challenge

Participated in the
The Great Outdoors Duct Tape Contest


