

Introduction: How to Make a Beginners, Inexpensive Quiver


The point of this instructable is to show you how to make a leather quiver with minimal leather working knowledge and a small budget.
I needed a quiver for my arrows and I had a pack of remnant leather sitting around.
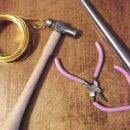
Here is what you need:
- Pack of remnant leather (got mine at the craft store half off) most of it is 7-8oz leather
- Leather needles
- wax thread (or any leather working or leather cord you have)
- Leather punch
- Rivet tool (not too expensive especially with a coupon)
- Scissors
- Buckle
- Marker
- Optional:
- Rotary cutter and mat (extremely helpful)
- Faux Fur
- Glue
Step 1: Sketching and Design


The first thing I did was scour the internet for pictures and ideas. I had to figure out how big the quiver needed to be and how I wanted the finished product to look like.
I found a guide online that had the basic measurements of the unrolled, flat leather as 11in across and 20 in tall, so that is where I started. Draw a small sketch of what you want the shape to look like. Cut out the sketch and fold it over to see what it would look like then, using scissors, adjust it accordingly.
When you have the basic shape, use newspaper or a piece of cardboard to make a template. Make sure that the length across is 11in and the height is 20in at the tallest part.
We are ready to measure out the leather!
Step 2: Template and Cutting


Alright, go ahead and lay out your pieces of leather. If you do not have a piece big enough for the entire quiver, place the pieces against each other but not overlapping. Place your template over the leather. This is where the rotary cutter comes in handy. If you do not have one, make sure you have a very sharp pair of scissors, or a box cutter.
Important! if you are piecing together bits of leather, cut the leather about a 1/4 in larger than the template to account for the extra stitching.
Step 3: Stitching


Now for the hard part, the stitching.
Take your hole puncher and punch holes along the edged of the leather where you are going to join it to other pieces of leather. I used the smallest hole punch and a small distance between each hole. This is because I was using small wax thread to stitch it. If you are using larger leather cord, you will need bigger holes spaced father apart.
I used a quilting stitch for all this, but use what makes you most comfortable.
When you are done, you should have a whole piece like in the last picture.
Step 4: Altering

Take your sewn together piece of leather, fold it over and adjust. Make sure that it looks like the original design. I needed to take some off the top of mine to make it look right.
Step 5: Straps


The strap is made up of two parts.
- The strap that will attach to the back of the quiver and go around your neck and rest on your chest
- The strap that will attach to the bottom of the quiver and go up to buckle into the first strap
To get an idea of length for the first one, I measured from the shoulder blades on my back to the middle of my chest and adjusted. The length ended up being a total 17in. Attach a buckle at one end (most of the buckles you buy come with how to on this). I recommend a larger one, but I had a small one so that is what I used.
The second strap I had to make out of two pieces stitched together. It totals 28in in length. It will also need some holes punched into it for the buckle (this will need to be done later).
Time to attach them.
Step 6: Rivets


The next step is going to be attaching the straps and riveting up the body of the quiver.
It is very important to do this step now. I didn't think to and it was SO much harder. Also, you could stitch up the body but for the sake of looks and laziness, I used rivets instead.
This was a little frustrating of an experience because the instructions on the rivet kit weren't great. So after messing up and getting annoyed and after checking the internet, the problem was that I was using the wrong size rivets. Because the leather isn't very thick, you have to use the smallest rivets in the pack...and it's crazy easy.
You will want to attach the first strap about 7in down the back of the quiver. Check the placement on your back and mark it with a sharpie before actually attaching them.
Do the same with the bottom strap but place it 2in up from the bottom.
-Both my straps are placed along the tallest part of the leather (so the line where it measures 20in)
After you have the straps attached, fold the quiver over into the position you want it. Mine has the leather overlapping each other by about an inch. Now, I put three rivets down the body but after finishing it, you should probably put 5.
Step 7: Bottom of the Quiver


Take your sewn quiver body and stand it up over another piece of leather and trace around it with a marker. Cut along the lines you drew.
Using your hole punch again, punch holes around the bottom of the quiver body and matching ones on the circle of leather. I had 22 holes, but remember that if you are using bigger cord and holes, you will need less.
Beginning stitching the bottom on like I have shown in the third picture.
If you have opted to use faux fur, stop halfway through stitching and move to the next step. If not, continue and you will soon have a finished quiver!
Step 8: Optional: Faux Fur


I used faux fur for two reason: It looks really cool and it helps the arrows from moving around and making noise.
To add fur to the bottom, cut a piece a little smaller than the circle you cut for the bottom. The rotary cutter works well for this.
Caution, you will get fur everywhere!
Once you have the piece cut, glue the fur to the inside of the quiver bottom. Finish sewing the bottom up, and trim the fur that sticks out.
To add fur to the top, I cut out a piece of fur that was about 8in by 10in. Place it inside the top and arrange it how you like. I curved mine over the edge of the quiver. I then stitched the top of the fur in place by punching holes in the top of the quiver and sewing through the leather.
It is difficult but the results are great!
Step 9: Finished!


Congratulations! You now have an awesome looking, functional quiver.
As something extra, you can attach a charm to it by some wax thread as I did.
Some notes on this project
- It was a little easier than I expected
- Always measure and have an idea what the steps are before starting
- This caused me the most trouble
- Not a great idea to do this project sleep deprived
- A rotary cutter was one of the best investments I've ever made!
Not accounting for the tools that I already had, I think that this project cost about $25-30 and almost zero previous leather working knowledge.
It is a great project to get you started on leather working! Enjoy!

Participated in the
Leather Contest


