

Introduction: How to Make a Ring From Cast Off Copper Pipe


How to make a stylish ring from piece from 3/4" copper pipe.
Made with inexpensive plumbing tools, polished with available materials.
Step 1: Aquiring Materials


- Copper pipe. 3/4" pipe makes approximately a size 9 or 9.5 ring.
- Something to cut copper pipe. I use a pipe cutting tool, but a hacksaw would probably work.
- Something to remove sharp edges. Sandpaper, a file, or a dremel should work.
- Something to polish the ring. You could try several grades of very fine steel wool, or fine sandpaper, followed by a polishing cloth, or a dremel.
Step 2: Cut the Ring

This is actually the easiest part. Grab the pipe, and cut it to size. The best way to do this is to decide how wide you want the ring, then cut it to that width. An alternate method would be to cut a pipe to length for plumbing purposes, then find out you cut it too long. Simply cutting the excess off leaves a ready-to-go ring section! If you are lucky, your wife is not there when you curse at the realize your mistake, and you can tell her you thought this whole thing up as a way to say you love her.
I cut two rings to 1/4" width and one to 3/4" from one section to try different looks.
Step 3: Remove Sharp Edges


A pipe cutter can leave some very nasty sharp edges on the rim of the ring. A hacksaw would leave some nasty burrs. So we need to get them off.
I tried 3 different bits on my dremel trying to find one that worked. In retrospect, a simple metal file might have worked better, especially as it can get difficult to hold a ring while grinding at it with a 20,000 RPM tool grinding at it fruitlessly. I ended up using a sanding band attachment, which took a good whack at it. A grinding stone was worthless, and a sanding disk was not up to this task.
Make sure to grind not only the inside, but also outside edges. One can still be cut by the part fo the ring away from the finger.
Step 4: Polish the Ring


Now that you have a functional ring, it is time to make it pretty. If you are aything like me (and I know I am!) then you probably left the rings sit for 3 weeks in a damp environment between cutting them and finishing them. If so, you found that there is a lot of corrosion on the pipe already. You'll want to remove that.
There is an awesome tool you can buy for cleaning of the outside edges of copper pipe (and the inside of fittings.) It is the red thing in the photo below. Don't use it. It is bad for rings. First of all, it is made for lengths of pipe, so that you can hold one end of the pipe while cleaning up the pipe. That does not work on a 1/4" piece of pipe, and you'll cut yourself up trying to get it out. Trust me on this. Second, if you do actually manage to clean off the corrosion, you'll find that you now have a bunch of scratches on the ring from the steel bristles. Now you have to sand those out. Or you could skip this devil-tool and just sand it out in the first place.
I used a medium sanding disk on my dremel to grind off all the corrosion and restore it to a pretty copper shine. You could use any sanding material to do so. You can start pretty fine, I actually had to switch to a fine disk before I called it smooth.
Once you get it cleaned up, it is time to actually polish it. Brasso is a classic stand-by, and should be kept around the house for just such purposes anyway. I recently was given a polishing wheel for a dremel, and used that and brasso to make quick work of the polishing. (Can you tell I used a dremel for a lot of steps?)
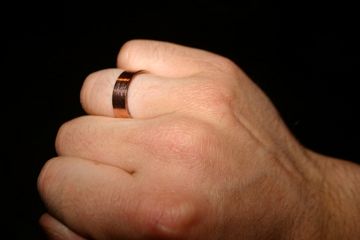
Step 5: Show It Off

Clean the polishing materials off the ring, then slide it on and show it off. I found that it was just a little to big for my 8.5 sized ring finger, so it probably is a 9 or 9.5 ring size. Unfortunately, it is too small for my index finger (where I want it.)
It turns out it fits my wife's thumb pretty well, but she does not like thumb rings. So now I need to figure out how to enlarge it.
Step 6: Notes
There are, of course, other sizes of pipe available. Ladies with small fingers might try 1/2" pipe; men with large fingers might try 1" pipe. My fingers are fairly thin for a guy, my wife's are fairly large for a girl. Find the size that works best for you, unless you use scrap like I did.
I also noted during the polishing stage that there were marks on the ring. On one of the cuts I made, I started to cut, then stopped after only one traversal of the pipe. Turns out this made a line that stayed on the final product. This could be used to great effect. Additionally, I had a Y on a ring. Curious, I looked at the original pipe and found that it had information printed on it in ink, and additionally imprinted on it. With a little pre-planning, this could be used to stamp a chosen letter, number, or pair of letters/numbers on the ring intentionally. I could grind these out, but it would change the shape of the ring a bit and would loose its fun, questioning character.


