

Introduction: How to Make a Simple PC Game Controller Test Program


In this instructable, I will show you how to make a simple program that allows you to test the buttons on your PC game controller so you know that they still work, or that they need to be replaced.
I must warn you, that this instructable is very wordy. I recommend reading GM8's manual before the instructable
Step 1: The Program

The program that I used was Game Maker 7.0. while I was finding a download link for 7.0 for you guys, I found 8.0
7.0 - http://www.dl4all.com/games/9355-game-maker-7.0.html- i used 8.0 as the example, and 7.0 is different
8.0 - http://www.dl4all.com/software/132265-game-maker-pro-8.html
You will need WinRar or 7 zip or anything but the built in windows extractor to open the RAR file.
If it asks for a password it will most likely be> www.dl4all.com
Install the program, there should be instructions on how to unlock the full version in the RAR. Most likely in the folder called "Crack"
And I warn you that this instructable is very wordy. READ GM8'S MANUAL BEFORE THIS INSTRUCTABLE!
Step 2: Starting a Game: Backgrounds

With game maker, the layout is so incredibly simple a monkey could figure it out. to start, we will make a background. choose a background (i googled an image of decent size that resembled my controller, google [game station or controller name] controller to find a picture.) pictures that are about 250 pixels wide are probably the bare minimum. with ones that are 650 pixels wide being the best.
Step 3: Starting a Game: Sprites


With a background chosen its time to make whatresembles the buttons for your controller in the game. (the pictures at least, the physical button comes later)
if you chose a controller for a picture:
go into the background that you chose. click edit background. pick one of the buttons. (not an analog stick or dpad) and click the dotted square thats on the button panel. select a square around the chosen button, click edit, and click copy. after closing everything (not the actual game maker, just the background), click on the pacman at the top of the screen. you have created new sprite. give it a name, in my case, x button. go into edit sprite, click edit at the top, and click paste. the pitcure area you copied earlier should now be in the gray area. double-click on the picture so you enter the picture editor. touch up your picture so that it is just the button, and not the original area around it. use black or gray to do this. make 2 sprites od the button. one for when it hasnt been pressed and one for when it has. be sure for both that you go into image and click erase color. select the bacground color and click ok. there will now be a grid behind the button. the area the grid shows is transparent, or invisible. to make a selected button, choose a modifier from te image list. i have never used gm8 before, so i chose glow. you are done. click all the check marks until the sprite is closed. repeat this for each button.
if you didn't choose a controller picture, make your own buttons in paint, and load them into game maker by clicking load sprite in the sprite window (the red pacman opens it)
Step 4: Now for the Real Deal

now its time to prepare a room for it all. first, write the dimensions of your picture down somewhere. en, on the same bar as the red pacman, click the white and blue square beside the blue circle and the "i". this opens a new room dialog.
unless you are making a wii remote, (which wouldn't really work) the larger dimension is going to be the X axis. put the larger dimension in the "Width" box, and the smaller dimension in the height box. go to tiles and select your chosen background. click on the top left corner in the grid and your background will appear in the grid. if you put the dimensions right, the background will not be cut off on any of the edges.
Step 5: The Physical Buttons
this step uses some trial and error.
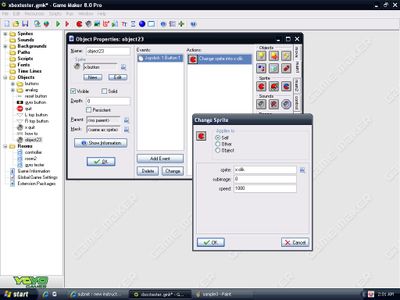
click the blue circle in the same bar as the red pacman. this opens a new object dialog. pick a sprite from the sprite menu. the sprites are the buttons you made. pick a button. any button. (in off mode) now click new event. click mouse. hover over joystick 1 until another submenu opens. select button 1 to start with. then go over to the right unti you find another panel of buttons. click he main 1 tab on the side. click and drag the regular red pacman into the white area beside the button panel. a box will open. leave the "applies to" box alone, as self. select the sprite that resembles the button as "on" set the speed to 1000 and click ok. you have now made a button. place it anywhere in your virtual room, or the same place you put the background, save the game under file, and then test it by clicking the green triangle at the top. once you find the right button, change the sprite to the button that is button 1. so it looks like the button that is being pressed on both your virtual and real controller. once the button is set up, move it (ctrl and click) to exactly where you want it to be. (hold alt while dragging it to move it more precisely). repeat this for each button, excluding each button you have already done.
Step 6: Make a Button That Restarts the Program

this is important so that you can retest the buttons without having to re open the program.
make a new sprite, a simple button, and put the word RESET on it, however you like. make an object, set your new button as the sprite, and add a new event. it is a mouse click. so click mouse, and click left button. now go to the main 2 tab in the actions menu, and drag the restart icon into the actions area. (this one is the one with 2 curvy arrows) click ok and you can now place it wherever you want in the room. after saving the game, test it. make sure everything is responding correctly. then you can make it run without gamemaker
Step 7: Make an Executable
now thatits done you need to make an executale that wont need gm8 to run. go into file, save it, and enter file again. click on create executable from the menu. it will ask you where you want to save it, and what you want to call it. choose these ave it. test the .exe file you just saved. (i recommend saving it to your desktop)
congradulations! you can now tell when your controller needs replacing!


