

Introduction: How to Measure a Capacitor or an Inductor With Mp3 Player


Here is a simple technique that can be used to measure precisely the capacitance and inductance of a capacitor and inductor without expensive equipment. The measurement technique is base on balanced bridge, and can be constructed easily from inexpensive resistors. This measurement technique measure more than just the capacitance value, but also the effective series resistance of the capacitor at the same time.
Components required:
1. Few variable resistors
2. A MP3 player
3. A multimeter
4. A calculator to work out the value
Step 1: A Bit of Background Theory
As an intro to the project, let's take what is a LCR bridge and what it takes to make
one. If you just want to make an LCR bridge, skip these steps.
To understanding the working of a LCR bridge, it is necessary to talk about how a capacitor, a resistor, and an inductor behaves in a AC circuit. Time to dust off your ECE101 textbook. Resistor is the easiest to understand elements out of the group. A perfect resistor behaves the same when an DC current pass though the resistor as when an AC current pass though it. It provide resistance to the current flowing though it thus dissipates energy in doing so. The simple relationship between the current, voltage and resistance is:
R = I / V
A perfect capacitor on the other hand, is a pure energy storage device. It does not dissipates any
energy that pass though it. Rather, as an AC voltage is applied to a capacitor terminal, the current flow though the capacitor is current required to add and remove chage from the capacitor. As a result, the current flowing though the capacitor is out of phase when comparing to its terminal voltage. In fact, it is always 90 degrees ahead of the voltage across its terminal. The simple way to represent this is the use of imaginary number (j):
V (-j) (1 / C) = I
Similar to the capacitor, inductor is a pure energy storage device. As an exact compliment to the
capacitor, the inductor use magnetic field to maintain the current passing though the inductor, adjusting its terminal voltage in doing so. Thus, the current flowing through the inductor is 90 degrees ahead of the terminal voltage. The equation the represent the voltage and current relationship across its terminal is:
V (j) (L) = I
Step 2: More Theory

As a summary, we can draw the resistor current (Ir), Inductor current (Ii) and capacitor current (Ic) all on the same vector diagram, shown here.
Step 3: More Theory

In a perfect world with perfect capacitor and inductors, you get a pure energy storage device.
However, in a real world, nothing is perfect. One of the key quality to energy storage device, may it be a capacitor, a battery or a pump storage device, is the efficiency of the storage device. Some amount of energy is always lost during the process. In a capacitor or inductor, this is paracidic resistance of the device. In a capacitor, it is called the dissipation factor, and in an inductor, it is called the quality factor. A quick way to model this loss is to add a series resistance in series of a pefect capacitor or inductor. Thus, a real life capacitor looks more like a perfect resister and a perfect capacitor in series.
Step 4: The Wheatstone Bridge

There are a total of four resistive elements in a bridge. There is also a signal source and a
meter at the center of the bridge. The element we have control is the resistive elements. The main function of the resistive bridge is to match the resistances in the bridge. When a bridge is balanced, which indicates the resistor R11 matches R12 and R21 matches R22, the output on the meter in the center goes to zero. This is because current that flow though R11 flows out of R12 and current flow though R21 flow out of R22. The voltage between left side of the meter and the right side of the meter will then be identical.
The beauty of the bridge is the source impedance of the signal source and the linearity of the meter does not affect the measurement. Even if you have a cheap meter that takes a lot of current to make the measurement (say, an old needle type analog meter), it still does a good job here as long as it is sensitive enough to tell you when there is no current flowing though the meter. If the signal source has substantial output impedance, the drop in output voltage caused by the current going though the bridge has the same effect on the left side of the bridge as the right side of the bridge. The net result cancel itself out and the bridge can still match the resistance to remarkable degree of accuracy.
Observant reader might notice that the bridge will also balance if R11 is equal to R21 and R12 is equal to R22. This is the case we are not going to consider here, so we won't discuss this case further.
Step 5: How About a Reactive Element Instead of Resistors?

In this example, the bridge will be balanced once Z11 matches Z12. Keeping the design simple, the
right side of the bridge was made up using resistors. One new requirement is the signal source must be an AC source. The meter in use must also be capable of detecting AC current. Z11 and Z12 can be any impedance source, capacitor, inductor, resistor or combination of all three.
So far, so good. If you got a bag of perfectly calibrated capacitors and inductors, it would be possible to use the bridge to find out the value of the unknown device. However, that would be truly time consuming and expensive. A better solution than, is to find a way to simulate the perfect reference device with some trick. This is where the MP3 player comes into the picture.
Remember the current flowing though a capacitor is always 90 degrees ahead of its terminal voltage? Now, if we can fix the terminal voltage of the device under testing, it would be possible for us to apply a current that is 90 degrees in advance and simulate the effect of a capacitor. To do this, we have to first create a audio file that contains two sine waves with a phase difference of 90 degrees between the two waves.
Step 6: Putting What We Know Into a Bridge


Uploading this wave file into the MP3 player or play it back directly from the PC, the left and right channel produces the two sine wave with the same amplitude. From this point on, I'm going to use capacitor as example for the sake of simplicity. However, the same principle is applicable to inductors also, except the excited signal need to be 90 degrees lagging instead.
Let's first redraw the bridge with device under test represented by a perfect capacitor in series with a perfect resistor. The signal source is also splitted into a two signals with one signal phase shifted by 90 degrees when reference to the other signal.
Now, here is the scary part. We have to dive into the math that describes the working of this
circuit. First, let's look at the voltage at the right hand side of the meter. To make the design simple, it is best to select the resister on the right side to be equal, so Rm = Rm and voltage at Vmr is half of the Vref.
Vmr = Vref / 2
Next, when the bridge is balanced, the voltage at the left of the meter and the right of meter
will be exactly equal, and the phase will also match exactly. Thus, Vml is also half of Vref. With this, we can write down:
Vml = Vref / 2 = Vcc + Vrc
Let's now try to write down the current flowing though R90 and R0:
Ir0 = (Vref / 2) x (1 / Ro)
Ir90 = (Vz - (Vref / 2)) / (R90)
Also, the current flowing though device under test is:
Ic = Ir0 + Ir90
Now, assume the device under test is a capacitor and we want Vz to lead Vref by 90 degrees, and to
make calculation simple, we can normalize the voltage of Vz and Vref to 1V. We can then say:
Vz = j, Vref = 1
Ir0 = Vref / (2 x Ro) = Ro / 2
Ir90 = (j - 0.5) / (R90)
All together:
Ic = Vml / (-j Xc + Rc)
-j Xc + Rc = (0.5 / Ic)
Where Xc is the impedance of the perfect capacitance Cc.
Thus, by balance the bridge and find out the value of R0 and R90, it is simple to calculate the total current through device under test Ic. Use the final equation we arrived to, we can calculate the impedance of the perfect capacitance and the series resistance. By knowing the capacitor impedance and the frequency of the applied signal, it is easy to find out the capacitance of the device under test by:
Xc = 1 / (2 x π F C)
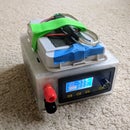
Step 7: Step in Measuring the Capacitor or Inductor's Value

1. Play the wave file using a PC or a MP3 player.
2. Connect the output of the MP3 player as the wiring diagram shown above, swap the connection to the left and right channel if you are measuring inductor.
3. Connect the multimeter and set the measurement on AC voltage.
4. Play the audio clip and adjust the trim pot until the voltage reading goes down to minimum. The closer to zero, the more accurate the measurement will be.
5. Disconnect the device under test(DUT) and the MP3 player.
6. Move the multimeter lead to R90 and set the measurement on resistance. Measure the value. 7. Do the same for R0.
8. Either manually calculate the capacitor/inductor value, or use the supplied Octave/Matlab script to solve the value.

Step 8: A Table of Approximate Resistance Required for the Variable Resistor to Balance the Bridge

Step 9: Thank You
Thank you for reading this instructable. This was a transcription of a webpage I wrote in 2009


