

Introduction: How to Repair the Weight and Rope Mechanism in Old Fashioned Wood Framed Windows


Spring has sprung. It's hot. But not really hot enough for air conditioners, unless we don't open the windows. Which, at my lovely old vintage house, our first spring actually living in it, mostly wasn't possible. I was putting screens into the storm windows right and left, but getting all the windows open, and keeping them that way, for real ventilation, was a nightmare. We ran out of short pieces of wood.
What's wrong with the windows, you might ask? You didn't ask. Well, I'll ask for you, in the interest of moving us all along. All the sash cords had either degraded from sun baking or just age and environmental degradation. They were, after all, nearly a hundred years old.
These instructions are for a "modern" vintage house with repair access ports designed into the frames. You can tell if you have these by opening the window and looking for joints and/or screws in the tracks.
If you have a much older house that doesn't have this modern convenience added to the traditional double-hung window, you'll have to pull the sides of the casing (trim) entirely to access the weight channels.
Most folks disabled the weight systems by cutting or simply not replacing the ropes as they failed, and resorted to propping the windows open when needed. However, some people actually opened up the frames and removed the weights (either to insulate the window or to turn the weights in for scrap), so the weights may be gone. If they are gone from one window, they are probably gone from all of them. You can find vintage replacements on ebay (to find out the size you need, weigh the sash before you put it back, you will need two weights that are each half the total weight of the sash) or replace the weight and pulley with spring balances.
Also, even though all our windows are double-hung, the upper sashes are painted into place and their cords are (unsurprisingly, as they were protected from the sun) in fine shape, so we're only working with the lower, inner sash and its cords. Pulling both sashes, stripping and restoring full sash movement is a whole other kettle of lead paint chips (and something we are not tackling until the full stripping and restoration of the exterior), so we won't be going that indepth here, but the technique for replacing just the cords is the same for the upper sash.
This is an update and reworking of a how-to I published to my blog in 2007. All links were chosen for usefulness.
Step 1: Tools and Materials, and Some Safety Notes
The first thing you will need is sash cord.
DO NOT use poly rope, even if it is the same tensile strength or braiding style. Poly line is prone to slipping in this situation. The secret to good sash cord is the stiffness and the textile glazing (also known as starch) that makes the knots grip so well. Modern sash cords have a poly core for strength, water resistance, and durability, but the outer shell is still the same glazed cotton as the original. Rejuvenation sells sash cord for $8 per 25 feet. I bought mine at the local ACE hardware/farm supply for a similar price.
You'll also need:
- a hammer
- a large flathead screwdriver or small prybar
- a screwdriver for removing and replacing any screws
- a cutting implement.
- Another thing you want is a long stiff piece of wire with an open hook at one end - a repurposed coathanger is perfect. More on this later.
- You may need a small hacksaw
SAFETY NOTES:
Weight metal content:
My weights looked like they were probably made of iron - if you look at them, there is a slight rusty look under all the dirt and dead spiders.That said, weights were also made of brass and lead.
Lead hardly discolors at all, by comparison to iron - it appears gray or almost white, like aluminum, when it has oxidized. These weights tend to be smaller than the equivalent iron ones. Lead also has a smoother appearance when it oxidizes, and would not have roughened up to the point that dust would gather like it has on ours. If you see a light colored, smooth weight, glove up before continuing, and it's probably also a great idea to put on a particle mask.
Vacuuming:
It will seem like a good time to pop a vacuum detail tip in place and clear out those cobwebs and other assorted funk. HOWEVER! if you want to do ANY vacuuming during restoration in an older home, make sure you use the fine particle filters for your shop vac, because you are at much greater risk from paint dust than from any residual dust from the weights. Be safe, and enjoy your renovation.
Glass safety:
If your sash has really damaged putty (the stuff on the outside of the window holding the pane in place, it looks like caulk) that's falling off, or hardly any putty left, It's a good idea to replace that now to prevent it falling out of the sash while you move it around, or leaking heat in winter. Here is a how-to on that.
Once you pull it out, put the sash aside, up and away from where you will be walking around or working, to prevent damage and accidents. You do NOT want to put a foot through it.
Step 2: Open the Access Panel


First, pry off the stop moldings (these are the ones along the front edge that form the front of the groove that the window sash moves up and down), gently, and set aside.
If there is a single cord left holding on, or if you are replacing cord before it gives way, cut the cord now for safety.
Grasp the lower sash firmly and pull it straight out and set aside, somewhere you won't step into or kick it. I know you won't and you know you won't, but do you want add a trip to the hospital and the home store, plus recreational re-glazing to your day?
Look at the window frame. You'll probably find some evidence of previous repairs, as I did. Only two of the prymarks I left behind were mine - the other dozen were already there. Clearly the cords had been replaced before. Now, if there are screws holding in the access panels, rather than just friction and the pressure of the stop molding, remove them and put them somewhere safe, like a cup.
Start by prying carefully. There might also be a small nail securing the panel (these are under the window trim, where they occur, at my house, which meant either pulling the trim -all of it- or hacksawing the nail). Remove or cut the nail, depending on your level of commitment. The edge that is secured by this nail occurs under the stop moldings at my house, so I just cut the nail.
Continue prying gently until the panel pops out. You may have to pull it out after the leading edge is free, since the center stop molding is still there. One edge is often under that. Once it's out, we get to do the fun part.
Step 3: Yuck. Take the Weight Out of the Window Pocket


I would put on gloves for this bit.
Reach in there and grab the weight and pull it out. Wear gloves if you like - our weights are iron, but as often, they can be lead. Look at the knot configuration, if you can. You probably can't, if it looks anything like the example weight did. We get to the not-so-arcane-after-all knotting technique after we get the new cord through the pulley and out where we can reach it.
Clean it up and pull off any remaining shreds of cord.
Step 4: Put in the New Cord


Measure the general length you'll need the cords - measure how far down the sash the cord groove goes, plus the length from the top of the pulley to the top of the weight (if you stood it up on the windowsill), and the cord should be long enough. Add up to three inches extra if you are worried.
Tie a plain old half-hitch close to one end, and pull it as tight as you can. Then thread the other end through the top of the pulley, push every bit through until you get to the knot. If you are really lucky, the cord will just snake down the inside and fall out the opening.
However, this is unlikely, so use that long wire hook to fish around up there and pull the cord through.
Step 5: Tie on the Weights


Not-so-arcane knotting method:
- Take the end of the cord and thread it through the hole in the weight. You should have enough slack to do this pretty easily, but not so much that the weight can lie on the windowsill while you work. I propped the weight up in the outer slide channel and that worked fine.
- Now, tie another firm half hitch close to the end. This would be the not-as-arcane-as-you-think knotting method.
- Next, pull the knot up, wrap it around the cord, and "button" it through the resulting loop.
- Then pull tight to secure it. Don't leave any slack in the loop.
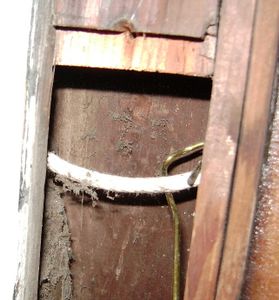
This is what was hiding under that dust coat when we pulled the weight out of the pocket.
Done! The small amount of length lost when tying the knot in place should prevent the weights from hitting the bottom of the weight pocket.
Step 6: Do It All in Reverse.
Put the weight back in the weight channel, and close up the access port, making sure to put any screws back in as smoothly as possible. Repeat on the other side.
Get the sash, and remove any remaining old cords from the cord grooves. Get another person to hold the sash (or prop it on something secure), make sure you've got the right side of the sash facing in, pull the knots down from the pulleys and tuck them into the holes for the knots, then push the cords into the grooves.
The sash should now be hanging freely in the window, and should slide easily up and down. Re-install the stop moldings (if you pulled the trim, re-install that, too), and you're done.


