

Introduction: How to Use Any Relay With Your Arduino the Safe Way


This instructable will show you how to use any relay new or used with your ARDUINO the safe and proper way, If you purchases a preasymbled relay board for your arduino with all the components on it this is not the tutorial you are looking for. This instructable will show you how to use optocouplers and transistors to safley connect a stand alone relay to your arduino board..
SO lets get started!..
Step 1: Build the Circuit
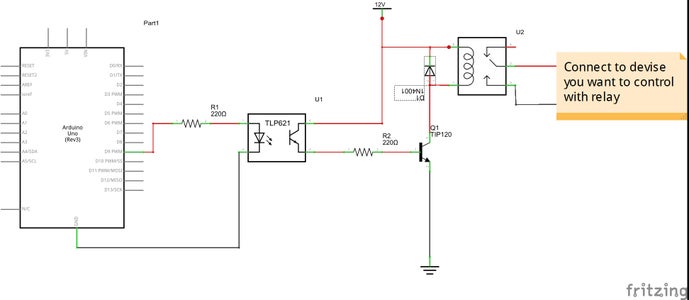
The picture above shows the circuit you need to build..
The parts you will need:
2 x 220Ω resistors.
1 X TIP120 DARLINGTON transistor is recommended but any one that will handle your relay will work .
1 X SHARP PC817 optocoupler.
1 X relay.
1 X 1N4001 diode.
ARDUINO board, jumper wires & breadboard.
The Optocoupler is the most important part, it isolates the circuit from the relay using light. For more info about optocouplers please check out my instructable about them at this link (OPTOCOUPLERS). The 220Ω resistor cuts the voltage down from 5v to 1.2v on the led of the optocoupler, The max voltage on the led of the sharp PC817 is 1.4v.
The transistor is a darlington tip120, I chose this because it will handle almost all the small to medium sized relays you could be using. This transistor will handle up to a 60v 5amp load. The base voltage of this transistor is 5v max and that's what the 220Ω resistor is for, it brings the voltage down to 1.5v well below 5v (try to never run components to there max, they will have short lives and get very hot).
Now for the relay I'm using a 12v relay, if you are using a relay that requires a different voltage please use the appropriate power supply. Also remember NOT to connect your grounds between your arduino and power supply, that's why we are using the optocoupler to isolate them from each other.
If your relay does not have a diode built in make sure you add one, A 1N4001 or any similar will work.
Now you have the circuit built lets try it out!..
Step 2: Testing

To test your new relay circuit out just copy and paste this code into your ARDUINO IDE... Make sure you are using pin 9 on your arduino for the relay trigger!!..
int rel=9;
void setup() {
pinMode(rel,OUTPUT);
}
void loop() {
digitalWrite(rel,HIGH);
delay(1000);
digitalWrite(rel,LOW);
delay(1000);
}
---------------------------------------------------------------------------------------
This code will make your relay turn on and off every 1 second.
If you have any questions or problems please leave a comment.........


