

Introduction: Hug & Touch Sensitive Instructables Robot Patch


This chap sits in my shirt pocket, just like in the contest icon, and goes with me wherever, ready to shine his light upon the world...
Anyway, notice how he seems to look down, wearing a slight smile? That's because he gets happy and blinks his lights when you tickle his feet... or when I get a hug :-)
The Aniomagic touch-sensitive learning sensor can be calibrated to detect direct contact, or proximity to another person, so it made perfect sense to use it for this project. For this project, the tilt switch allows you recalibrate the sensor when you turn the robot upside down. Doing so makes him really excited.
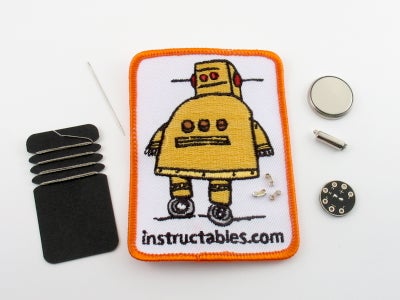
Ingredients:
- Robot patch from Instructables
- 3 sequins
- conductive thread
- large battery
- tilt switch
- learning sensor (touch)
You can grab the parts from our store, and make yourself a pocketable touch & hug sensitive robot patch.
Step 1: Preparation


Arrange your pieces to see how they'll fit. I tend to put the electronics underneath my designs.
The sequins fit this patch so well. Nothing else comes in such tiny ready-to-sew form.
The thin conductive thread is perfect for this project. It has enough resistance so you don't need extra resistors for the sequins. Just remember to double-stitch.
Also, look for this blue patch in your craft store. It gives you awesome grip for pushing and pulling needles through thick material.
Step 2: Lights


First, connect the "L" hole to the brass bead of the sequin of your choice. We'll sew all the minus (silver beads) in one go later on. Use long stitches underneath, and short stitches on top to make it neater. I think I could have done a better job, but I need another patch to sew on :-)
Step 3: Lights (2)


Sew down second sequin to the "M" hole of the learning sensor. Make sure to sew the stitches far enough so they don't touch.
Step 4: Lights (3)


Connect the third sequin to the "H" hole.
Because conductive thread tends to fray at the knots, experiment with starting your stitches a little distance from the holes on the learning sensor. Then work your way back to the hole, stitch well, and then move forward to the sequin. This way any unravelling won't cause shorts and touch other holes.
Step 5: Tilt Switch

Connect the brass bead of the tilt switch to the "C" hole of the learning sensor. Make sure the brass bead will normally face up when your project is finished.
For this project, the tilt switch allows you recalibrate the sensor when you turn the robot upside down.
Step 6: Battery Minus


First, make two knots in your thread, arout where the arrows are.
This enables you to have a decent coil that will be taped to the battery later.
Stitch this thread, connecting the brass beads of the tilt switch, the "_" hole of the learning sensor, and to the brass beads of all three sequins.
Step 7: Touch Sensors


Time to connect make the touch sensor using the robot's wheels. Start from the "S" hole of the learning sensor. Make large stitches on the top side of the wheels. These will act like antennas to detect touch and/or proximity.
Step 8: Battery Plus

Using the same technique for the minus thread, stitch some thread to the "+" hole of the learning sensor, leaving some extra to form into a coil
Step 9: Sealing the Battery


We really need to make a soft, ultra-thin battery holder. Until then, adhesive tape is the next best thing. It holds the battery really well, yet is easy to take off.
First, apply some tape to the minus thread as shown. This will help prevent short circuits with the battery "+". Wind the thread into a small coil and tape to the battery minus.
Step 10: Sealing the Battery (2)


Turn the battery over and do the same with the plus thread.
The next project will feature a sewable pocket, but this will have to do for now. Now go git them hugs.
Participated in the
Pocket-Sized Contest


