

Introduction: Hunting Spear From Scraps


WARNING! This instructable shows the making of a potentially lethal tool for hunting wild pig I intend to eat. Weapons are dangerous. Hunting is dangerous. Also, some tools to make this are dangerous. I am not responsible for any lives except the animals I hunt (and eat). Check your local laws. This could be illegal where you live. Don't break the law.
Some wild pigs have been terrorizing the homes around the valley here. I needed something to hunt the pigs that was non-projectile, lethal, and gives me space from the pigs. Now, some of my friends hunt with dogs & knives, but that's too brave for me & there's no sense for them to come so far for 1 or 2 pigs.
Guns & bows, are out since too many people around. I figured a spear could work good. I can track them pretty good and at night I can/have walked right up to them. Not always a good thing. I wondered if the spear could break but I figured I will only going for a pig at a time, not too worried.
Parts: Strong wooden broomstick
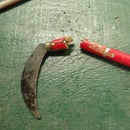
Fixed tactical knife (see the note on knifes after Tools)
Two nails (or bolts) to fit the holes in the knife tang handle
Strong tape like Gorilla or fiberfix
optional, small piece of rope to tie in back
Tools: Measuring tape
Marker & pencil
Drill & drill bits (that match holes in knife tang handle)
Miter saw, but I think a table saw would actually work better
Reciprocating saw with wood and metal blades
Bench vice
Hammer
And some tools to take the knife apart
About knives, a folding knife won't work here. It needs to be about 8--9 inches or longer and not much more than an inch wide. Since so many knives are different I can't really say how it comes apart for each one, but I got a picture of how mine came apart. This is an easy kind to use for this application. Just a couple screws hold it together. Any 1/8 inch thin metal knife shank can work, but all I have to use is a nice gerber tactical knife and I want to have the option of it to still be a knife, down the line. So I tried to make it modular, or permanent and temporary at the same time.
Remember, all these steps are dangerous so wear personal protection equipment if you decide to proceed at your own risk.
Step 1: Chop the Broomstick & Angle Tips, Cut Groove for Knife


Using the chopsaw, cut the threaded end of the broomstick flush. Then turn the saw to 45 degrees and make an angled cut. Turn the broomstick and measure the cut to give an even "V" off the end. Place the knife next to the broomstick on a table. With a measuring tape and marker, find the best depth for knife tang. Keep in mind the holes for the nails (where the screws use to go through the tang) during measurement. Draw a line like in the picture. This line is the cut for the knife tang to fit. Tricky on a chop saw. I had to turn it over to finish the cut. I think a table saw is better here. After the cut, I stood up the broomstick in the vice and finished clearing up the slot with a sawzall until the tang fits nice and snug.
Step 2: Make Holes and Install 'pins'


Measure out where to make the holes in the broomstick based on the placement of the knife. Drive nails in the holes and cut off the extra with a sawzall but leave about 1/4 inch. Lay it down with the nail heads down (1/4 inch pointing up) on the anvil side of the vice. Use a hammer to mushroom the nail point down and hammer it into the wood without smashing the wood. If you have nuts & bolts, they can work. Pre-drill a counter-sink so the bolt, and nut sink in half way or so & grind or cut it so it's flush and smooth.
Step 3: Wrap It Up, Install Trim


This is when to wrap up the stress points. I actually got the fiberfix for another project, but didn't need it. I overlapped it with electrical tape and a small ring of blue painters tape for looks. I drilled a hole at the end & strung a small piece of scrap leather instead of rope and tied with a bowline and stopper knot. Time to catch. More pictures if works good.

Second Prize in the
Manly Crafts Contest

Participated in the
Instructables Outdoor Projects Contest


