

Introduction: Icosahedron Form


My goal was to make a large sphere with some flat planes to create a round form that is virtually clear, with minimum glare so I could photograph into the center of it. The benefits of an icosahedron over a true sphere are that you can make it with the minimum of space and waste, and each of the two panels are interchangeable, so you can customize panels and change them out as you need.
Why a clear sphere made out of poly with interchangeable panels?
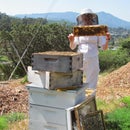
This is the third iteration of my hive body for B-code Project, a biological 3D printer that employs bees as the 3D printers.
But icosahedron forms like this can be used for many different purposes, and if you read on, I'll show you how to make one...
Step 1: Materials and Method

To make this truncated icosahedron I use two molds in a vacuum former with a material called PETG.
I made two different molds using MDF and acrylic.
Materials Needed
.20 inch PETG sheets from Amazon. (Make sure its optically clear and doesn't have lines in it.)
MDF sheets (I used .5 inches for this, two layers)
1/16 or 1/8 inch acrylic for top of mold (Optional- makes it really clear and crisp at edge)
scrap plywood
3M Fastbond
Titebond III
Special paper clips (Bulldog clips work too but aren't as fancy)
Disposables
Paper towels
Disposable paintbrush
Gloves
Work paper
heat-resistant tape (optional for features on molds)
Tools
Laser cutter, jigsaw, router, or waterjet
Table saw or miter saw
Vacuum former
Clamps
Sander
staple gun, brad gun or other quick and dirty fastener
box cutter, scissors, or tool to cut petg
Step 2: Modelling Your Icosahedron...


...well sort of. I found this model on GrabCad by typing it in as a search. I imported the file into my favorite CAD software Fusion 360.
This form is a truncated icosahedron, better known in the world as a soccer ball. A truncated icosahedron is made of pentagons and hexagons.
In the next steps I have a screenshot for each step that will better illustrate the how, but here's the what to do.
Increase the thickness of the planes to the thickness of the molds
Calculate the draft angle between the edges and cut them there
Slice the forms again so the model has cut lines to match the thickness of your MDF.
Create 2D cut files for your tool of choice for cutting the layers, be it a laser cutter like I used, a router, jigsaw, etc.
Remember that you have two different molds you'll need to make, and so your draft angles will not all be the same.
Also, I didn't show it here, but it helps in your model to make holes for dowel pegs. That way your layers don't slip around while you're gluing, and you only have to clamp on the z axis.
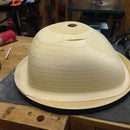
Step 3: Prepping and Assembling the Mold


I cut my layers from the MDF and acrylic using a laser cutter. Laser cutters leave a sooty residue that you need to remove for better gluing. Its not a bad idea to sand the surfaces no matter what you method with a low number sandpaper to give it more tooth and help the glue hold, especially the acrylic.
Set your dowels and glue the MDF with the Titebond and clamp. Let it dry 24 hours then glue the acrylic on the top of each mold with the Fastbond, being sure to follow the directions on that, and let the glue set before joining the pieces.
Step 4: Miter Your Edges Clean


The layers will have a stair step edge to them, and you'll need to cut that off. Or sand it. (This is a quick and dirty project, but the smoother the edges the better they will line up when you build your form.)
I used a table saw with a miter angle, and checked my angles with a digital level placed on the blade. (Calculating the angle was a bit tricky, but I used Fusion 360 and the "construct plane at angle" tool to figure them out.)
The pentagon is tricky, since you can't use the fence on the table saw without a jig. So make one! This is where the scrap wood and quick and dirty fasteners come in handy.
Step 5: Optional: Features to Your Molds

I wanted to have different panels with different features, but I didn't want a lot of molds. So I made a hole in the pentagon, and when I didn't want that feature, I just taped it with heat-resistant tape in the vacuum former.
Step 6: Vacuum Former


Once you have your molds made, the next step is to vacuum form. I chose this size for my icosahedron based on the vacuum former bed, and you should do the same.
Vacuum forming takes a little practice, and if you haven't tried it before then I recommend getting some instructions before. I've used three different machines and they're all slightly different, so don't be a maverick and get some how-to.
Pro tip: You should have your PETG precut to fit the vacuum bed, and if its rainy out or humid, it might be wise to keep it in a humidity controlled place for a while. I'm not sure it its true for petg, but with acrylic it will get bubbles if its too wet and you heat it too quickly, and as a precaution I keep all my materials in a humidity controlled environment.
If you want to add features to the panels, now is the time. You can cover holes, pull a few molds ad then drill holes, you can add other material to make indents. Go wild. PETG is very flexible and forgiving, but don't forget- every feature will need a slight draft angle so the mold will not get stuck.
Step 7: Cut the PETG

I got fancy and cut my petg with a laser cutter, but its easy enough to cut with a box cutter or even scissors.
I used tape to index my cuts in the laser cutter, and made sure to leave the lid closed for about 30 seconds between each piece, and turned up the air to suck out the smoke. When I do crazy stuff like this, I always make sure I've noted the locations of fire extinguishers and emergency call buttons in the room, and I keep a damp towel at hand to put out any small flareups.
Step 8: Assemble and Be Amazed

Now time to assemble.
Its pretty easy, just clip each edge together. Takes about five minutes.
All together this project took me just a few hours if you take out the ovenight gluing time.
You could use it with other heat-able poly materials and die it to make lamps, make other similar polygons, and get creative.I'm going to put a hive of bees in mine!
The best part is that the whole thing packs down small and the molds are small too.
Step 9: Now for Bees and Thank Yous

This truncated icosahedron will be assembled and filled with bees at my lab. The goal is to make this into a 3D biological printer. For more of this project, see my other Instructables
Collaborating with Bees: Honeycomb Light Boxes
Special thanks to:


