

Introduction: Illuminating Vinyl Holiday Characters


The first one of these I built was last year. I had put it away and completely forgot about it until just recently. I don't remember exactly how I built it and I wasn't going to write up anything about it until I saw them on sale at Michaels crafts store a week ago. I picked up 5 for about $2 each. I got a Santa, a couple of reindeers, a penguin and a snowman. You can imagine that these are seasonal items only available during the holidays. They are so seasonal that I can't seem to find a product listing for them anywhere. If you decide to build one of these, race on down to Michaels and pick one up before they're all gone.
This Instructable will detail the build for a Snowman. At the end I'll show last year's reindeer and provide the code but the build won't have any specific details for it.
Step 1: Parts and Tools


Parts
- Creatology holiday vinyl character
As mentioned above, I can't find a product listing for this. I've only every found them at Michaels. - 3mm LEDs, qty 6
- Yellow 5mm LED, qty 1
This is for the snowman's nose. I didn't have an orange LED so I just used yellow. - 150 Ohm resistor, qty 6
- 100 Ohm resistor, qty 1
- Arduino UNO
- DPDT ON-OFF-ON toggle switch
- 4 3/8" (L) x 2 7/8" (W) x 1 1/8" (H) tin box
This is larger than an Altoids tin. If wanting to use an Altoids tin, replace the Arduino UNO with an Arduino Nano. - 22 awg wire
The wires can be thinner, but then they won't snuggly fit in the Arduino Uno's headers. Anything thicker than 22 awg might likely not fit in the tin. - 9V battery connector with barrel connector
- 9V battery
- Heat shrink
- Electrical tape
- Sharpies of various colors and various tips
- Epoxy glue
Tools
- Exacto knife
- Hot glue gun
- Soldering gun, solder
- Awl
- Hammer
Step 2: Color

Use Sharpies to color the character. Use an ultra-fine tip to get into tight spots and the brush tip to cover a wide area. While coloring, let the ink dry before coloring a new area. Otherwise, the ink will rub off onto your hands and possibly onto other areas of the vinyl character.
Step 3: Build


Holly Berries
The holly berries are a cluster of 3x 3mm LEDs. Wires are attached to the anode leads and extended long enough to plug into the Uno and a little bit longer. The cathode leads are tied together in pig tail fashion which also extends down.
Cut out the holly berries in the vinyl and a large hole in the bottom. Feed the wires down into the holly berries cutout and out the bottom. Push the cluster into the holly berries hole just a bit so that it sits snug. Use epoxy glue to hold it in place.
Nose & Buttons
For these, the procedure is nearly the same as the berries except there's no clustering. Extend both the anode and cathode so that it'll make its way out of the snowman and into the UNO.
The Switch
The DPDT switch is OFF when the lever is in the center and ON when it is either on the left or right side. For power, both sides will be connected up such that either side will turn on the Arduino. For audio, only one side will be connected up.
Power and the Switch
Lay the toggle switch down so that 3 leads are facing up on one side. Bridge the two outer leads together. Then extend one of the outer leads and the center lead. Splice these two wires into the positive wire of the 9v power connector cable.
Audio and the Switch
Flip the toggle switch over. Extend one of the outer leads and the center lead. Connect one of these wires to the piezo speaker wire.
Mount the Switch
Drill a hole in the center of the long side of the tin box. Attach the switch in place with the nut and washer.
Mount the Piezo
Simply find a place for the piezo inside the tin and use some double-stick tape or glue dot or hot glue to hold it in place.
Mount the Arduino
Place a non-conductive barrier such as electrical tape on the bottom of the Arduino. Use double-stick foam tape or glue dots to hold the Arduino in place in the tin.
Tin Lid
Create a hole in the center of the tin lid. Start by using an awl to create a small hole. Slowly increase the hole until it's large enough for the bundle of wires in the snowman to feed through. Remove any splayed metal or pound it down. Then put electrical tape all around the circumference of the hole so that metal does not cut any of the wires.
Resistors for the LEDs
For every LED, add a resistor to its extended wire. For mine, I used 100 Ohm for the green and 180 Ohm for the rest. For those that used 180, only 150 was needed but I didn't have any on hand. Use heat shrink or electrical tape to cover the resistor.
Connect Up the Arduino
Feed the wire bundle from the snowman and through the tin lid. Put a plop of hot glue on the wires on the inside of the tin lid. Place each wire in the correct pins. See the schematic for the hookup.
Attachments

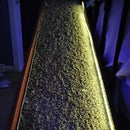
Step 4: Final Result

The video shows the final result of the snowman build. It will also show last year's reindeer build. I'm attaching the Arduino code for the reindeer as it stands. If I could do it over again, I would program the reindeer code to be more like the snowman's code.
References
The audio is based on the Melody tutorial which I modified for my needs.
Attachments

Participated in the
Arduino All The Things! Contest

Participated in the
Make It Glow! Contest


