

Introduction: Import a PDF As a Note in LectureNotes on the Samsung Galaxy Note 10.1


When you first open LectureNotes the main page is known as the 'Notebooks Board.' I have created folders on the board for each class I am presently taking classes in, as well as a Notes folder for general items.
From the Notebooks Board or within a folder, we are going to choose the menu icon (three vertical dashes in the top right corner) and choose "Import PDF as new notebook"
Step 1:

LectureNotes does not currently support the built in file browser due to permission issues. I instead used ASTRO File Manager to access my documents.
Click on the respective application to browse for your PDF file.
Step 2:

For this instructable I am using the 'Lecture_10_S12.pdf' as the primary PDF.
Step 3:

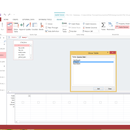
This is the notebook creation page where you can set a variety of settings. On the top line you can type out a new name for the notebook or use the name of the PDF as it is shown below.
I leave the zoom alone, but for the Paper Pattern it depends on personal preference. A full A4 or letter sized PDF will cover over any pattern, but because I am using smaller sized slides they leave white space above and below the slide, where the pattern you choose here will show through. So if you want a ruled or checkered background around smallers slides you may choose to do so here.
I like my ruled lines (if I'm using them) to be size 70, which you set under 'Pattern size,' but anywhere between 50 and 70 seems to be large enough for me.
You can adjust the color of the notebook cover, paper and pattern as well using the triangle wheels.
Step 4:

After you choose 'Create' or 'Create and Open' you will be presented with the import dialogue. Choose your settings as you see fit.
Step 5:

Processing and Reading a 48 page PDF took me about 2 minutes, maybe 2 seconds per page.
Step 6:

Here I have the imported PDF with the slide centered on the page, you can modify where the slide imports or choose to have the slides import cropped to the slide in the settings menu.
I like to have them import in the middle of a regular sized page so I can write notes above and below each slide.
Step 7:

Now we're going to add my final exam review (3 page PDF) to the end of the original document. I choose menu and select 'Notebook Overview'
Step 8:

This is the notebook overview.
Step 9:

Now I am going to add my final exam review the same way I imported the first PDF.
While inside the notebook overview, open the menu and choose 'Import PDF as new pages'
Step 10:

Choose the location of your new PDF the same way as before.
Step 11:

Here I am choosing 'EXAM1.pdf' to import.
Step 12:

You can now choose to import all of the pages or a subset depending on your preferences.
Step 13:

If you haven't received this dialogue already, click okay.
We'll cover adding a layer in another instructable.
Step 14:

As you can see, my original 48 page PDF now has the 3 pages from my EXAM1 PDF added to the end.


