

Introduction: Install Sliding Cavity Door (Pocket Door) Privacy Handle


This guide shows you how to install a Pocket Door Privacy Lock. Pocket Doors are also known as Cavity Doors or Sliding Doors.
A privacy lock on these doors is generally used on Pocket Doors leading into a Bathroom or Bedroom where the user wants to be able to lock it from the inside with a turn-snib. On the outside, most locks have an 'emergency release' which can be used by inserting a butter knife or coin into the slot and turning.
The dimensions in this guide specifically related to the GunMetal Grey Cavity Slider at HardwareBox although the process will be similar for most locks.
Step 1: Prepare Door

Fold the template which comes with the hardware around the door edge. The template can also be viewed in the images section in this step of the guide.
1. Mark the center of the Escutcheon hole at the desired height from the floor. A common height is around 1000mm
2. Mark the cutout for the lock body onto the door edge
Step 2: Drill Holes and Install Lock Body


First drill the Escutcheon hole (the hole on the face of the door). This can be done by using a 50mm hole saw drill attachment. It is important to drill this hole squarely. This can be achieved by drilling half way from one side of the door, then drilling from the other side of the door, until the holes goes right through the door.
Secondly Drill out the cavity where the lock body is installed (In the end of the door). This can be completed by drilling a series of holes next to each-other using a 12mm drill bit. There are jigs available which attach to the end of the door which can make the process easier. If you're drilling freehand, then ensure you drill carefully and straight.
The next step is to clean up the cavity with a hammer and chisel.
Once you have test fitted the lock body in the cavity, you can install it and screw it in place.
Step 3: Install Escutcheon


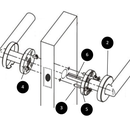
Now you can install the Escutcheon and Spindle.
Insert the snib side of the Escutcheon into the 50mm hole (on the side of the door you wish to be able to lock). Ensure the screw holes are horizontal and in line with each-other.
Then insert the spindle (flat metal item) thourgh the other side, through the lock body so it goes into the Snib Escutcheon.
Now place the other Escutcheon (side with the emergency release) into the 50mm hole on the outside of the door so the spindle is inserted into the correct place. Use the Screws to screw both Escutcheon's together.
Finally, screw on the lock body face plate on the door edge using the screws provided.
Check the latch moves freely and adjust Escutcheon's if required
Step 4: Install the Striker Plate

Using the Striker plate as a guide, mark the striker plate onto the door jamb. Ensure it is mounted at the correct height based on the height you installed the Lock Body.
Chisel this out to a depth of 1.6mm
Drill 2 x 15mm diameter holes to a depth of 18mm so it can house a fully extended latch
Screw the striker plate onto the Door Jamb.
You are now done!
Hardware provided by HardwareBox.com.au


