

Introduction: Interactive Arduino Skull


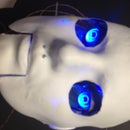
I heard an interview with Evil Mad Scientist _____ on the Science Friday podcast. He discussed the snapping pumpkin kit that they are offering. I had just found a pretty detailed plastic skull at the local Walgreens for about $6, so I had the idea of making a prop that really snapped its jaw shut in a satisfying way.
It really didn't take too long to piece the project together. The skull is sitting patiently on my work table waiting for the next victim to walk by.
Step 1: Materials

Bits and Pieces:
Skull - but you could use a pumpkin or any prop head from a costume shop
flat brass - some flat brass works well for attaching the motor
square brass - I really like using this. It doesn't rotate
bead - for the cam follower
brass rod - very thin - you could actually use a big paperclip
scrap foam core - I get scrap from a couple of frame shops
gears - I scavenge them from old printers but there are many sources online
2N3904 transistor - Radio Shack or any electronics supply
5 volt SPDT relay - available at any online electronics supply
SR-04 ultrasonic sensor
wire
a few 6-32 bolts and nuts
10-24 threaded rod and nuts
some black scrap foam core
a lever switch - also available at any online electronics supply
22K resistor
1/4" elastic
Tools:
soldering iron
drill
dremel tool with metal cutoff wheel
xacto knife
screwdriver
side cutters
saw or dremel tool for skull surgery
Step 2: Surgery


I got a really cool Japanese pull saw for my birthday. It worked really nicely to cut the skull if half, just behind where the jawbone comes into the skull. I am sure that you could use a Dremel tool, but it was really easy to get a clean, straight cut with the Japanese saw.
Step 3: Motor, Gears and Cam


I decided to use a GM3 motor from Solarbotics that I had left over from another project. I thought of using a servo, but I wanted continuous rotation and I wanted a motor that I could use a lever switch to stop the motion and a relay that would override the lever switch.
The GM3 is pretty strong and easy to mount. It also runs nicely on 5 volts. I used a couple of gears that I think I got from Allelectronics. I also have gotten some gears from dead printers that could have also worked. The GM3 just turned too fast for what I wanted. So I put the smaller gear on the GM3, and mounted the larger gear on a piece of square brass tubing from the hardware store (second picture). There is usually a display with many kinds of brass flat stock and tubing in all sizes.
The square brass tube is attached to the motor with a bolt. Then the tube continues and is attached to the skull with a 6-32 bolt and nut.
I cut a cam out of two pieces of scrap foam core. I used the nautilus shape so that the jaw would slowly open, then when the cam follower comes to the straight drop, the jaw will snap shut with a satisfying clack. I had attached two long 6-32 bolts into the large gear, and the cam attached to the bolts, holding the cam away from the motor a little. I put masking tape along the cam edge so that the cam follower would have a smooth surface to travel over.
Step 4: Cam Follower and Jaw


First, I snipped off the pins that went from the jaw into holes in the skull. Next, I drilled holes in both jaw ends where the pins had been. I threaded a length of 10-24 threaded rod through to act as a pivot.
I used a ceramic bead for the cam follower. I bent a piece of brass wire to go through the bead, and then go down and attach to the square brass tubing that will move the jaw.
The cam follower has a hole in the end of the square brass tube large enough to thread through the 10-24 threaded rod going between the two jaw sides. The cam follower is locked onto the threaded rod with two nuts tightened against it. This way, when the brass cam follower moves, the jaw moves too. I did have to enlarge the holes in the skull so that the threaded rod moved easily.
Step 5: Lever Switch and Relay Control


I attached a lever switch to a piece of flat brass and attached it to the skull with a 6-32 bolt and nut.
Wiring - Attach the 5vdc ground to the motor. The positive 5 vdc will go to the lever switch common and then out of the Normally Closed terminal to the motor. That way if the switch is not pressed, power will flow to the motor. The idea is that when the cam follower has moved so that the jaw is closed, the lever switch is pressed, and no power goes to the motor. When the motor is activated by the Arduino for a couple of seconds, the cam follower moves down and the lever switch is no longer depressed, so power goes to the motor.
A 5 vdc single pole double throw relay acts to override the lever switch. I attached a diode across the relay coil, and I used a 2N3904 transistor to power the coil from the Arduino digital pin. See the tutorial on relays if you haven't worked with them before.
If you've wired it all correctly, you can touch the 5 vdc positive line to the resistor and the transistor will turn on the relay and the jaw will open. With the power off to the relay, the jaw should stop after it has snapped shut.
Step 6: Sensor and Stand


Finally, we add in the ultrasonic sensor. The HC-SR04 sensor is really cheap. You can get them for less than $4 on eBay. They need two of the data pins from the Arduino to work. But they work pretty well at medium distances.
I cut some black foam core for the base. I used an x-acto knife to cut holes for the ultrasonic sensor to peer out of. The base also houses a transformer to supply the 5 vdc to the circuits.
I used another piece of 10-24 threaded rod to attach the skull to the base. Washers kept the nuts from digging into the foam core.
Step 7: Code and Fun

/*
*Skull code - Charles Ford Fall 2013
*
* CandleLight
* -----------
*
* Use random numbers to emulate a flickering candle with a PWM'd LED
*
* 2007 Tod E. Kurt <tod@todbot.com>
* http://todbot.com/
*
*/
// ---------------------------------------------------------------------------
// Example NewPing library sketch that does a ping about 20 times per second.
// ---------------------------------------------------------------------------
#include <NewPing.h>
#define TRIGGER_PIN 12 // Arduino pin tied to trigger pin on the ultrasonic sensor.
#define ECHO_PIN 11 // Arduino pin tied to echo pin on the ultrasonic sensor.
#define MAX_DISTANCE 200 // Maximum distance we want to ping for (in centimeters). Maximum sensor distance is rated at 400-500cm.
NewPing sonar(TRIGGER_PIN, ECHO_PIN, MAX_DISTANCE); // NewPing setup of pins and maximum distance.
// ***************VARIABLES*********************************************
int ledPin = 13; // select the pin for the LED
int jawPin = 9; // select the pin for the transistor to open the jaw
int signalPin = 5; // led on minimal Arduino board
int k = 0; // loop variable
int val = 0; // variable that holds the current LED brightness
int delayval = 0; // variable that holds the current delay time
int distance = 0; // variable for ultrasonic distance in cm
//****************SETUP************************************************
void setup() {
randomSeed(0); // initialize the random number generator
pinMode(ledPin, OUTPUT); // declare the ledPin as an OUTPUT
pinMode(jawPin, OUTPUT); // transistor control as OUTPUT
pinMode(signalPin, OUTPUT); //built-in led on bare Arduino board
digitalWrite(ledPin,HIGH);
delay(2000);
digitalWrite(ledPin,LOW);
}
//***************LOOP***************************************************
void loop() {
delay(50); // Wait 50ms between pings (about 20 pings/sec). 29ms should be the shortest delay between pings.
unsigned int uS = sonar.ping(); // Send ping, get ping time in microseconds (uS).
// Convert ping time to distance and print result (0 = outside set distance range, no ping echo)
distance = (uS / US_ROUNDTRIP_CM);
if (distance < 60 && distance > 0) jaw(); // run the open jaw routine
}
//************END OF LOOP**********************************************
void jaw() {
// routine to open the jaw and flicker the lights
for (k=0;k<100; k ) {
// ACTIVATE THE RELAY
if (k<50) digitalWrite(jawPin,HIGH);
else digitalWrite(jawPin,LOW);
// CANDLELIGHT EFFECT ON EYES
val = random(20,255); // pick a random number between 100 and 255
analogWrite(ledPin, val); // set the LED brightness
delayval = random(50,150); // pick a random number between 30 and 100
delay(delayval); // delay that many milliseconds
}
analogWrite(ledPin, 40); //leave the eyes low at the end of the routine
}

Participated in the
Halloween Decorations Contest


