

Introduction: Internet Content Filtering Using DNS


Updated 3rd February, 2021 to include further information in Steps 8 & 9.
It is widely known that there is a lot of content on the internet that is not exactly suitable for viewing by kids. What is not so widely known though is the fact that you can relatively easily block access to such undesirable sites by simply changing the DNS server that you are using. This is something which is actually fairly easy to do, it can be implemented irrespective of the operating system being used (be it Windows, Mac OS, Linux, Unix, Android or any other OS), takes only about 5 minutes to complete, and best of all, it’s completely free!
Step 1: What Is DNS?

DNS stands for “Domain Name System”. As can be seen in Fig. 1. a DNS server is like an automated phone book that looks up the IP address of the website that you entered into your browser, and then connects you to that IP address. Most people use the default DNS settings that are pre-selected by their Internet Service Provider (ISP), however it is possible to change the DNS servers from the default option to one of your choice.
There are a variety of reasons why someone may want to try a DNS server other than the default one, such as trying to increase browsing speed. Another reason to do it is to avail of the ability of DNS servers to filter web content at source. Several DNS providers offer a filtering service whereby undesirable websites (such as pornography, gambling or violence) are blocked by the DNS server so the end-user is unable to access these sites. Switching to one of these DNS servers will ensure that any attempts to access an undesirable website will automatically fail. Fig. 2 shows how a request to a DNS server can be allowed through to the destination website (Fig. 2A) or blocked (Fig. 2B) if it is deemed to be inappropriate.
The process of changing DNS servers is fairly straightforward, and does not involve installing any software. It has the added advantage that once the change has been made it does not require any further user input as the list of blocked websites is constantly updated by the DNS server provider. And as mentioned previously, some of the companies who provide this service do so free of charge for home and personal use. There are a variety of different DNS service providers which offer this free DNS filtering service, such as CleanBrowsing, Open DNS, Comodo and Neustar. The specifics in the instructions provided below are for the CleanBrowsing FamilyShield service; however the same approach applies to any of these providers.
Step 2: How to Change DNS Settings
The best place to change the DNS settings is on your router, as that way any device that connects to the router will automatically benefit from the DNS filtering. Unfortunately some ISPs do not permit its customers to change the DNS settings on their routers. In such an instance the only option available is to change the DNS settings on each device that connects to the router, or to try the wifi hotspot workaround described later on.
You do not need to be very technically minded to change DNS settings, it will mostly be a matter of doing a small bit of research on Google to figure out how to access the appropriate settings on the device of interest. The following guide covers the broad steps involved, however there are more specific instructions on the CleanBrowsing website for different device types (check out www.cleanbrowsing.org for more details). CleanBrowsing offer both free and paid content filters, the one I will focusing on is the free Family Filter service but the approach is the same for whatever option you may decide to use.
1. Firstly, see if you can change the DNS settings on your router (simply type in the ISP provider plus the router model into Google and see what this turns up). It is usually necessary to log into the router to make changes to any of the settings, here again Google will provide you with the necessary information on how to do this.
2. If it is not possible to change the router DNS settings then you will need to configure each internet-enabled device individually. Type in a search string into Google along the lines of “change DNS settings Windows 10” (or whatever the device happens to be) and follow the steps outlined.
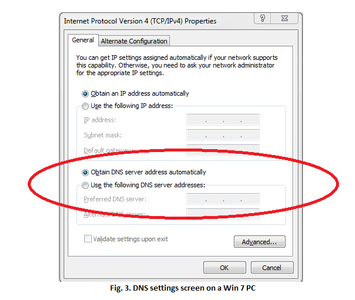
3. You may need to navigate through a variety of different sub-menus within the Settings menu to get to the one where you can access the DNS settings for your device. Fig. 3. shows what the relevant screens for changing the DNS settings look like on a Windows 7 PC. Although the screen for your device may look radically different to the one shown you should be able to find a section on it which deals with DNS settings (see the section highlighted in the red ring in the figures below). In some instances there may be an option to allow the DNS settings to be selected automatically, or else there may be some default value displayed.
4. Click on the option to allow you to manually define the DNS server addresses, and then enter the appropriate details for the CleanBrowsing Family IP filter addresses into the relevant fields. Some newer hardware may have options for both IPv4 and IPv6 settings, but the majority of hardware will only have the option to use IPv4 settings. If your device only has one input field for DNS server settings then you can enter both server addresses by placing a comma between the addresses.
Server 1: IPv4 settings - 185.228.168.168/ IPv6 settings - 2a0d:2a00:1::
Server 2: IPv4 settings - 185.228.168.169 / IPv6 settings - 2a0d:2a00:2::
5. Save the settings and then exit from the Settings menu. That’s it!
Step 3: The Moment of Truth

Having made the changes to the DNS settings, now all you need to do is test it to see if the new DNS settings are working. The only way to do this is to open a browser and type in the address of a website that you would prefer that your children did not access. Fig. 4. contains screenshots taken from an Android smartphone configured to use CleanBrowsing DNS upon which I tried to access the pornographic website redtube by two different routes. As can be seen from the left-hand screenshot, the Google search could not find any matches to the term redtube. When I tried to access the site directly by typing its address into the address bar the request was blocked by the DNS server.
Job done!
Step 4: Changing DNS Settings for Wifi Networks on Android and Apple Mobile Devices


Changing the DNS settings on Android and Apple mobile devices is slightly more convoluted as both of these device types can connect to the internet through both wifi or through cellular networks. The steps below outline how the DNS settings can be changed for wifi networks on these devices.
A. Apple:
- Go to Settings, then Wifi.
- Choose Wifi Connection. Look for the option called DNS (see Fig. 5 for an example of the wifi network settings screen on an Apple iPod).
- Select the DNS option, delete the details for the current DNS servers configured and replace them with the CleanBrowsing IP addresses.
B. Android:
- Go to Settings, then go to the Wifi list.
- Find the Wifi entry for the network that you are connected to and click on it (on some devices you may need to press down on the selection for a few seconds to activate the menu).
- Go to Manage Network. On some Android devices, you will need to click on Advanced or show Advanced settings (see Fig. 6 for an example of the wifi network settings screen on an Android tablet).
- Change the IP settings from DHCP to Static.
- Select the fields entitled DNS 1 and DNS 2, remove the details for the current DNS servers and replace them with the CleanBrowsing IP addresses.
There is one limitation associated with wifi network DNS settings on both Apple and Android devices. The changes applied are network specific, so they are not automatically applied to new wifi network connections. Thankfully there is a way around this problem, as outlined in the next section
Step 5: Changing DNS Settings for Cellular Networks on Android and Apple Mobile Devices
Neither Apple nor Android devices allows users to directly change the DNS settings for cellular networks, so a different approach is required. This can be done by downloading and installing a DNS changing app which is then configured to use the CleanBrowsing DNS servers. These apps have the added advantage that they work with both cellular and wifi networks, so you do not need to configure them separately. In addition the settings are automatically applied to new wifi networks, thus overcoming the limitation mentioned previously.
A. Apple:
There are several DNS changing apps in the App store, including the CleanBrowsing.org DNS app. This free app provides the exact same filtering service as outlined previously, and is compatible with devices running iOS 10 or later. The app can be downloaded from the Apple App Store. More information can be found on the CleanBrowsing website.
B. Android:
There are a wide variety of DNS changing apps in the Google Play Store, such as DNSChanger for IPv4/IPv6 from Frostnerd. The app is simple to use, and has an added advantage in that it doesn’t show ads. Once the app is installed you simply click on the Default DNS Addresses bar and then select the DNS service that you require (there are a variety of DNS servers available, including two of the free CleanBrowsing servers).
When you first start a DNS changing app you will be greeted with a connection request screen explaining that the app wants to set up a VPN network on your device. Click on OK to allow the VPN to be set up, and the app will then launch. Once the service is up and running a small key icon will appear at the top of the screen to show that the VPN is active (it can be seen in the upper left corners of the screenshots in Fig. 4). This VPN symbol also provides a visual clue that the DNS filtering is currently active. Irrespective of which app you use, the DNS settings are automatically applied to cellular networks and to existing and new wifi networks.
Step 6: Caveat Emptor
When it comes to the internet, the concept of buyer beware should always be borne in mind as you do get what you pay for. With all this in mind, you may well be wondering if there is a catch to using DNS filtering? The good news is that there isn’t a catch as such, but rather there are some limitations which you should bear in mind as to exactly what DNS filtering includes.
- To borrow a well-known advertising phrase “it does exactly what is says on the tin”. DNS filtering will block access to undesirable sites, however it may not necessarily prevent search engines from displaying undesirable images or video thumbnails. The CleanBrowsing service does force both Google and Bing to operate in safe search mode, however some of the other free DNS services providers do not provide this safe filtering functionality. If you happen to be using DuckDuckGo as your browser of choice then this must be manually configured for safe searching.
- DNS filtering does not provide any protection from undesirable online activities such as cyberbullying, trolling, etc. If you are concerned about such things there is a wealth of information available online on these topics specifically written for parents (see webwise.ie or internetmatters.org for more information).
- DNS filtering may not provide protection from such security concerns as hacking, cracking, “Man-in-the-Middle” attacks or infection with viruses, Trojans or other malware. It may reduce the risk of picking up malware or viruses by preventing access to known sites for such infections, however the extent to which this occurs can vary depending on what DNS service you select.
- DNS filtering does not provide any parental controls such as the ability to limit access to the internet at specific times, or to block access to websites that do not fall within the categorisation applied by the DNS provider.
- DNS filtering will not prevent someone from accessing undesirable websites if they are using a Tor browser.
- Irrespective of what DNS changing app you are using you should make use of any options available to enable the app on start-up, and to set a PIN to prevent “unauthorised” access.
- Unfortunately the benefits of using these apps can be negated on Android devices that have the option to set up multiple users by simply switching to another user (unless that user has the app installed in their profile too). It is possible to disable the multiple user setting on Android devices, however it is not a simple thing to do and involves rooting the device (if you are so inclined to do this then a quick Google search should set you on the right path).
- One downside to using a DNS changing app on Android devices is the key symbol which appears when the VPN connection is running. The presence of the key symbol suggests that something is locked on the device. It is possible to configure the device to not display the key symbol when VPN is active, however this can only be done by rooting the device as it is a function of the Android operating system, rather than the app itself. This is not an activity for the faint of heart as you could quite easily brick the device.
- On a similar vein to above, any app can be easily uninstalled from Android and Apple devices.
With regards to the last point there is a work around that can be applied to prevent “unauthorised” uninstallation of apps on both Apple and Android devices, as outlined below:
A. Apple:
The Screen Time function in iOS and iPadOS provides a lot of parental control tools to restrict the features that children are able to access. Amongst these tools is the ability to block the deletion of apps. A quick Google search will provide a wide variety of articles on how to use Screen Time function to prevent app deletion. You can also use this opportunity to explore the other parental control functions that are available .
B. Android:
Due to the wide variety of different versions of Android in use, the only way to lock apps from being deleted is by use of a third-party app locking such as the Norton All Lock app.
- First, open the DNSChanger app, enter the Menu ans click on the Select option.
- Scroll down through the options until you find the PIN protection options, then select the Enable PIN protection option.
- If the phone has a fingerprint scanner then make sure to deselect this option in the PIN protection sub-menu.
- Scroll further through the Settings sub-menu to find the Change PIN option, and set a PIN for opening the app.
- Scroll further through the Settings sub-menu options to find the Device admin option (it is under the General heading), and turn on this option. This will open up an Information pop-up message explaining what the Device admin option is. Click on OK and then select Activate in the Device admin window that appears.
- Exit the app, then install the Norton App Lock app from the Play Store.
- Configure the Norton App Lock screen lock option using either a pattern or PIN. Pen the Norton App Lock app and tap on the lock icon beside any apps which you want to lock (you can lock additional apps besides the DNSChanger app if you wish).
- Reboot the device to ensure that the new settings take effect.
It might not be a very elegant approach, but it does appear to work on most Android devices.
Step 7: Some Thoughts on Parental Controls
Parental controls are one of these grey areas that vary from one device to another. In some instances it may refer to the use of software to monitor online activity, the ability to use blacklists on a router to prevent access to specific websites, the ability to control access to the internet for specific periods of time, or any combination of these.
With all that in mind there are several steps that can be taken to improve parental controls on routers. In conjunction with using DNS filtering, you may want to prevent access to a specific site not covered by the DNS providers classification. In this instance the only way to do this is by using the blacklist function on your router. For example you may want to block access to sites like Reddit (a site where a veritable cornucopia of porn can be accessed by turning off the NSFW filter in the Settings). Here again Google should be able to provide you with the information on how to do this.
You may also want to make use of the router option to restrict access to the internet during specific times, which can be done using the firewall settings on your router. One potential use of this could be to shut down access to the web for predefined periods to stop teenagers from having marathon all-night online gaming sessions. The downside to this is that it will also prevent you from binge watching Netflix or other streaming services into the small hours, but seeing as you should be leading by example then it’s a small sacrifice to make. Once again Google should be able to help you figure out how to configure the firewall settings on your router for this purpose.
Step 8: Some Final Musings
If you’re like me then the idea of companies providing this service free of charge may still be bugging you. The companies who provide free of charge DNS filtering services generally do so as a way of advertising their wares to corporate customers. Some providers may require users to set up an account in order to be able to access their service (CleanBrowsing currently do not require this). It should be noted though that if a service is currently provided free of charge, there is no guarantee that the provider will not introduce charges at some point in the future. If this does occur, or if you become dissatisfied for some reason with the provider you are using, then you can easily try a different provider, such as those included in list below:
- CleanBrowsing Adult Filter
- OpenDNS FamilyShield
- Norton ConnectSafe
- Neustar Family Secure
- Yandex DNS Family
- Comodo SecureDNS 2.0
- Dyn Internet Guide
You can easily get the required server addresses for these DNS servers by doing a simple internet search.
As I mentioned before, not all of these DNS services block inappropriate images in Google or Bing searches, so I would suggest reading up on them before deciding to switch to another provider.
I should point out the fact that any setting changes that you make to a device can equally be reversed by a tech savvy teenager (or by their tech savvy friends). If you are lucky enough to be able to change the DNS settings on the router then might I suggest you make two additional changes, as outlined below (to be honest you should perform these steps anyway as it makes good sense to do so from a security point of view).
- Change the default password on the router too, if you have not already done so. The default password for most routers can be easily found on the web, so you should change it to prevent anyone else from logging into the router and undoing any changes you may have made.
- Change the SSID on the router. The SSID is the name for the wifi signal that you connect to your router through. For security reasons you should not include anything in the SSID which helps identify the source of the wifi signal (e.g. changing the SSID from the default name to something like “No23s_wifi” would help a hacker identify the source, whereas changing it to “Here_Be_Wifi” is much more anonymous).
By changing the SSID you will be able to detect if someone performs a factory reset on the router in an effort to remove any changes you may have made to the settings. You will be alerted to this event by the simple fact that you will lose connectivity to the router on your own device as the SSID and login password will have been reset to the default settings (you will first need to make sure that you do not have any saved settings for the default SSID saved on your device).
If you are unlucky enough not to be able to change the DNS settings on your router then there is still hope. If your ISP allows you to change your router then you could invest in a decent one which provides the parental control features mentioned earlier. It may take some researching to find a router which has user friendly parental control features, but it time well spent . Unfortunately some ISPs do not allow customers to use their own router, in which case you could try either of the wifi hotspot work-around described next. The only way to apply DNS filtering to devices that are connected by ethernet is by changing the DNS settings on the device itself.
Step 9: Wifi Hotspot Work-around
As mentioned previously the best place to change the DNS settings is on your router as all devices which connect to it are then covered. If you are unable to change the router DNS settings then there are three potential ways that you can get around this.
1. Purchase and install a commercial “blackbox” hotspot.
There are a variety of commercial products available (such as the iKydz range of products) which provide a turnkey solution to the task of instigating parental controls on both home routers and mobile phones. They are designed to be as easy as possible to set up and use so are ideal for those who may not have the time or technical knowledge to do it themselves. Should you wish to find out more about these products then Google is once again your only man for the job!
2. Route all wifi traffic through a secondary router which you have pre-configured to use DNS filtering.
For this option you will need to source a router that allows you to change the DNS settings. There are plenty of routers on the market so a bit of research will be needed to select one that best suits your purposes. Set up the secondary router, and then configure it to use DNS filtering. Connect the secondary router to the primary router using an ethernet cable, and then disable the wifi on the primary router. The wifi settings on all internet-enabled devices will then need to be changed to connect to the secondary router.
3. Create your own wifi hotspot using a Raspberry Pi.
This is an option I would only recommend for those who like tinkering with computers. For those not in the know, the Raspberry Pi is a series of single board computer produced by the Raspberry Pi Foundation with the intention of encouraging children and adults to learn computer coding. The Pi was rapidly adopted by electronic hobbyists and is now used for making a wide variety of gadgets, ranging from media centres to weather stations, home surveillance systems and even tweeting cat flaps (every house should have one!). One popular use for the Raspberry Pi is to create a wifi hotspot. There is a wealth of guides on the web on how to configure a Raspberry Pi as a wifi hotspot so I'll leave the task of explaining how to do this to them. As the Raspberry Pi is under constant development and improvement I would recommend that you select a fairly recent guide as some older guides may be obsolete due to changes in the hardware and software.
If you do decide to make your own wifi hotspot, you will eventually get to a step where you get to select the DNS server you want to use. Choose Custom and then enter the CleanBrowsing IP addresses.
If you decide to create your own wifi hotspot using a Raspberry Pi then you should also take adequate steps to harden the Pi to reduce the possibility of it being hacked, such as changing the default password and username, as recommended by the Raspberry Pi Foundation (see link below for full details):
raspberrypi.org/documentation/configuration/security.md
The wifi settings on any internet-enabled devices that you wish to apply DNS filtering on should then be changed to connect to the Raspberry Pi hotspot. Should a tech savvy teenager try to by-pass the “parental controls” on the hotspot by swapping out the SD card from the Pi with another one and rebooting the Pi, they will automatically lose wifi connectivity on their device as the Pi will no longer be working as a hotspot.
If you so wish you can also use the Raspberry Pi hotspot as a wi-fi extender by pairing it with a pair of powerline network adapters. Start by plugging one of the powerline adapters into an electrical socket near the router, and connect it to the router using an ethernet cable. Then plug in the second powerline adapter in a location where you wish to boost wi-fi coverage, and connect it to the Raspberry Pi by ethernet. It is then simply a matter of pairing the powerline adapters (as per the manufacturers’ instructions), booting the Raspberry Pi and connecting to the new DNS filtered hotspot as described previously.
It should be borne in mind that the Raspberry Pi is not specifically designed for use as a router. One consequence of this is that it may suffer from bandwidth issues if too many devices are connected to the hotspot. This problem is easily overcome by creating a second hotspot using a different Raspberry Pi (make sure to give it a different SSID to avoid devices trying to connect to both hotspots).
Step 10: Conclusion
So there you have it!
Hopefully this article will have given you some idea of what DNS filtering is, and more importantly how it can be used to help reduce the amount of undesirable web content that your kids can access (either accidentally or deliberately). There are admittedly commercial “black boxes” available that you just plug into your router which provides a content filtered wifi hotspot plus other parental controls. The joy of DNS filtering is that it can be implemented relatively easily, requires no further input once it has been implemented, and best of all is free of charge. As there are some limitations with it then you should probably only regard it as a first line of defence, rather than being the ultimate solution to protecting your kids online.
Please note that the information in the article is based solely on my own limited experience, so I would strongly suggest that you do some research on the topic to confirm for yourself whether anything in this article is true or not! You can get more information on any of the DNS providers from their website.
Finally, it would be remiss of me not to mention the fact that no matter how well you try to shield your kids from the evils of the internet, this is no guarantee that they will not be exposed to undesirable content somewhere outside of your control. No matter what technological solution you may use to help limit their exposure, it is inevitable that they will at some stage see things that you would prefer that they didn’t. In such an instance the only fallback option is to do some old-school parenting. Thankfully there are plenty of resources available on the web to help parents through this process. Sites such as internetmatters.org, betterinternetforkids.eu or webwise.ie have a range of resources to help guide parents on how best to do this.
Good luck!

Participated in the
First Time Author


