

Introduction: [IoT] Telegram Bot With Arduino MKR WiFi 1010
![[IoT] Telegram Bot With Arduino MKR WiFi 1010](https://content.instructables.com/FYA/GJAY/JKVCSYGU/FYAGJAYJKVCSYGU.jpg?auto=webp&fit=bounds&frame=1&height=1024&width=1024auto=webp&frame=1&height=300)


This project demonstrates how to interface Arduino with the Telegram Bot APIs.
The project is built around the new MKR WiFi 1010 board equipped with an ESP32 module by U-BLOX.
At this stage, the project is no more than a proof of concept, just to show you what you could do with, so for this you need only the Arduino board.
But what is a Telegram Bot?
Well, Bots are simply Telegram accounts operated by software – not people – and they'll often have AI features. They can do anything – teach, play, search, broadcast, remind, connect, integrate with other services, or even pass commands to the Internet of Things. (credits by Telegram: https://telegram.org/blog/bot-revolution)
In our case we'll pass commands to Arduino building a simple IoT device. It will answer to simple commands and also turn on/off the built-in Led. I'll let your imagination do more with it... (imagine to connect one or more relay to the I/O pins and turn on/off an heater or the air conditioning system with your smartphone, for example).
Step 1: What You Need


For this project you need:
- Arduino MKR WiFi 1010 from Arduino store:
https://store.arduino.cc/arduino-mkr-wifi-1010 - Arduino IDE 1.8.5 or above:
https://www.arduino.cc/en/Main/Software - A micro-usb cable to connect Arduino to your PC
- An internet connection, it requires the SSID and password. Better if you use your own home router to be sure it is not blocked.
- Telegram app installed on your smartphone, no matter the brand.
Check here for PC and Web versions as well!
Step 2: Installing the IDE


Yeah, i know, i know... most of you already have the Arduino IDE installed in the PC, but this Instructables is intended also for beginners.
So, first of all, download the Arduino IDE 1.8.5 of your choice (zip file for 'non administrators' or exe file)
The 1.8.5 version is recommended, i didn't test old versions and the new board used in the project could not be supported at all.
Now you need to install the new boards with their drivers:
- start the IDE
- From the Tools menu choose Boards then, at the top of the processors list, choose Boards manager.
- Scroll the new window (see image) until you find the Arduino SAMD boards wich includes the new MKR WiFi 1010.
- Click on that tab or click on More info inside the tab, choose the latest version and install.
- Wait for the installation completed. It will take care also of drivers installation
- You need also a new WiFi library for this board: choose Sketch, Include Library and Manage Libraries.
Search for Wifinina and install as you did with the processor above.
Now connect your new Arduino board and wait for Windows to complete the driver installation.
From the Tools->Board menu you'll find the new boards, choose the MKR WiFi 1010.
Another special library is needed for this project, it's the ESP8266TelegramBot library by Giancarlo Bacchio.
The library has been slightly modified to work with this board so it's included in the sketch's folder.
Choose the correct com port and test the board with the Get Board Info command.
Congrats, you're done with the IDE!
Step 3: Creating the Telegram Bot

Creating a new Telegram Bot is quite simple.
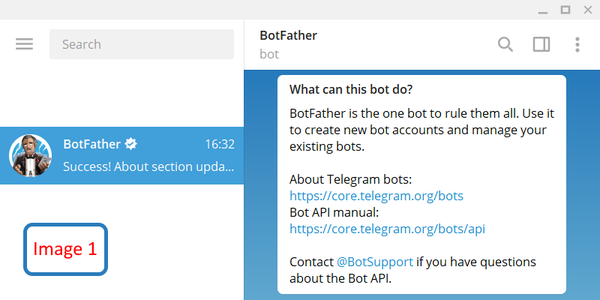
Open the Telegram app and, in the search bar, type @BotFather and start a chat with him (image1).
BotFather is the... Bot factory. It will help you create a new bot and change it's settings.
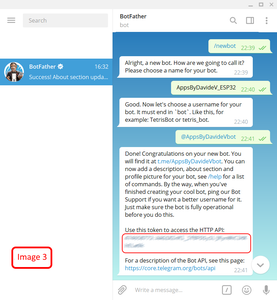
After the /start command you'll see the help list (image2).
- Type /newbot (image3)
Now type the name of your bot. The name is displayed in contact details and elsewhere. - BotFather will ask you for an Username. The Username is a short name, to be used in mentions and telegram.me links. Usernames are 5-32 characters long and are case insensitive, but may only include Latin characters, numbers, and underscores. Your bot's username must end in ‘bot’, e.g. ‘tetris_bot’ or ‘TetrisBot’.
- If both the name and username are valid you'll receive a long string of chars called TOKEN. This is your personal 'key' used to communicate with Telegram servers.
Copy and paste it in a text file on your PC for now. We'll use it later into the Arduino code.
If you loose it don't worry, just reopen the chat and type /token to generate a new one.
All the steps are described here:
https://core.telegram.org/bots#6-botfather
Advanced (optional)
Reopen the chat and type /help
Click on (or type) /setuserpic to upload a picture for your bot.
Click on (or type) /setabouttext to set the About section for your Bot: People will see this text on the bot's profile page and it will be sent together with a link to your bot when they share it with someone.
Click on (or type) /setdescription to set a description section for your bot. People will see this description when they open a chat with your bot, in a block titled 'What can this bot do?'.
Step 4: Modify, Upload and Test the Sketch


It's time to upload the software to the Arduino MKR WiFi 1010 board.
Download the attached files, for some reason I cannot upload a ZIP, so create a folder named as the sketch and copy all the 4 files inside it, please don't change names unless you know what you are doing.
Modify
Open the sketch, we need to fill some information (image1):
fill the arduino_secrets.h with your wifi and telegram credential.
- Locate the WiFi network informations and type in your network name (SSID) and password.
- Locate the telegram Bot informations and type in the name, username and token provided by @BotFather
Upload
Make sure the board is correct (image2) in the ide and connected then try compile the code. If the compilation goes well, upload it to the board, it will take only few seconds.
In case of problems check for a typo and retry.
Test
[IMPORTANT!] The sketch sends logs to the IDE. The processor has a native USB port (like Leonardo boards). Once powered on, the code will wait until the serial monitor is running. So, let it connected to the PC and open the serial monitor. Arduino will first connect to internet, then it will start polling the Telegram server for new messages (image3).
Now open Telegram on your preferred device and, in the search box, type the name of your bot (not the username that ends with 'bot'). Open a chat with it.
The first command to start a chat with a bot is /start, our Arduino will answer with a welcome message.
Now type help (without slash), it will answer with a list of supported commands, you can try them all (image4).
You are done with the test, if something is not working, check the infomations entered in the sketch (name, username, token...)
Certificates
If you are experiencing errors with the connection to the telegram server (log: Bot not connected):
- Open Tools->Wifi101/wifinina updater
- Make sure your board is connected, check the ports on the left of the updater tool, the board must be there
- Click Open updater sketch and upload it to the board
- After upload, in the updater choose the latest firmware for your board and click update firmware
- After update, in the updater, section SSL certificates, click Add domain, in the dialog write telegram.org:443 then press OK.
- Click Upload certificates to wifi module
- Upload this sketch to the board

Step 5: Improvementes

Looking at the code it's very simple to implement new commands and answer to the user.
New commands:
You can write a sub for each new command. Every sub will take care of completing the command and (eventually) return a status information to the user.
Limiting users:
Of course this project is only a demo. Any Telegram user can connect to your home and send unwanted commands. You don't want this!.
Well, look at the image1, it shows 2 users connected. As you can see each user has it's own user ID. With a little work on the code side you can filter (or build a list) for authorized users only. Just study the code and try intercept the user ID number. Then execute commands only from well known users.
Hardware:
On the hardware side, a lot of sensors and relays can be connected to the I/O pins of Arduino.
Be careful: the board used in this project is 3.3V tolerant!!! Use a voltage level shifter where necessary!
For more info and tips about this board please read here:
https://www.arduino.cc/en/Guide/MKRWiFi1010
That's all, enjoy!


