

Introduction: Ish Clock


I often find my self buying things that I have no idea what I'm going to do with. This project is a result of a purchase of a ring that has 12x WS2812b LEDs on. I had no plans for it but it looked cool online so I stuck one in my cart, played with it for a while when it arrived and then forgot all about it.
A while later I was thinking about making a clock and remembered it was sat there not doing anything. I was thinking about buying a second ring with 60 LEDs on to make up the minutes but then started thinking how we / I tend to look at the time and round it to the nearest 5 minutes.
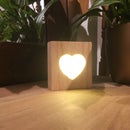
With this in mine I set out with my 12 LED ring to make the ish clock. It displays 1 LED at a time for 1 second, to indicate the hour (Blue LED) and then the minutes (Red LED) rounded down
Step 1: Gathering Parts & Wood Work


I was very lucky to arrive at work one day and spot a pallet. This pallet stuck out to me as it didn't look like your standard, run of the mill pallet. It was clean, heat treated and most unusually solid oak.
This project is made from one of the pieces of that pallet. ( I asked the boss before I took it home)
Also used:
- 12 pixel ws2812b LED ring
- Real Time Clock (RTC) module (Im using a DS3231 with I2C)
- Arduino Nano v3.0 compatible
- Acrylic sheet (5mm)
- Coloured Wire
Tools:
- Power Drill
- Router
- Adjustable flat wood bit
- Power sander
- Hand saw
- Soldering iron
- Hot glue gun
- Sand paper
- Danish Oil
Sanding
I started by using the power sander to straighten and clean the block of wood until all the sides where clean and smooth. I left some the imperfections visible and its not perfectly straight or square as I like to be able to see some of the history in the wood.
Marking and Cutting the holes
After sanding I chose the side I wanted the face of the clock and marked the centre by drawing lines from each corner. I set the adjustable wood bit a little bigger than the led ring so there would be a shelf for the acrylic to sit on and cut about 5mm deep then adjustable the cutter the just over the size of the LED ring and cut down another 5mm or so.
Routing and cable holes
Using my router with the 12mm bit I routed out a recess in the bottom of the block to hide the RTC and Arduino. Its about 15mm deep and no less than 5mm from any edge. I marked the centre (ish) from the bottom and drilled up using a 10mm bit just past half way to allow for the LED wires. Then using a 5mm bit I drilled from the centre of the LED recess to meet the 10mm hole from the bottom.
One more 4mm hole of the back for power to come in and and using a smaller router bit to make a channel for the wires on the back of the LED ring and the wood work is done.
Step 2: Acrylic Circles


To make the acrylic for the front of the clock I stated cutting a square piece that was just bigger then the hole it had to fill. Then using the power sander to start I began removing the corners until it was about the right shape and size. I then moved onto hand sanding so I didn't over shoot and have to start over.
It was a slow and tedious process of trial and error until it fitted just right but I think the end result was worth it. I finished off by using a very fine grit paper to give the front of the acrylic a frosted look.
Step 3: Soldering


I like to use a colour system for my wires on this occasion I choose:
- Red for Power (5v)
- White for Ground
- Yellow for Data
- Green for Clock
I began by soldering the 3 necessary wires onto the LED ring using the system above and pushing the wires down the hole. As it shouldn't be exposed to any real forced I used a tiny bit of hot glue to hold the ring in place. (I might need to change it sometime) and install the acrylic with just a little hot glue around the edge.
I then soldered the 4 wires onto the RTC using the system above. To keep things a little neater I decided to draw power for the RTC from the Arduino. Then connected everything to the Arduino and soldered 1 wire for power and another for ground to the Arduino.
RTC
- SCL (Clock) to Analog Pin 5
- SDA (Data) to Analog Pin 4
- VCC to 5V
- GND to any GND on the Arduino
LED Ring
- Din to Digital Pin 6
I had an old USB cable hanging around so decided to use that to power the clock. I cut off the end that would normally connect to somthing and pushed it through the hole in the back. Then stripped and tined the ends before soldering the VCC to the Arduino and the LED ring to the positive side and the Ground from the Arduino and LED to Ground. I little heat shrink later and it was looking good,
The hot glue gun came back out to keep to hold everything down. I decided to leave the Arduino with enough play that I will be able to access the USB port to program it in the future but not so much that I could fall out.
Step 4: The Code
You should now be able to upload this code to the Arduino.
If the RTC isn't running this code will set the time based on when the code was compiled so be sure to just hit the upload button and not verify.
alternately this also works really well for setting the time.
https://www.instructables.com/id/Setting-the-DS130...
Much of this code I borrowed from the Adafruit NeoPixel library and some from an RTC library I found and some I made up on my own.
// include the library code:
#include <Wire.h>#include <RTClib.h>
#include <Adafruit_NeoPixel.h>
// define pins
#define PIN 6
#define BRIGHTNESS 20 // set max brightness
#define r 5
#define g 5
#define b 5
RTC_DS3231 rtc; // Establish clock object
Adafruit_NeoPixel strip = Adafruit_NeoPixel(12, PIN, NEO_GRB + NEO_KHZ800); // strip object
void setup () {
Wire.begin(); // Begin I2C
rtc.begin(); // begin clock
Serial.begin(9600);
// set pinmodes
pinMode(PIN, OUTPUT);
if (rtc.lostPower()) {
Serial.println("RTC lost power, lets set the time!");
// following line sets the RTC to the date & time this sketch was compiled
rtc.adjust(DateTime(F(__DATE__), F(__TIME__)));
// This line sets the RTC with an explicit date & time, for example to set
// January 21, 2014 at 3am you would call:
// rtc.adjust(DateTime(2014, 1, 21, 3, 0, 0));
}
strip.begin();
strip.show(); // Initialize all pixels to 'off'
DateTime theTime = rtc.now(); // takes into account DST
byte secondval = theTime.second(); // get seconds
byte minuteval = theTime.minute(); // get minutes
int hourval = theTime.hour();
dot(strip.Color(0,g,0), 50);
}
void loop () {
// get time
DateTime theTime = rtc.now(); // takes into account DST
int minuteval = theTime.minute(); // get minutes
int hourval = theTime.hour(); // get hours
int secondval = theTime.second();
if (minuteval <= 4 && minuteval > 0) {
strip.setPixelColor(0, r,0,0);
strip.show();}
else if (minuteval <= 9) {
strip.setPixelColor(1, r,0,0);
strip.show();}
else if (minuteval <= 14) {
strip.setPixelColor(2, r,0,0);
strip.show();}
else if (minuteval <= 19) {
strip.setPixelColor(3, r,0,0);
strip.show();}
else if (minuteval <= 24) {
strip.setPixelColor(4, r,0,0);
strip.show();}
else if (minuteval <= 29) {
strip.setPixelColor(5, r,0,0);
strip.show();}
else if (minuteval <= 34) {
strip.setPixelColor(6, r,0,0);
strip.show();}
else if (minuteval <= 39) {
strip.setPixelColor(7, r,0,0);
strip.show();}
else if (minuteval <= 44) {
strip.setPixelColor(8, r,0,0);
strip.show();}
else if (minuteval <= 49) {
strip.setPixelColor(9, r,0,0);
strip.show();}
else if (minuteval <= 54) {
strip.setPixelColor(10, r,0,0);
strip.show();}
else if (minuteval <=59) {
strip.setPixelColor(11, r,0,0);
strip.show();}
delay(1000);
for (int i=0; i<12; i++){
strip.setPixelColor(i, 0,0,0);
strip.show();
}
if (hourval == 0) {
strip.setPixelColor(0, 0,0,b);
strip.show();}
else if (hourval == 1) {
strip.setPixelColor(1, 0,0,b);
strip.show();}
else if (hourval == 2) {
strip.setPixelColor(2, 0,0,b);
strip.show();}
else if (hourval == 3) {
strip.setPixelColor(3, 0,0,b);
strip.show();}
else if (hourval == 4) {
strip.setPixelColor(4, 0,0,b);
strip.show();}
else if (hourval == 5) {
strip.setPixelColor(5, 0,0,b);
strip.show();}
else if (hourval == 6) {
strip.setPixelColor(6, 0,0,b);
strip.show();}
else if (hourval == 7) {
strip.setPixelColor(7, 0,0,b);
strip.show();}
else if (hourval == 8) {
strip.setPixelColor(8, 0,0,b);
strip.show();}
else if (hourval == 9) {
strip.setPixelColor(9, 0,0,b);
strip.show();}
else if (hourval == 10) {
strip.setPixelColor(10, 0,0,b);
strip.show();}
else if (hourval == 11) {
strip.setPixelColor(11, 0,0,b);
strip.show();}
else if (hourval == 12) {
strip.setPixelColor(0, 0,0,b);
strip.show();}
else if (hourval == 13) {
strip.setPixelColor(1, 0,0,b);
strip.show();}
else if (hourval == 14) {
strip.setPixelColor(2, 0,0,b);
strip.show();}
else if (hourval == 15) {
strip.setPixelColor(3, 0,0,b);
strip.show();}
else if (hourval == 16) {
strip.setPixelColor(4, 0,0,b);
strip.show();}
else if (hourval == 17) {
strip.setPixelColor(5, 0,0,b);
strip.show();}
else if (hourval == 18) {
strip.setPixelColor(6, 0,0,b);
strip.show();}
else if (hourval == 19) {
strip.setPixelColor(7, 0,0,b);
strip.show();}
else if (hourval == 20) {
strip.setPixelColor(8, 0,0,b);
strip.show();}
else if (hourval == 21) {
strip.setPixelColor(9, 0,0,b);
strip.show();}
else if (hourval == 22) {
strip.setPixelColor(10, 0,0,b);
strip.show();}
else if (hourval == 23) {
strip.setPixelColor(11, 0,0,b);
strip.show();}
delay(1000);
for (int i=0; i<12; i++){
strip.setPixelColor(i, 0,0,0);
strip.show();
}
// for serial debugging
Serial.print(hourval, DEC);
Serial.print(':');
Serial.print(minuteval, DEC);
Serial.print(':');
Serial.println(secondval, DEC);
}
void dot(uint32_t c, uint8_t wait) {
for (int j=0; j<3; j++) {
for(int i=0; i<12; i++){
strip.setPixelColor(i, c);
strip.show();
delay(wait);
for(int i=0; i<12; i++){
strip.setPixelColor(i, 0, 0, 0);
strip.show();}
}
}
}
Step 5: Danish Oil


The final and optional step is to apply some danish oil to the wood. I really like how it brings out the grain plus it offers some protection from stains and moisture. So I highly recommend it.
You can brush it on or I just use an old cloth to wipe it on.
All thats left now is to plug it in and enjoy.

Participated in the
Clocks Contest


