

Introduction: Journey Simple Marionette


Ask anyone who has played That Game Company's latest release and they will likely tell you the same thing: "It's the most beautiful game I've played all season / year / ever!" Journey is an emotional interactive experience of discovery and wonder, where you play as a nameless, robed figure trekking through desert in order to uncover more about yourself, your lost civilization and your purpose in life. With stunning visuals and a haunting soundtrack, this game quickly leaves a memorable impression on the player.
I knew I had to make something to commemorate the wonderful experience of this game, and since enchanted cloth is such an icon of the story, I was excited to put my sewing skills to use. The game is a perfect example of the phrase "poetry in motion," so it would be a shame not to at least try and recreate the traveler's graceful leaps and strides with this build. In the end I decided to animate my robed figure by making him a marionette.
Step 1: Tools and Materials


Tools:
Screwdriver
Wood saw
Sandpaper (or sander)
Sewing needles
Pins
Materials:
Balsa wood
Styrofoam ball
Small craft hinges (and screws)
Broken mechanical pencil (or small hollow tube)
Twenty pennies
Tape
Wood Glue
Red and yellow and black fabric
Yellow ribbon
Red, yellow and black thread
Red and white embroidery floss
Fishing line
Two wooden dowels
Two small eyelet screws
Fiberfill or couch stuffing
Step 2: The Legs


The upper portion of the legs are 5" long by 1" wide, shaved down at the bottom to 1/2". Shave off one of the 1/2" edges at a 45° angle. This joint will be the bend of the knee. Drill a small hole about an inch or so up from the bottom (smaller) end.
The lower portion of each leg is 5" by 1/2", glued on the angled edge of the last piece of wood. Use a little tape to hold the joint in place until it dries.
Since there is such a dramatic bend in the knee, if you let the legs hang down on their own, the knees will fall in front of the puppet's body. In order to achieve the more dynamic poses of Journey's robed traveler, I decided to counter-balance the legs so his "feet" pull back further at their resting position. For each leg make two stacks of five pennies and tape them to the upper thigh. This way, the pennies cancel out the weight of the leg below the knee. Make sure the upper leg falls relatively vertical when hung freely from the top.
Step 3: The Body


The torso is made from a 3 X 7 1/2" block of balsa wood. Place the wood vertically and mark a line a quarter inch in from each side. On the front of the block, mark a straight line from the bottom corner to the marked line you placed at the top. This should make a tall trapezoid shape, when you include the top and bottom edges. Cut along these lines so your block is 2 1/2" on the top and widens down to 3" at the bottom.
For the head, you will need a hollow shaft running through your Styrofoam ball. This is where the fishing line will run through the head, so you will need to line this shaft with a small tube to keep the line from cutting through the styrofoam. For this I took apart an already broken mechanical pencil and pulled out a small hollow tube from inside. Push the tube in one side of the ball, through the center and out the other. Shave off the excess and set it aside.
On the top of the body block (the side that's 2 1/2" wide) place a mark at its center and install an eyelet screw here.This will be where you install the head. Take a length of fishing wire and anchor one end to this eyelet. This will be the string that reaches up to the cross bar being used to control the puppet.
The head is attached by stringing the fishing line through it and letting it sit on top of the body block. Start by taking the excess of the plastic tube from earlier and stringing it on the wire on top of the eyelet. This will distance the head from the body, serving as a kind of neck. String the head on top of that, letting the head rest on top of the extra length of tube. The head should stand up straight as long as you are holding the fishing line up taut.
Step 4: The Skeleton


When the wood glue on the legs as dried, install a hinge at the top of each one with a pair of screws. Attach the free end of each hinge to the front edge at the bottom of the body. We are using hinges so that the legs only have one degree of motion: back and forth. be careful not to stress these joints too much. Balsa wood is soft, making it easy for the screws pull out. If need be you may need to reinforce these joints with some hot glue.
Take this time to check the balance of the legs. Hold up the wood block, letting the legs hang free. If the upper legs are not vertical, adjust your penny weights until they are. This would also be a good time to test that the string at the top of your puppet is strong enough to lift the entire puppet.
Lay the puppet down on its stomach and install a second eyelet crew at the bottom of its back. Anchor another fishing line here. Finally, attach two more fishing lines, one tied to each leg through the holes you drilled in each thigh. Again, this would be a good time to test your strings. Hold the puppet up by the head string and steady it with the string anchored in its back. When you pull the back string up, the puppet should bend over, but its head straight up and down. Next, hold the body up and gently tug up on each leg string. They should only move forward and back, but still swing freely.
Step 5: The Hood


I made the hood by adjusting a clever pattern posted by Tina Lam on tumblr.
Start by folding the panel in half, good side in, and pin together the edges on the concave side (The one straight edge on this pattern). Stitch together this edge with red thread up to where the straight portion ends, and tie it off there. This seam will run down the puppet's chest.
The curved section at the front will be where the hood opens up for the face to show through. You will need to pull these edges back and pin them flat. To do this, cut a few slits starting at the fabric's edge and ending on the line. This should leave you with a series of tabs that you can fold back along the curve without causing the fabric to wrinkle. Try your best to get the folded edge to follow the curved line of the pattern. Stitch these tabs down close to the folded edge. Again, use red thread so it hides in the fabric (I used black because I was out of red at the time). If you are less experienced with your needle work, you may want to turn the hood right side out and stitch from the outside, to make sure your stitches look good on the side that will show.
Turn what you have so far back wrong side out. Try to lay it down flat, stretching the outer edges so they are flat. All bunches of fabric should be in the middle. The outline of the fabric edge is the outline of the back panel you will cut out and stitch on next. Pin the hood you have so far down on top of this new panel of fabric, wrong sides out. Again, try to stretch out and flatten the outer edges of what you have stitched so far. The outline traced onto the fabric should be symmetrical now, even if the surface of the fabric is bunched up in the middle. Stitch down the outside of the hood along the sides and top, leaving the bottom open. When you flip the whole thing over now, your stitches on the other side should trace out a clean shape on a flat piece of fabric. Trim off any excess fabric and turn right side out to check your work.
Turn the hood bad side out one more time and fold up the bottom edge, along the curve marked at the bottom of the outline. Pin it down and stitch across, close to the fold. Your stitching here does not need to be very pretty, so long as you keep it near the edge. It will be covered up by ribbon later.
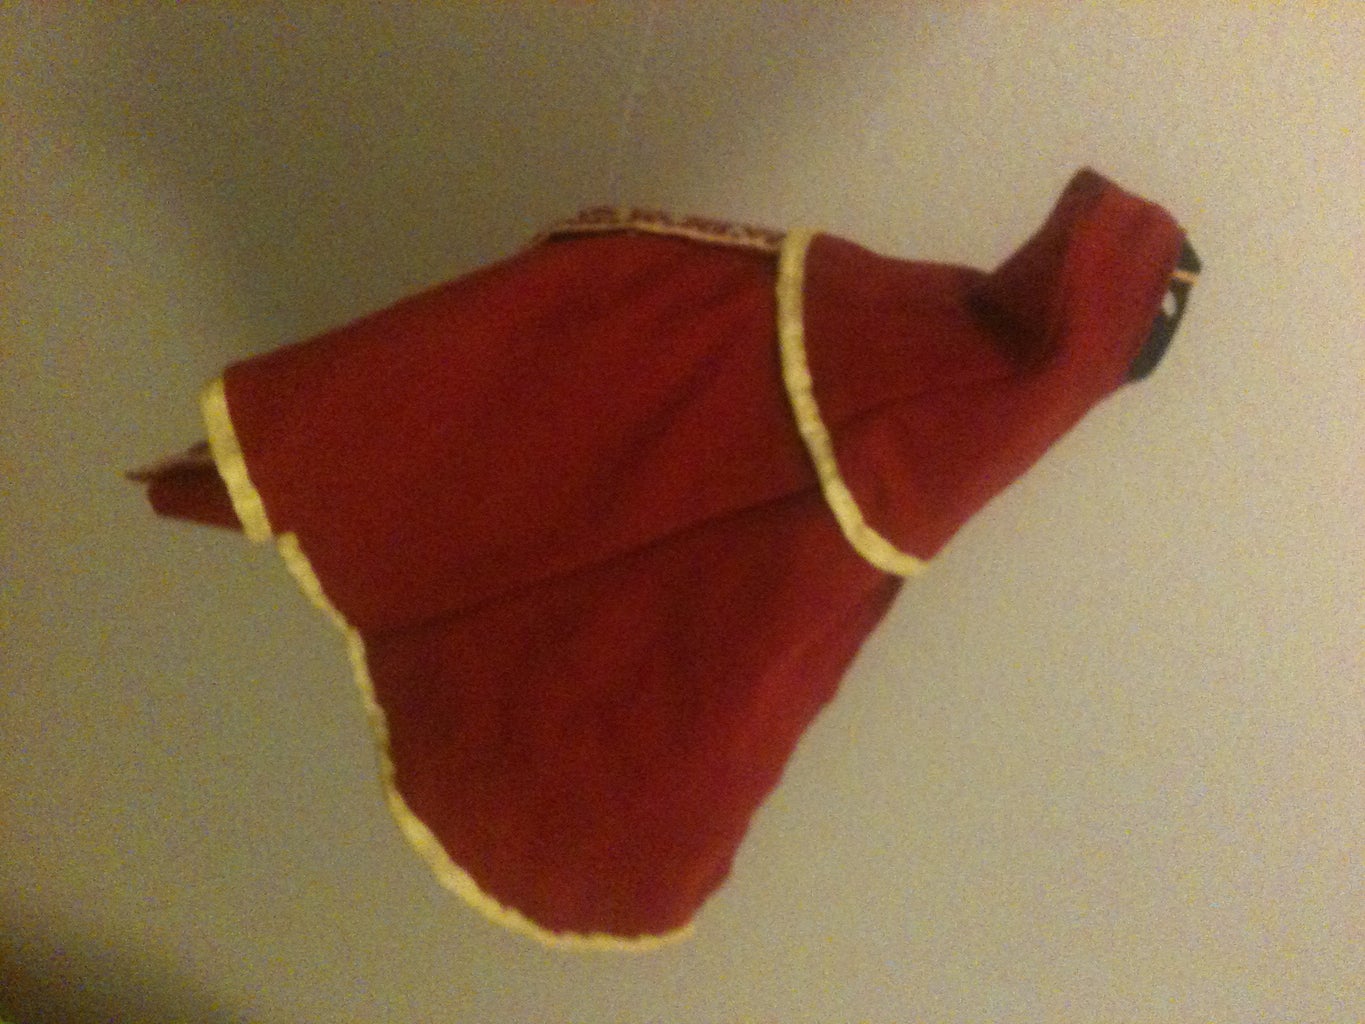
Step 6: The Cloak


The cloak is made in three somewhat-triangular panels. The stencil you make has a straight top edge measuring the distance between the neck and shoulder (about 1 1/4"). One side extends down at a 90º angle measuring from the top of the torso to the knee (about 13"). The edge opposite comes out about a 45° angle from the top, extending down the same length. Finish the stencil by closing the bottom up with a gentle curve.
Trace the stencil onto your fabric and cut it out, clipping the edge a short distance outside of the traced outline, about a half-inch or so. Flip the stencil over and trace and cut a second panel, a mirror image of the first.
To find the size and shape of the third panel, place the first two together so the straight vertical edges meet at the middle. Arrange the three panels with their good sides in, the first two mirroring each other on top of the third, larger panel. Stitch down the left and right edges with red thread. Next fold in the unfinished straight edges at the middle, along the line. Pin it in place and stitch it up with red thread. Again you may want to stitch from the outside for this part, since the needlework will show when you are finished.
Lastly, fold in the bottom edge along the curve and stitch that in place close to the folded edge, just like the bottom edge of the hood. Your stitching here will also be covered up by a ribbon.
Step 7: Pants


Since I have more experience with sewing than wood carving, I decided to shape the body as I would a stuffed animal. To make the pattern, start with a rectangle (or two, since the whole leg has two different widths. Find the full length of the leg, measuring around the bent knee and use that for the length of the rectangle. To find the width, measure the width of the front face of the leg, plus the width of one side. Draw out this basic leg shape outside this rectangle. The thinnest this shape will get is when it meets the rectangle around the knee area. No line should cross inside the rectangle.
Trace this pattern onto your fabric and cut it out, leaving a short allowance outside the lines. Cut out a similarly sized piece of fabric to pin together with your outlined panel, good sides in. Stitch down the left and right (curvy) sides, leaving the top and bottom open. Turn right side out and slip over the wooden leg of your puppet to make sure it is sized correctly. Do this with each leg.
Find the place on the fabric leg cover where your fishing line is anchored to each thigh. Thread the free end of the fishing line through a needle and pull it through the cloth at that point, so the wire reaches straight through the fabric to the leg. When you slip the cloth cover over the wood, use the open ends at the top and bottom to feed in some stuffing and fill out the loose pockets. Push in some stuffing at the front and back for the upper leg, but only the back for the lower leg to make a calf. Tuck in the loose edges at the bottom and stitch it closed with red thread.
The body cover is just a simple rectangle that wraps around the wood block. Just stitch the edges together around the back with a quick and dirty seam. This part will not show under the cape. Be sure to leave a gap in your stitching at the lower back where your eyelet screw and fishing line can poke through.
Add a little stuffing to the front of the body to puff out its flat stomach. Try to keep the stuffing away from the bottom of the body block, or it will block the leg from moving up all the way. Stitch the outer edges of the leg covers to the edge of the body cover using a slip stitch with red thread. If you end up with excess fabric try to work it to the back where the wrinkles won't show. Stitch the inner edges of the legs to each other and close up the bottom.
Finally, make another quick and dirty stitch across the top to seal everything in. This stitch will not show. Make sure to leave a gap for the eyelet screw at the "neck" to poke through.
Step 8: The Face


The face is just a simple black cover over the ball. You do not need to cover the whole head, because only a small portion of it will show through the opening in the hood. Take your black fabric and fold it in half. Place the ball in the fold like a sling and pin down the curve of the ball. When you stitch across this curve, you should have a little pocket in the approximate shape of the head. Trim off the excess and turn inside out.
I marked out the eyes using a pencil (the graphite reflects a little in the right light if you look carefully) but if you can trace in wax or chalk that would make a good temporary outline for you. Thread your embroidery needle with a couple threads of white embroidery floss and fill in the outline of the eyes.
The headband is just a simple strip of yellow across the forehead. You could use some of your yellow ribbon or embroidery thread if you have extra. I wound up using a yellow string I had leftover from other projects. Wrap it around the head and position it where you want it before putting in a couple of stitches back toward the edge of the black fabric. You want these stitches far enough back so that they are hidden by the hood.
When you have everything together, find the parts of the black cover that fall over the holes at the top and bottom of the head. Use a sewing needle to pull your fishing line through the fabric so it travels a roughly straight path into the fabric at the bottom, through the hollow shaft in the head, and out of the fabric at the top.
Step 9: Details and Assembly


The bottom of the hood and cape are trimmed with a yellow ribbon. Fold your ribbon in half lengthwise, sandwiching the bottom edge of the cape and pin in place. Stitch across with yellow thread through both sides of the ribbon and the fabric between them. Before you reach the ends of the edges you are trimming, fold the ribbon ends in on itself and stitch the folded edges together.
Stitch the top of the cape closed, much like you did with the fabric covering the body block. Again, leave a gap in the middle for the neck. Put a few stitches down at the top of the opening at the front to make sure the neck doesn't slip out through the split at the front of the cape. These seams will be hidden by the hood.
Drape the cloak around the puppet's shoulders and slip the fishing wire for the head through the gap. Find where the cape falls over the fishing line anchor on the lower back. Use a sewing needle to pull the line through the cape at that point.
Find the fishing line anchored at the neck and feed them through the neck tube and head ball. Lastly, string the line through a needle and pull it through the top of the hood before slipping it down over the puppet's head.
Step 10: The Scarf


Start by drawing a 1 1/4" wide rectangle drawn on your red fabric (bad side). Make the length can vary depending on how ridiculously long you want your character's scarf. Stitch down the long side of your scarf. Shift the seam so it runs down the center of the strip and flatten it out, leaving a crease down both sides. Stitch closed one end of the scarf and turn it inside out. The seam should be running down the center of the back of your scarf.
Draw out a 1 1/4" wide rectangle on yellow fabric, the same length as the red scarf. Cut it out with an allowance around the outline. Take this time to decorate the yellow portion of the scarf. Print out a few reference pictures and copy the design onto the yellow rectangle in light pencil or something washable.
If you want to try embroidering the scarf, be advised that it is a long and repetitive process. If you don't want to put up with stitching the whole thing you may have an easier time painting the pattern or embroidering the non-enchanted version of the scarf. To start thread an embroidery needle with a couple of strands of red floss. Begin by stitching the red lines down the sides, then move on to the red shapes in the middle. Fill in these shapes completely by stitching across it width-wise. Once you fill in all the red parts, thread your needle with white embroidery floss and add in the magic glyphs, stitching vertically on top of the horizontal red threads.
When the pattern is finished, fold in the edges of the yellow fabric and pin it down to the red scarf, covering up the big seam down the middle. Stitch together the sides with a slip stitch using red or yellow thread. You should now have a finished two-color scarf. Take the end of the scarf and stitch it to your puppet's cape, under the hood. Find the place where the scarf falls over the fishing line anchored to the puppet's lower back. Just as before, string the fishing line through a sewing needle and draw it through the scarf so it doesn't interfere.
Step 11: The Cross Bar


Eventually I plan on making a a more solid crossbar. I will cut notches in the dowels where they meet and glue them together, drill holes to anchor the strings and cut off the excess wood extending past the anchor points. The important thing now, though is that I have found a configuration that works.
With this setup, the angle of the upper body can be changed by tilting the crossbar forward and back. This is how you can make the puppet bend forward to walk against strong winds, trudge up steep dunes or takeoff into flight. The legs can be controlled by twisting the cross bar side to side, lifting the controller's arms and pulling up the legs alternately.

Participated in the
Puppet Contest

Participated in the
Game.Life 3 Contest


