

Introduction: K'NEX Universal Joint (Original & 3D-printed)


Welcome to this ible on how to make a K'NEX Universal Joint. If you don't already know what this is: It's a type of connection between two rotating axles, that may be able to move a certain amound of degrees. I've added a short animation (Credits to Dazz L - youtube) to make the last sentence more understandable.
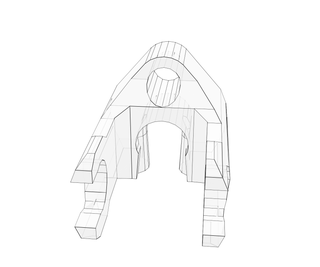
First I will show how to make a U-joint from original K'NEX pieces. The parts needed for this will be also summed up (not the structure around it) This begins at Step 1.
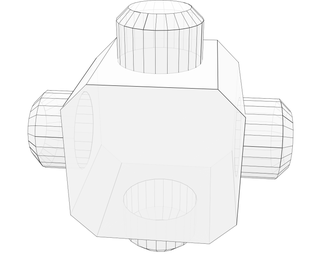
In the second part of this instructable I will give the .stl-file to the U-joint I designed my own. It was printed for me. It's much smaller, but with the same kind of functionality. The forces (torsion) it can take are probably a bit smaller, but I haven't done any tests. To directly go to this part, move to Step 3.
In the last step (4) I will summarize some pro's and con's about both designs.
See it in work here!
Step 1: Parts Needed

4x 2-way connector Orange/Brown
4x 3-way connector Red/Dark-Gray
1x 8-way connector White/Black
6x Clip with rod end Black
4x Green/Black rod
4x White/Silver rod
2x Rod (may be everything, suitable for your application)
Step 2: Construction


- Attach the "Clip with rod end Black" to the end of the longest rod (in your own design, this may be different, of course)
- Put an Orange/Brown 2-way connector on the rod end of the clip.
- Put another 2-way connector on the other end, and put a White/Silver Rod to attach it.
- With a little bit of force, put another White/Silver rod on the other end. (this is not an ideal connection, but it works)
- Put two Red/Dark-Gray 3-way Connectors on the white rods and put a "Clip with rod end" on it.
- Make this 2 times.
- Make a cross with a 7-way (3D-blue) or 8-way and 4 Green/Black rods.
- Attach.
Step 3: 3D Printed Piece


Note: The file for the pieces can be found on the end of this Step (as .stl files)
Well, there's not much to say about this. There were some versions of it, 4 to be precise, before I got the actual shape of the hinging part right. It's fragile to put together, but works as it should.
Step 4: Comparison: Original Vs 3D Printed
This was my first 3D printed piece, so it was a new (and enjoyable) experience. I must thank the guy with his 3D printer who let me print the pieces -all the versions- for free. But here goes:
3D printed
+ Much smaller and effective
+ Great flexebility in use (different rod sizes (white rods are possible!))
- Weak. can't handle alot of Torque.
Original K'NEX
+ Original K'nex. Nuff said.
+ Very strong
- Bends some pieces
- Very large and inefffective!
I hope you will enjoy this as much as I did, maybe print a piece (3 actually) for yourself (?) I will try to find a good use and maybe make a short video comparison. But I won't make any promises.
Thanks for reading/watching!

Participated in the
3D Design Contest


