

Introduction: LORA Peer to Peer Communication With Arduino


I'm a beginning electronics enthousiast and this is my first instructable so please don't be harch in your comments. In this instructable I'm going to explain how to make two LORA nodes communicate directly without TTN (the things network).
What is LORA?
LORA stands for LOng RAnge It's a modulation patented by Semtech based on CSS (chirp spread spectrum) modulation.
It is:
- long range
- low power
- low data rate
Because of these characteristics LORA is very well suited to use as communication medium for sensors. A sensor can literally run for years on a battery and ranges can exceed multiple kilometers. Also LORA can be used in license free frequency bands. On the things network you can find the free bands by country. I live in Belgium so I can choose between EU863-870 and EU433.
Example uses:
- Agriculture (soil moisture, tank level, temperature, humidity, wind direction,....)
- Tracking in combination with a gps receiver
- Anti theft (I've seen a concept to put it on expensive high voltage cabling to detect vibration)
- ...
There are many more applications, your imagination is the limit.
Step 1: Get the Hardware
Hardware:
- 2 arduino nano's or 2 arduino uno's pinouts should be the same.
- 2 esp breakout boards
- 2 lora cards rfm95 868mhz for other frequencies click here.
- 2 breadboards
- 2 usb cables for nano or cable for uno
- jumper wires male to female
- jumper wires male to male
- 2 antenna's (I use solid core 0.8mm or 20awg)
- header pins if not included with the arduino
Tools:
- soldering iron
- wire cutter
- wire stripper I use 102
- ruler
- solder
Step 2: Download the Software
Step 3: Install Arduino IDE


- After downloading the software go to the installer and double click it.
- Click I agree
- Click next
- Click install
- Click 2 times install to install the usb drivers
- Click close
Step 4: Install the Radiohead Library


- Open the arduino IDE
- Go to file -> preferences
- There you can find the path to the arduino folder where you should find the Libraries folder. (first picture)
- If the Libraries folder doesn't exist you should create the folder.
- Open the downloaded zip file Radiohead-master.
- Extract the folder to the libraries folder.
- Restart the arduino IDE.
- You can now find your library in the list (see 3rd picture)
Step 5: Create the Antenna
For the antenna I use some leftover cable of my 2x2x0.8mm or 2x2 20awg bus cable.
These are the lengths per frequencie:
- 868mhz 3.25 inches or 8.2 cm (this is the one I use)
- 915mhz 3 inches or 7.8 cm
- 433mhz 3 inches or 16.5cm
Step 6: Soldering

- Remove the resistors of the esp shield (see R1 to R3 in the red field)
- Solder the rfm95 chip onto the esp shield.
- Solder the pinheaders onto the esp shield
- Solder the antenna onto the esp shield. Don't use without an antenna you can damage the shield.
- If the pinheaders aren't soldered onto the arduino solder these too.
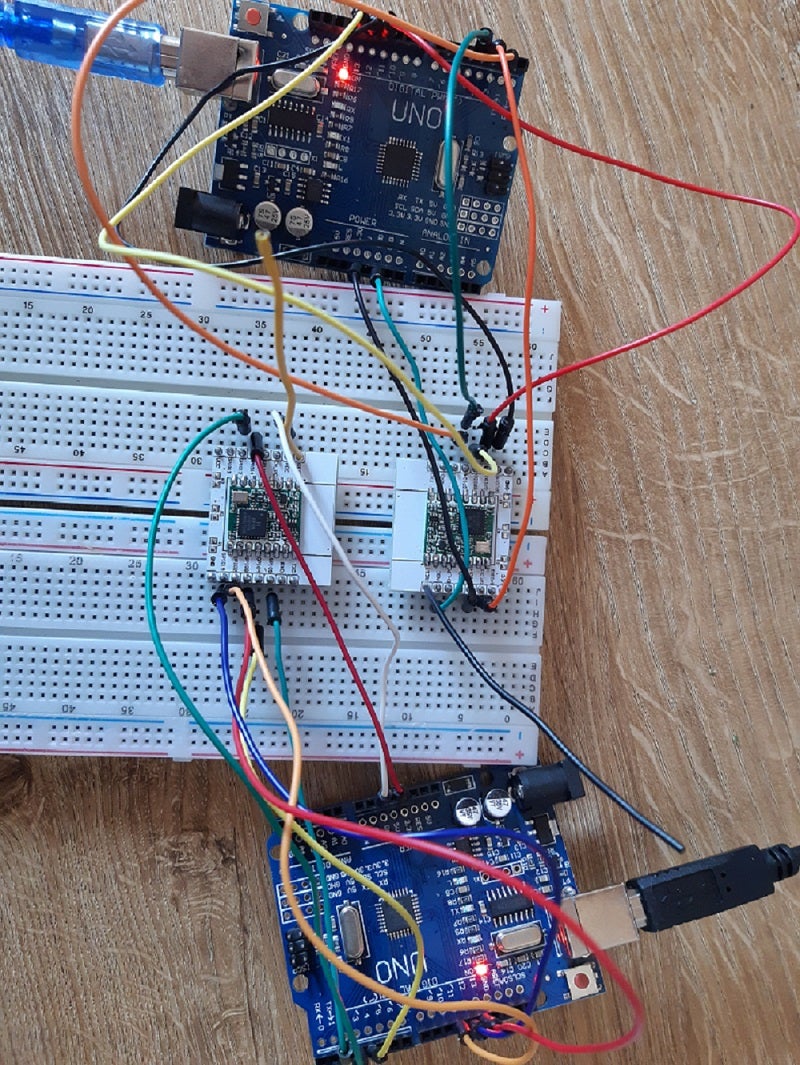
Step 7: Wiring

In the image you can see how to connect the arduino to the rfm95. For the completeness of this table I also included the pinout for when you are using the adafruit shield instead of the esp breakout.
Step 8: Coding


- Download the code
- Open the code in arduino ide
- Go to tools, board and select your board
- Go to tools, port and select the com port for your arduino
- Click the upload button (marked in red on the third picture)
- If all went well your can use the serial monitor and you see packets arriving on both server and client (marked in red on last picture)
Attachments

Step 9: Conclusion
In this instructable I showed the basics of LORA. If you like this instructable and/or if you like me to write more instructables of LORA or others, please press the like button.


