

Introduction: Laser Cut Card Game Box


Card games are great. Really fantastic. But you know what is not great at all a lot of the time? The boxes they come in. Especially the double tuck box. You know that monstrosity. The wide flat one with two decks next to each other and a divider that pretends like it will keep them separate. We all know it won't.
What is a crafty gamer to do in this situation you ask? Replace the box! Yes, my intense dislike of the double tuck box lead me to design some snazy laser cut wood boxes just so I did not have to deal with them.
Step 1: Cut the Box
These designed are meant to be cut out of 3mm material. My material of choice is Baltic birch because it finishes nice and is fairly cheap. I see no reason why you could not do this out of acrylic or really anything but I can only speak for the birch myself.
This is also the point at which you will want to add graphics if you are so inclined. I typically put the main logo on the top and a smaller one on each end so it is easily distinguishable on the shelf.
Attachments

Step 2: Assembly

What you will need:
- Wood Glue
- 220 grit sand paper
Before you dive into putting it all together hit all the pieces with a light sand. It is loads easier to get the bulk of this now before you have to deal with all the nooks and crannies of the assembled piece. It is also a good idea to apply a stain to the inner pieces if you want them to be a different finish than the outside of the box.
Before I start on the actual assembly here are a few pointers and clarifications about the instructions:
- When I say to glue a corner I mean to apply glue to the flat side of the tabs of a piece that are going to be in contact with the piece they are joining with
- Always dry fit before applying glue. Just to be absolutely sure you know you are putting glue on the right side (I speak from lots of experience)
- Clamps are great if you have them but some large rubber bands or a heavy book work great too to aid in the glue setting process
- Keep a wet and a dry paper towel handy to clean up excess glue
To assemble:
- Start with the inner pieces of the bottom. Glue the corners and get all 4 walls loosely connected. You are going to be assembling the whole bottom before any glue has a chance to dry fully.
- Glue the dividers into the long walls of the inner structure
- Flip the inner structure over and glue the inner bottom in place putting a bit of glue around the edge and on the tabs of the dividers that slot into it.
- Glue one long side of outer the bottom and both short sides to the outer bottom piece and to each other.
- Apply a bit of glue to the 4 surfaces of the inside of the partially constructed outer bottom (the inside of the 3 walls and the flat of the bottom making sure not to hit the center where the hole through the inner bottom will be)
- Slide the inner structure into the outer structure
- Glue on the last wall of the outer bottom
- Make sure all of your joints are snug. At this point the bottom is done. Clamp it, rubber band it, or put it open side down with a heavy book on it. It is done
- To assemble the top just glue all 4 of the short outer walls to the top. It is very similar to the outer portion of the bottom just with shorter walls.
- Check for any glue drips and clean them up. It is far better to get these now then have to sand them off later.
- Let it dry. Depending on the glue this could be overnight.
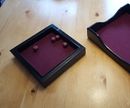
Step 3: Finish

You are nearly done. All that is left is to give your fancy new box a fancy, shiny finish. As you can see from the picture I really like the look of amber shellac. A few coats of it give Baltic birch (really any wood, lets be honest) a beautiful semi-gloss finish. I have given a few of these as presents and I have seen them stained and just clear coated with polyurethane. This is really whatever floats your boat.
To replicate this finish it will take about 4 or 5 coats of shellac so know that if that is the finish you want it is going to be somewhat of a time investment (but oh so worth it).
Step 4: Other Designs
I have made several different sizes of boxes that all assemble in much the same way so I have just attached them here for those that are interested. Good luck in your project and have fun gaming.


Participated in the
Gaming Contest


