

Introduction: Laser Cut Pivoting Box


I needed a small storage container for things like router and drill bits, glue and other small items I use in my workshop. I liked the design of a pivoting box, but the ones that could be bought were way to large, so I decided to make one myself. Fortunately I could use the lasercutter at my local FabLab in the evening hours. This pivoting box has 4 small compartments and one large, and two of the small compartments can be divided into 6 smaller compartments using some dividing walls. The pivoting box has a handle so it can easily be transported and top compartments have lids that uses 100% laser cut hinges, that are solid and don't rattle.
The box is made out of 3 mm. MDF, and uses 10 mm. m3 machine screws, washers and locknuts.
If you like this instructable, please consider voting for it in the "make a box" contest and the full spectrum laser contest.
Attachments

Step 1: Designing the Box


To design the box I started by making a sketch from the side of the individual boxes represented as squares. The rods, that assemble the individual boxes and make them pivot, are just represented as lines, to find out how long the assembly rods are. As seen in the sketch image, taken from my autoCAD document, the boxes pivot along the green line. The individual boxes are made using box joints, or finger joints. Normally when I design something using these types of wood joint, I keep all the joints in the whole design the same length, and I always make sure that the number of individual joints on a side is an uneven number, so the joints are symmetric. Afterwards I design each part and lay them out. When I draw something in AutoCAD I try to make a sketch first, then the individual parts, and lastly the layout for cutting all the parts.
Step 2: Hinge Design


The hinge is an improvement of a hinge design I saw online, for a previous project I made. The hinge functions, so that a circular piece with a square hole attaches to the side of the lid, so that the edge where the lid pivots is at the center of the circle, so when the lid is lifted the whole lid turns around one edge. It is a fairly simple design, but I came up with this improvement independently and I can not find other people who have done it so far on the internet.
Step 3: Cutting the Parts


For this project I used a laser cutter at my local FabLab. The laser cutter has a work area of 600*450 mm. and it can cut up to 6 mm. soft materials (plywood, MDF, acrylic etc.). I could almost cram the whole design into one sheet. But some parts had to go on another sheet. In this lasercutter, the part that is cut will get flashmarks on the bottom of the cut, because the material rest on a honeycomb mesh of metal. So when the laser burns through and hits the metal it will spark and leave a mark on the wood, even though it can be removed using a damp microfiber cloth. I wanted the flashmarks to be on the inside of the box, so some parts had to be mirrored. Because I had to do that, two of the plates on the two top boxes had to be cut, turned over and then engraved for the slot where the dividerers go in.
Step 4: Cleaning the Parts


Obviously laser cut objects often smell burned, some people like it some people don't. Personally I'm fine with it, since my workshop already smells of burnt wood. But in this instructable I will show how to clean the parts and remove the smell. All that is needed is a piece of damp microfiber cloth, it can easily wipe of the soot, and even though the edge is still charred, the smell is mostly gone, and after a few days in a well ventilated area, the smell is pretty much gone. The quality of the wood that is cut is also important. The binder in the MDF and plywood determines how much smoke and soot the cut will generate, and therefore how charred the edges are. The edge can also be sealed by using bees wax, to keep the smell in.
Step 5: Gluing the Lid


The lid is glued by adding the two small circles on the two notches, the most important thing is to make sure that the edge that the lid pivots around are set in the center of circle. I let the lid dry by having it sit over an edge, so as not to stress the joint.
Step 6: Gluing the Boxes


The second step in assembling the box, is to glue together the individual smaller boxes, that make up the large box. I use fast setting PVA glue, it works fine with wood, and it can easily be wiped off with a damp cloth before the glue dries. I assemble the boxes by laying out the different parts so they can be pivoted upright and meet the corners. Each joint gets a dot of glue. To make the top box, the lid should be inserted into the hinge, before assemblying the box, because the lid and box interlocks. When assembling some of the glue will squeeze out of the joints, to remove that I normally just clean it up with a wooden stick that is cut at an angle. A cotton swab can also be used.
Step 7: Final Cleanup

It is difficult to clean the edge where the joints are without breaking something so I normally assemble the box, and the give it one final clean.
Step 8: Inserting the Dividers


In the two top boxes, I have engraved a long recess in the wood, measured the depth to be 0.5 mm, and drawn some dividers that can slide into the recess. The depth of the recess might vary depending on the laser cutter and the material, so I recommend that the box is cut first, then measure the depth of the recess and cut some dividers that fit. I have chosen to use all the dividers in my box.
Step 9: Assembling the Box


To assemble the box I use 10 mm. m3 machine screws, washers and locknuts. The locknuts are essential, since they make sure that the nut will not unscrew itself when the box is opened and closed. I add a washer between the assembly rod and the boxes, and one before the locknut, to reduce friction when opening and closing the box. I also tighten the screw so the boxes will be kept closed by just the right ammount of friction. I also add a washer between the bottom box and the handle so the box will have some tolerance when opening and closing it. To assemble it, I first screwed in all the first assembly rods in the bottom box, then the next box etc. Then I added the handle.
Step 10: Conclusion
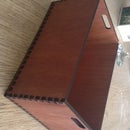
This is the final product. The box can open wide enough so it does not make it hard to reach small parts, it has dividers in the top boxes, a lid that uses a 100% laser cut hinge, and a handle. I am quite satisfied with the look of it, personally I have always liked the look of laser cut wood joints. and the charred edge. I am probably going to make some more of them for all kinds of stuff I use regularly.
If you like this instructable, please consider voting for it in the "make a box" contest and the full spectrum laser contest.
Improvement
An idea for improvents could be to add some sort of lock mechanism for the lids, so the box can be closed better, for when you are on the go. It could also be cool to have another box underneath where small drawers can be inserted, for screws, resistors etc.

Runner Up in the
Make a Box Contest

Participated in the
Full Spectrum Laser Contest 2016


