

Introduction: LittleBits + Lego Animated Head


Our shop TechShop Chandler was lucky enough to have been chosen by Instructables for their June build night, sponsored by littleBits!!! We were sent FOUR Deluxe littleBits kits... all of them containing switches, power supplies, lights, and motors!
We decided to make kids the focus of this particular build night, because lately we've been trying to find more kid-centric activities for our members who have families.
So - this is the first of our projects: Meet Mr. Tungsten... He is an animated head, whose eyes light up, propeller hat spins and tongue sticks out. This was a super fun project! It is perfect for kids of any age. It is simple enough to be enjoyable, but still enough of a challenge to make you think.
Step 1: Build Mr. Tungsten


I do not have a pattern for Mr. Tungsten - but he is pretty simple... you can make him however big or small you like, as long as there is room for his components... namely his tongue.
For this project I used these littleBits modules:
2 - RGB LEDs tuned to whatever color you prefer (you could make him scary with RED eyes!)
1 - DC Motor
1 - Servo
1 - Power Supply with 9V battery
1 - Button
1 - Latch
1 - Fork
3 - Wires
As you're building, test the fit of the Bits. Bracket them in place with the Legos, keeping in mind where your wires will come out - for ease of access.
Step 2: Mr. Tungsten's Tongue


For Mr. Tungsten's tongue:
I used a small piece of soft leather and covered it with red vinyl decal... What I was looking for was enough firmness in the material to hold it's position when moving around, but also soft enough to roll well over it's spindle. I cut the tongue to be longer than what appears out of his mouth - so there was plenty to roll up onto the spindle.
* Instead of leather, you could probably layer duct tape to get a similar look and feel.
For the spindle, I used the disc accessory that comes with the servo. I used a Nerf dart. I recommend using a small piece of a foam adhesive pad to secure the suction cup end to the center of the servo wheel.
I cut the dart to the size of his tongue and the inside of his head. I used a piece of masking tape to secure the tongue to the dart. Before you tape the tongue in place, ensure that it will be going in the correct direction, by turning on the servo and changing the position of the tongue on the spindle as needed. Keep in mind how the servo will need to lay within the lego wall (whether it is upright or to the side).
The Legos don't fit perfectly around the servo, so I used that extra gap to slide my other wires from the LEDs and the DC motor through.
Step 3: The Propeller Hat


Finally! Mr. Tungsten's crowning feature! His silly propeller hat.
As I built up the walls of his head, I added in pieces to begin building a shelf inside.
Make a pretty sturdy shelf for the DC motor, then bracket it in place to stand upright.
Attach the white piece that comes with the motor onto the spindle and stick a wooden kabab stick into it firmly... point side up.
Finish building his head/hat around it
Make his propeller - I used Legos, but it might be cool to actually make a little hat propeller out of cardstock or plastic.
Trim the kabab stick so that it doesn't protrude too much, but gives the propeller plenty of clearance.
If you're using Legos for his propeller, you will need to make a tape topper to fit the Legos firmly on the end of the stick.
I took a small strip of masking tape, folded it over a couple of times into a thin rectangle, the rolled it tightly around the tip of the stick - then I slid the Lego propeller on top... VOILA! C'est parfait!
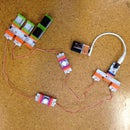
Step 4: Connect the Bits


Snap together your bits in the configuration pictured...
Power Supply + Button + Latch + Fork:
Fork 1: Servo attached to one fork
Fork 2: Wire + Light + Wire + Light
Fork 3: Wire + DC motor on the other fork
The wire Bits just give you a little extra length when needed.
Then turn on the power supply, press the button and IT'S ALIVE!...ISH.
Also, on the little servo Bit, there is a small switch where you can change between "swing" and "turn" modes... this will change what the tongue does.
And for even more littleBits experimentation, try a pulse control to make his eyes flash! Or a timeout Bit to make him active for only so long before it automatically stops.


