

Introduction: Makarov Handgun Leather Holster With Sheridan Tooling


Hi, folks!. My name is Roman and now i am gonna show you how to make a
Makarov handgun leather holster. You can buy this pattern here
To make it I need these goods and tools:
- A4 piece of 9-10 oz veg tan leather.
- Wing divider.
- An Awl.
- Utility knife.
- Woodcarving round chisel.
- №5 overstitch wheel
- 1mil and 6mil round punches.
- Paring knife or skiver.
- A piece of plastic 4mil*38mil*100mil size(or a leather strap with same size).
- Some clamps.
- Molding tools(such as bone creaser, sticks with balls, modelers etc. )
- A pencil or a pen.
- Dremel tool with sandpaper drum.
- Adjustable U-gouge.
- #2 edge beveler.
- A mallet or maul.
- A glove snap and setter for it.
- Some leather dye(your preferred color).
- Some kenda orly edge dye.
- Neatsfoot oil.
- Some pieces of sandpaper(different grits).
- Multi-size wood slicker.
- A thread and two needles.
- Thread cutter.
- Leather stamps and swivel knife.
- A gun or a bluegun.
- And, of course, a will to make an awesome holster!
Step 1: Start

And now let’s start to make it. First of all put your holster pattern onto a piece of leather and trace it with pen, pencil or awl.
Step 2:


Then cut it with utility knife. You may use a woodcarving round chisel to cut rounded corners.
Step 3:


Now we are ready to make some Sheridan style carving on a reinforcement piece. Damp it with wet sponge and transfer a pattern onto it. Then cut with swivel knife and make tooling with your stamps.
Step 4:

I put my logo on a belt loop with arbor press.
Step 5:

{"context":{"location":{"href":"https://www.instructables.com/editInstructable/edit/EARVB0QJRGOJ85G/step/6","origin":"https://www.instructables.com","protocol":"https:","host":"www.instructables.com","hostname":"www.instructables.com","port":"","pathname":"/editInstructable/edit/EARVB0QJRGOJ85G/step/6","search":"","hash":""},"jQuery112406143497708740027":1},"selector":"#editor-Object-1081"}
Step 6:


Mark the hole for the snap and cut it with 6mil round punch. Mark the outline from flesh side of leather to fit the snap. Cut the socket with adjustable U-gouge to drown the snap inside the holster. Punch 1mil hole in the locking loop. And now install the snap.
Step 7:

Now you have all your parts ready to assembly.
Step 8:


Mark all the stitching lines with overstitch wheel. You should have 16 holes on double edges of the holster.
Step 9:

Then burn single edges with your preferred method. I damp it with water and burnish with a slicker, then dye with kenda orly.
Now you can dye your holster as you like. I like to sew it first and then cover with some coats of neatsfoot oil.
Step 10:


Then dye is dry we are ready to sew. I sew witn 1 mil thick waxed thread. First sew reinforcement piece and belt loop. Don’t forget to glue it with contact cement!
Step 11:

Then upper part of belt loop is sewed wet with water the middle part of it.
Step 12:

Sew lower part of the belt loop and put in it you plastic piece or a leather strap.
Step 13:

Wet the inside of holster with water and glue the single edges together with contact cement. Clamp the holster with your clamps to better fit the single edges.
Step 14:

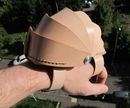
Now we are ready to mold the holster. Prepare your gun. If you use a real gun make sure that it is unloaded. I use an airsoft gun. I put needless leather stamp on the top of a gun to make a rear sight channel. You can use whatever you want the same size.
Step 15:

Put your gun into the holster and close the locking loop.
Step 16:


Using your molding tools make a desired shape of your holster.
Step 17:

Now I am ready to coat my holster with neatsfoot oil.
Step 18:

And let it dry for a night or longer if it is necessary.
Step 19:


And now it is ready. Thank.


