

Introduction: Make 3d Printed Topo Maps of Anywhere


When I was a kid I was dragged through more National Park visitor centers than I can remember. For me the highlight was the always the miniature model of whatever park it was. By exploring that model you could experience the landscape as if you are a bird (or Superman) and able to fly around. Standing in Yosemite valley looking up at Half Dome is amazing, but you only see it from one angle. The 3d model in the visitor center reveals so much more.
When I got into 3d printing one of the first "killer apps" I discovered was printing 3d maps. Everyone asks me what a 3d printer is good for. Well here is a great use. With a little time and some free or inexpensive software you can make your own 3d model just like the cool one in the visitor center. What's more you can make such a model of anywhere in the world. And depending on the data available you can sometimes make a model much more accurate than the one in the visitor center. For instance my model of Yosemite valley is so accurate that you can see individual trees.
You aren't limited to anywhere in this world, with a little digging you can find data for the Moon and Mars as well.
Step 1: How Does This Work?
If you want to see an exact step by step walk through of this process you can watch either of my two videos linked above.
I made my first 3d terrain models following the instructions given by Gregor Luetolf. His techniques work well and I still use some of the same software, but I have made some improvements which I will detail here.
The basic process is as follows:
1 Get digital elevation data for the area you wish to model. You will typically download that data as a GeoTiff file.
2 If necessary, crop the section of interest from the larger dataset.
3 Convert that data to a DEM file.
4 Make a 3d model based on the data.
5 Print and enjoy.
Step 2: Get Your Data: OpenTopo


There are many places online you can get DEM or digital elevation model data from and as you look around you may discover more. The best and easiest to use one which I have found is http://opentopo.sdsc.edu/. It has a really easy to use interface which allows you to crop the section you want and download just that chunk. It also has really good tools for thinning the data before you download which is great because it has some datasets of unbelievable size and it is much nicer to crunch through them on a super computer rather than melting your laptop. Opentopo has a huge collection of LIDAR datasets which record the surface of the earth in such detail that you can sometimes see individual trees and cars. While some LIDAR data may have data points every foot the coverage is very limited. In 2000 the Space Shuttle flew a mission called the SRTM or Shuttle Radar Topography Mission where they surveyed almost all the land areas of the planet. You can download this data from anywhere in the world but it is at a relatively low resolution of 1 data point every 100 feet or so. It is great for mountains, but you can't see smaller features very clearly.
Using their web tools select the area you want and download it as a GeoTIFF file. Depending on the dataset you are using you may have a option to set the grid resolution. This determines how detailed your model will be. You will need to play around some to determine how much data your comparatively puny little computer can handle. Start with their default setting and play from there.
Since this file is produced by a massive Unix supercomputer it comes zipped up as a .tar.gz file (sometime known as a tarball). This is just the Unix version of a .zip file. It isn't hard to unpack, but you may need a tool like 7zip for windows.
Step 3: Get Your Data:The National Map

If you are looking to model an area where you can't find data on openTopo you could check The National Map. It is another good source of DEM data (at least for the US). The interface is easy to use and you can select from elevation models at various different resolutions. The problem is that it doesn't crop the data for you, you need to download the files and open them in QGIS to crop them and extract the data. You may also have to merge different tiles of data and then crop them. This is possible with QGIS but it is a royal pain. But the National Map gives you access to datasets which you can't get on OpenTopo so it is worth knowing about.
A note for our international friends: Both of these sites are sponsored or funded by the US government and as such they concentrate mostly on data from the US. OpenTopo has the SRTM project data which is worldwide, but the more detailed datasets are all from the US. I don't know if these websites can be accessed from outside the US. Some countries have their own download sites where you can find data from your own part of the world. But no matter where you are in the world if you look around you can probably find some data to work with.
Step 4: Crunch Your Data


So hopefully by this point you have a downloaded and un-zipped GeoTIFF file. Some of you may recognize that a TIFF file is a standard raster image file format. So it should come as no surprise that you can actually open this file with Photoshop or a similar program and look at it. It is a greyscale image where the darker areas represent lower elevations and the lighter areas represent higher points. It is possible to run this image through one of myriad programs which convert greyscale pictures to 3d models. This is a useful method as a last resort, but you are left to guess at the scale of the z axis. You can fudge it, but the x and y axes of your model are accurate to millimeters shouldn't the z axis be as well?
My preferred workflow takes the GeoTIFF and converts it to an Ascii DEM file. There are a couple of programs you can use for this. The best one to start with is 3DEM . Although this program is no longer being developed it still works most of the time for what we ask of it. You simply open the GeoTIFF, admire the pretty picture and save it is an ASCII DEM. It couldn't be simpler, except that it doesn't work with all the data sets out there.
The other option here is called MICRODEM. It does all kinds of things which I'm sure are amazing to folks who understand them. For our purposes you just load your GeoTIFF, which they refer to as opening a DEM (just to make things confusing) and then save it as a USGS ASCII DEM. Also worthy of note, there is a function to output your file directly as a .obj 3d model. This option is located in the appropriately named "Caveat emptor" submenu. It is sometimes useful when the next step fails, but it usually produces models with a lot of artifacts which need to be cleaned up by hand.
Step 5: Make Your Model

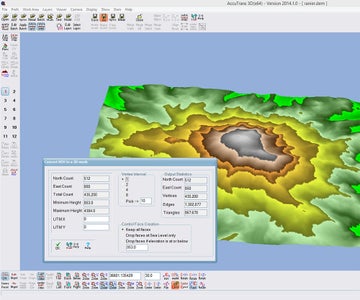

The best program to make a 3d model from DEM data is AccuTrans3d . This is another quirky program which does all kinds of amazing stuff. Like MicroDEM it has the feel of someone's personal tool box that they wrote to do what they needed to do at the time and then released to the world in case someone else had a use for it. You can down load it and try it for free, but if you decide to use it please send the the author the $20 he asks for it. It isn't very polished and the interface is difficult at times, but once you get the hang of it it does a great job of tuning our DEM data into an accurate 3d model.
The workflow starts with opening your DEM file as a USGS 1 degree ASCII DEM. Then use the "Convert to 3d" function to make your model. This tool's dialog box gives you the option to thin out the data a bit which you may choose to do if you have a big data set and a memory challenged computer. After you have made the conversion I suggest the "Adjust object" tool to shrink your model somewhat. AccuTrans sees things actual size so if you try to export a mountain it isn't going to fit on your printer, and it may cause a painful death to any modeling software you open it with. Scale by whatever factor you need to get the model onto your printer. Accutrans' internal units are meters, but those are interpreted as millimeters when you import your model into other software.
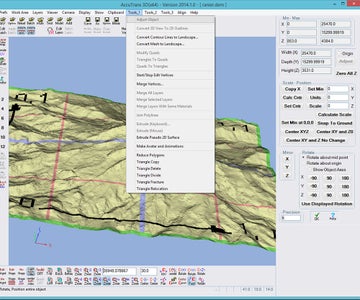
Right now your model is just the top surface of the terrain so it isn't printable. Luckily we can use the curiously named "Extrude Pseudo 2d surface" tool to fix that. You can choose whether to flatten the base for printing on an FDM printer or merely thicken the surface for more economical printing on industrial printers like Shapeways uses. The algorithm which flattens the base is a bit annoying because it projects every polygon from the top surface to the bottom. This doubles the size of your file, when it really only needs to add 4 data points to define the flat rectangular bottom as a single polygon.
Step 6: Set Up for Printing


After you export your model from AccuTrans3d you may want to do some post processing before printing it. I usually use Blender to merge all of the polygons on the bottom of the model into one. This cuts your model's size in half with no loss of quality. It makes it easier on your slicer software particularly if your model is large to begin with.
The other thing to consider is which orientation to print your model. For large scale things like mountains I tend to print them in real world orientation. This avoids printing overhangs and the layer lines mimic the topographic lines of a map which is cool. Really detailed maps made from LIDAR scans are sometimes better printed on their side because the sides of a print reproduce more detail than the top.
Step 7: Print Your Map


Once you have your model set up it isn't hard to print, but there are a few tricks. Because your base will be a large square or rectangle it may have pull up problems when printing. PLA is a more forgiving material for this type of print as it tends to shrink less. Choose a build plate with good stick characteristics such as PVA glue on glass. And keeping the whole printer warm or at least away from cold drafts can help with the print. You can save time when printing maps like this by not printing any base layers. You don't get as neat an appearance on the bottom but it can save hours of printing. It also helps keep the model on the build plate because there is less material to shrink and pull on the early layers.
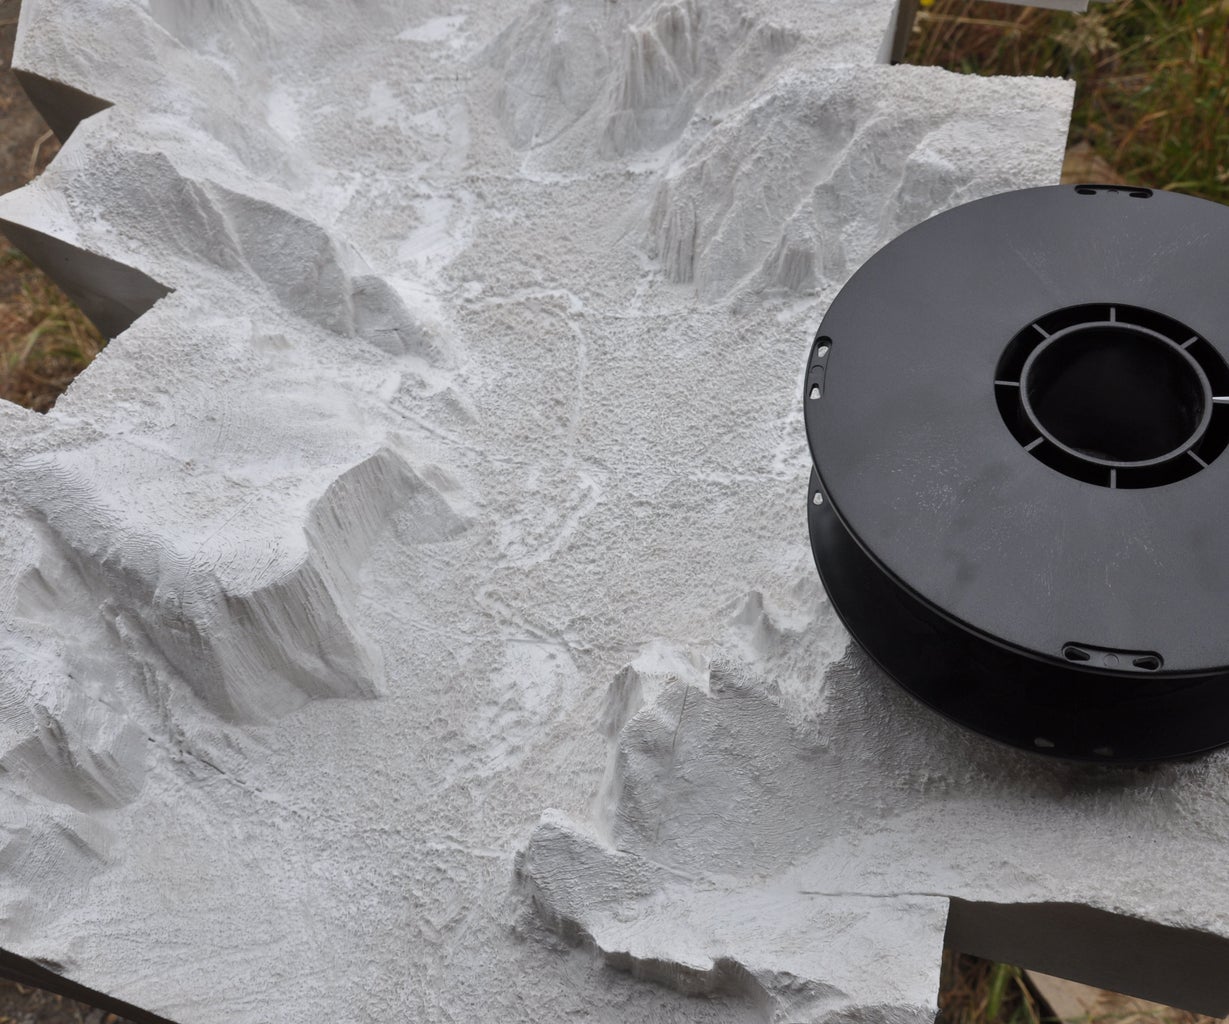
This Yosemite model was made by gluing together 35 separate prints. Each print took about a day on a Replicator clone. The LIDAR data is so accurate that you can see individual trees and cars in parking lots.
Have fun with the technique and be sure to let me know what you come up with.

Runner Up in the
3D Printing Contest 2016


