

Introduction: Make a Costume Mask Using Pepakura (Bonus: Foam Armor)


So, I've been eyeing this process called Pepakura for quite a while now. It's all over the internet and instructables already but if you're new to the term basically the idea works like this: You create a 3D model, or take an existing one, and "unfold" it. Unfolding refers to the process of breaking the surface area of the 3D model into manageable pieces that can be printed onto paper or cardstock like puzzle pieces. Each piece has tabs, numbers, and fold lines so that it can be put back together in an actual physical representation of the 3D model. Awesome right?
Well, it doesn't have to stop there. At that point all you have is a paper model, but with the use of things like fiberglass resin you can harden it and make it strong, and then you can apply things like papier mache or Bondo (an auto body filler) and basically make it into a real thing.
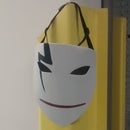
Here I'm using it to make a mask from the character Juggernaut, from the game DOTA: II.
Edit: I have attached a file for anyone looking to make this themselves. I did not create this file myself but it was freely shared so I will share it here.
Attachments

Step 1: Getting Started With Pepakura


To use Pepkura you need:
- Tamasoft Pepakura Viewer or Designer which can be downloaded here.
- Cardstock
- Glue
- Respirator
- Fiberglass Resin
- Fiberglass cloth
- Auto Body Filler
- Sandpaper
- Patience
- Paint
This is not going to be a terribly in depth look at Pepakura since there are already many good tutorials out there. I will, however, give some specifics on some of the things I did that may be different than elsewhere.
The complete process of Pepakura goes like so:
- Obtain "pep" file
- Painstakingly cut out 20 or so pages of tiny abstract shapes
- Fold along dotted lines
- Glue tiny numbered tabs to matching numbers
- Paint 2-3 layers of resin on the outside
- Paint 2-3 layers of resin on the inside adding fiberglass cloth after the first layer
- Trim off excess cloth and coat with auto body filler
- Sand smooth
- Continue recoating with auto body filler and sanding until it loses it's polygonal shape and looks smooth
- Paint
Now, I am very cheap, so rather than buy cardstock I printed the files on the backs of scrap paper, traced them onto manilla folders I happened to have around and cut them out of that.
When I glued the pieces together I used ordinary Elmer's/School/PVA glue because I had it on hand and didn't feeel like dealing with the added complications a hot glue gun would cause. PVA glue doesn't dry very fast so rather than putting a big glob of glue on and then holding the tabs together for upwards of five minutes a piece I used a toothpick to apply small amounts of glue to the tabs so that it would dry faster. I'm sure this sounds like I just told you I cleaned my whole house with a toothbrush, but honestly, gluing all of those tabs together is tedious regardless of how you do it. Using a toothpick didn't make it any more so.
Step 2: Resin/Bondo


The resin step was intimidating at first because of all of the work I had done up to this point combined with all of the hazmat warnings. All I can say is, you should definitely use gloves and a respirator but it's not really all that scary.
Because of my cheapness again I actually didn't use fiberglass cloth. I happened to have fiberglass mesh tape (the kind used for drywall repair) on hand and thought, "Hey, that's the same thing right?!" Well it's not really the same thing, but it did seem to work just fine. The one thing that seemed to work for me was the fact that it was self-adhesive, however it's also not as dense as the fiberglass cloth since it's, well, mesh instead of cloth.
All I did was paint a layer of resin on the outside, let it dry. Paint another layer of resin, let it dry. Cover the inside with fiberglass mesh tape. Paint a layer of resin on the inside, let it dry. Paint another layer of resin on, let it dry.
Once the resin was done I covered it with Bondo, sanded it smooth. Filled in low spots and rough areas, sanded it smooth. Sprayed it with some rust colored primer. Added some more Bondo and sanded that. Realized it still wasn't smooth and this step was going to take FOREVER. Decided that I was actually happy with the look since the roughness seemed appropriate for a barbarian swordsman type character, decided to moved ahead with the next step of the build...
Step 3: Painting and Details


I gave it a final coat of primer and then set to adding the detailing. I used a pencil to draw the lines from the chin up to the forehead and under the eyes. Then I used my dremel with a grinding wheel attachment to carve into them. It's pretty shallow since the whole mask isn't terribly thick but I just wanted to give it some depth.
The paint I used was Rustoleum Appliance Epoxy in Almond. I happened to have it on hand and thought it might look kind of cool. I actually really like the way it turned out. It feels really thick and it has a glossy finish. I just used regular red acrylic paint for the detail and then sprayed some sealer over that.
I sprayed the inside black and glued some craft foam on the front for padding. I went back and forth a lot with what kind of straps to use. I debated about doing some sort of elaborate leather strap and buckle method but in the end I thought cloth ties fit better with the overall look of the character. I basically just made two long, tubes of fabric and flipped them inside out so the hem wasn't visible. then I glued them in using a two part epoxy.
Step 4: Bonus: Vambraces!


For the vambraces I thought foam would be a good material to use. I used a sheet of 6mm craft foam from the craft store as well as some 2mm craft foam I had on hand.
First I cut the sheet of 6mm foam in half. Then I traced it onto the 2mm to get the right size. I drew the design onto the 2mm foam and cut it out with a utility blade. I applied contact adhesive to the inside of both sides, let it dry until it was tacky and then pressed them together. Then I took my dremel and smoothed out the edges using a sanding drum bit. I did the same for the other one and then made the two pieces that cover the hand using the same method.
To form it I softened it up with my heat gun and then bent it around the edge of the table. This project taught me that if you want your foam to curve you need to curve it way beyond what you want it to actually look like because it will tend to flatten out somewhat.
Before painting it I used my utility knife to add some "battle damage". Pro tip from WMArmory: One way to add this sort of detailing is to make a cut with your knife and then heat that area up with your heat gun. This will cause that area to "pop" apart.
For more intense battle damage I actually cut a shallow diagonal slice out of the foam and then used the heat gun on it.
I sealed the foam with several layers of black Plasti-Dip and primed it with some metallic Rustoleum so that any wear on it would appear to just reveal metal underneath. I painted the exterior black again, painted the interior red, and then gave it a black wash.
The hand cover got attached using a small piece of vinyl webbing harvested from the strap of an old laptop bag. The straps were done with the same vinyl webbing but I then sewed some fake leather over them and sewed velcro on to fasten them. All of the vinyl webbing was attached to the foam using hot glue.
Step 5: Extras


There was plenty more to do but this was for my brother-in-law so my part was mostly complete. I helped him heat-form some more foam pads into shape which he then painted and glued onto fabric for the leg armor plates. He made the fur that goes over the shoulders using a furry rug. The wide belt was made from more craft foam. The sword was made in the same way I made this sword (it's one of the character's many available swords).
Step 6: Cosplay Your Heart Out!

Here's the completed costume! Once again, I only made the mask and the vambraces, and helped with the leg armor. I had fun, learned a lot about pepakura and will hopefully be doing more with it in the future. Both pepakura and foam are so versatile that even if you're not building this specific costume there are tons of other projects and costumes you can use them in. So get out there, glue bits of paper together, and make things!

Participated in the
Halloween Costume Contest

Participated in the
Superheroes and Supervillains Contest


