

Introduction: Make a DC Motor.


In this instructable I will show how to make a nice and functional DC motor.
This motor can be used for demonstration purposes, as a class project or just to have it over your desk, it is really simple to make.
Materials:
-Slab of wood.
-Magnet wire (also known as coated copper wire)
-Metallic sheet (or 2x threaded hooks)
-Magnet/s
Tools:
-Plain wood saw.
-Jewelers saw
-Metal saw.
-Sandpaper. (dremel or other tools if available will do the job easier)
Step 1: Video
Step 2:

First draw the zones you want to cut through over the wood, the shape doesn't really matters as long as there's a concave or half cylindrical shape inside so the coil can spin freely.
In my case the body is 4.5cm tall, 3.5cm wide, and 7.5 long, the circumference has a radius a bit less than 3cm.
Step 3: Making the Body of the Motor


Cut out the main block of wood, as you can see, mine is quite irregular, to solve this I marked the zones that needed to be reduced and sanded it with ~100 grit sandpaper.
TIP: Place the sandpaper over a completely horizontal surface to end with perfectly level surfaces.
Step 4: Making the Body of the Motor 2


Next we're going to cut out a piece of the block so the coil is able to have a place where it can spin freely.
I cut it with a jewelers saw, with no doubt, a band saw can do it faster and better, so, if you have the opportunity, use one.
TIP: It is very important to keep the saw straight and leveled , constantly check you are doing it correctly.
Step 5: Finishing the Body of the Motor


Unless we use precision tools we'll certainly end with some imperfections, to solve this I used a dremel with the sanding bit and ring for the rough zones and sandpaper wrapped on a circular tube for the final details, as before, it is important to keep it straight and level to avoid inclined zones.
Step 6: Making the Brackets


I preferred to use metal plates as a contact for the coil instead of threaded hooks just because the aesthetics, but the overall performance isn't better than with threaded eye hooks as the coil tries to climb on the metal part and the increased surface area increases friction.
If you want to do so cut two plates of plain steel, these will have to be fitted on top of the piece so cut them a bit longer than the top.
This steel is from an old computer case, I used it to make electrolysis cells which ended rusting.
I used a dremel to cut them and then I sanded them with 200 grit sandpaper to give them a nice look.
Step 7: Making the Brackets 2


Next, if we want the coil to stay in place, we must bend the plates making a "U" shape.
To make it easier I made a mold using a brick of used wood and my jewelers saw, then I place the metal stripe perpendicular to the cavity and press it in with a steel rod, when it's in and still pressing it I bend the sides, and with some soft hits with the hammer I align them, that way I can get two identical pieces.
This operation has leaved some marks on the steel, so I sanded them again.
Step 8: Last Details.

Now, we want to get the metal pieces into the wood, to do so, we mark the shape of the pieces on the wood with a pencil and them we cut a groove to fit them in with the jewelers saw, make sure to cut the groove at the middle of the piece.
Two screws on each side will help to keep to hold the plates in place.
To finish it all I paint the block with a diluted mix of black paint and acetone to conserve the grit of the wood.
P.D: Sorry about the lack of pictures of this steps, I forgot my camera.
Step 9: The Magnet

I inserted the magnet at the base of the block, I drilled a small hole and attached some staples at the other side so the magnet wouldn't move, I made the hole big enough so I could reverse the polarity of the magnet.
This is a tiny old magnet, to take advantage of the magnetic power of the coil I recommend you to get a bigger magnet.
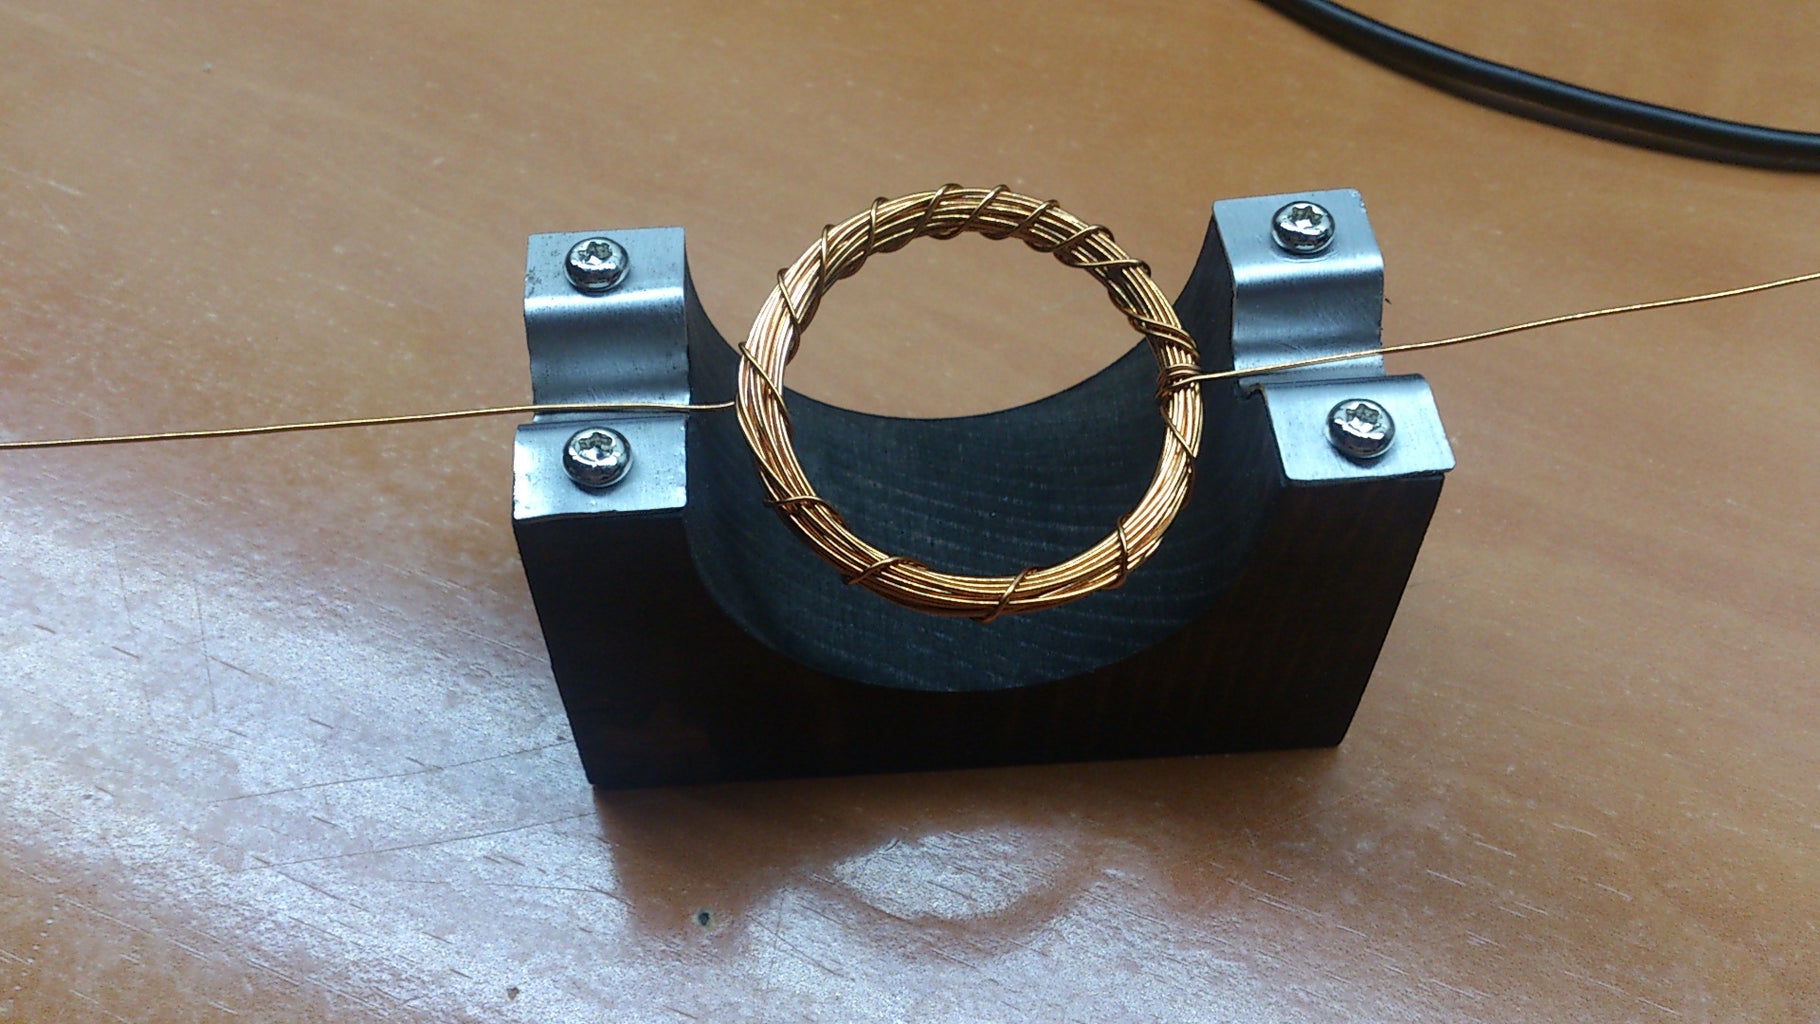
Step 10: The Coil

To make the coil I wrapped thick copper wire around a cylindrical object and tied the ends so the coil was tightly wrapped.
A very important step is to scrape the enamel of the corresponding parts at the ends of the wires, if this step goes wrong the coil will be useless, in order to make it work, you must scrape all the enamel from one of the ends, then, you must scrape only the top side of the wire, as represented by the image, do this with an x-acto knife or similar tool.
IMPORTANT: Don't scrape towards your fingers in order to avoid getting cut, you can also use sandpaper.
Step 11: How It Works
When the coil spins it makes contact with the metal plates or the eye hooks, when this occurs current flows though the loop and creates a magnetic field, tis magnetic field, in presence of the one created by the magnet, makes the coil move. The wire has been scraped at a certain position to make the coil move in one direction, repeating the cycle each time the loop of wire makes a turn.
To make your motor work place the coil (with the corresponding scraped ends) inside the brackets or eye hooks, then connect a battery to the ends, you might need to give it a little push to get the motor working.
If the coil is balanced and well designed it can spin with a single AA battery without problems, although you might need to make several adjustments to achieve this.
Step 12: Experiment!


Try with several configurations, observe what happens when the polarity of the magnet or the battery is reversed, try with different coils, etc...
For example, the coil I made was way too thick, and a lot of current passed though it, it works, but my power supply screamed for mercy, it also had a few amount of turns, so I decided to improve the design.
By using a thinner copper wire I gain resistance to avoid too much current flowing through it, I also gain magnetic flux, due the increased number of turns, this will translate into more efficiency. The problem with this coil is the wire is so thin it won't be able to sustain itself, so I took two pieces of the same wire I used to make the other loop and I joined them together by twisting them, by making this I make sure there's no electrical contact between both ends. Now, I poke holes though the coil with a needle and pass the wire though, it takes some bending, but after a while I tie the wire to the coil and align it properly. This coil is almost complete, I now just have to scrape a bit of the wire inside the coil to solder its ends, then I scrape the ends of the wire as I did with the other coil. It is more tedious, but the improvement in efficiency is worth it.
DANGER: Don't use LiPo batteries or any other source that could be damaged if short circuited, a single 1.5 volt AA battery should work just fine, specially if the coil has many turns and has a considerable resistance.
Step 13: Thanks for Watching
Thanks for watching and I hope this information has been useful, magnetism is a fascinating phenomenon.


