

Introduction: Make a Rainy Day Tissue Box Guitar! - Great for Kids


I'm going to show you how to make a guitar with your kids out of a tissue box, paper towel roll and some rubber bands! My mom and I used to make these all the time when I was little - They're really fun!
Attachments

Step 1: Tools & Supplies

The stuff that you need is pretty simple...
Empty tissue box (the long kind)
Empty Paper Towel Roll
3 Rubber bands (You may want another in case one snaps)
Tape
Something to cut with
Marker
A kid ready to have fun! (The inner kid in you works too :D)
Step 2: Cut Off the Cellophane


Cut around the edge of the opening to get out the plastic that the tissues come through. This will make it easer to strum.
Note - If you're doing this with a small child, make sure you do all of the steps that require use of the knife/scissors.
Step 3: Cut Hole for the Neck


Now you're going to be making a hole in the box for the neck/paper towel roll. Go to one of the small sides of he box, and put your paper towel roll on top. Use your marker to trace around the roll, and then cut out the circle.
Step 4: Insert the Neck

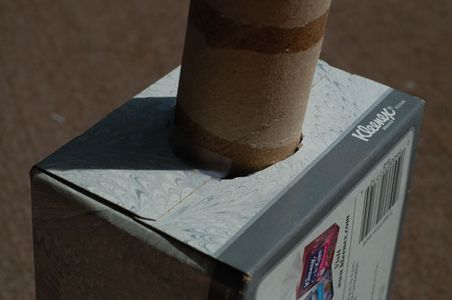

Now, just insert the neck into the hole about 2 inches. If there is much space around the neck, and it doesn't stay well, stick tape around it to help stop it from sliding.
Step 5: Add the Strings


Now you can add the strings, just put a rubber band around the box, one on each side of the neck. You can also put one straight in the middle by cutting halfway through the neck right at the base, sliding a rubber band into the slit, and taping over the where you cut. (You can go ahead and play it now)
Step 6: Extra Things to Do

Here are a few extra things you can do to make your guitar even better!
1. Add bridges (suggested by lemonie)
2. Make different tones using different types of rubber bands (suggested by lemonie)
3. Add space for strumming
Adding Bridges
Bridges raise the strings of a guitar off the base, allowing the strings to vibrate freely in the air, producing better notes.
What you need:
2 index cards
tape
1. Fold up the index cards so that they are a little less than a cm wide.
2. Place under strings at the very top, and bottom, of the base of the guitar. Then tape to the box on the sides, where the tape won't interfere with the strings.
Different Notes
Using different size and thickness of rubber bands will change the notes they produce when plucked.
What you need:
Different rubber bands!
1. Just replace the old strings with new ones
More Strumming Space
If you're like me, the strings would sometimes hit the box as you played, this is how I solved it.
What you need:
Your cutting device from before
1. Figure out which way you hold the guitar, and then determine which side faces down as you play.
2. Cut out as much space as you need from the bottom of the hole. (when you're holding it, NOT the thin side) I needed about a centimeter.
Step 7: Decorate!

Use whatever you want to make your guitar prettier! Stickers, crayons, paint, whatever you have!...You're done! Now you can go and start a rock n' roll band!


