

Introduction: Make a Bunch of Kitchen Utensils From a Block of Wood


Somehow every project I start ends up being more complicated than it needs to be. We needed a pair of salad tongs and I had a nice block of wood so this should be quick and easy... As it turns out, the piece of wood I wanted to use was nicer than I thought so rather than put yet another weird shaped scrap of wood back on a shelf, I made as many things as I could from this single block of wood.
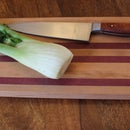
I ended up making a pair of salad tongs, two wooden spatulas, a rice paddle, a pair of chopsticks with a chopstick rest, two wooden spoons, a butter knife, and a jam spoon (spoon on the front, knife on the back... scoop and spread). Not wanting to fill my house with sawdust, I made it at TechShop.
For this project you'll need:
a 3"x3"x12" piece of wood (I used what I think is quilted maple)
a band saw
a belt/disc sander
a dremel with a carving burr
some sandpaper
and a food-safe finish (I used Good Stuff, though walnut oil or salad bowl finish or something would be fine)
Let's get started!
Step 1: Slice Up the Wood


Draw the profile for the spatula/salad fork - straightish line for the handle, a curve at the end. Use a band saw to cut along the line. When you cut the first slice you end up with a stumpy wedge that turns out to be the perfect size for a rice paddle. Cut four slices with a similar curve. I freehanded it but would have probably gotten better results if I had drawn lines to follow.
Take the remaining chunk of wood, draw a straight line down the side, then slice it in half following the line. Take the flat piece and draw the profile of a pair of spoons (I cheated and traced a wooden spoon I like). Cut the shapes out on the band saw.
I used the remaining weirdly shaped piece of wood to make a pair of chopsticks, a butter knife (who needs a wooden butter knife?), and a jam spoon (the bastard child of a tiny wooden spoon and an offset spatula).
Step 2: Cut the Spatulas, Rice Paddle, and Salad Forks


Draw (or trace) the shape of each utensil on a slice of wood and cut it using a band saw.
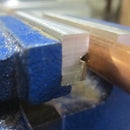
Step 3: Sanding... So Much Sanding...


Sand everything roughly into shape. Use a disc sander, use a belt sander, use sandpaper, stick the thing in a vise, hold it in your hand. Do any combination of those things, then repeat. Who thought it was a good idea to do something that required this much sanding?
Step 4: Hollow Out the Spoons


Use a carving burr in a rotary tool to roughly shape the inside of each spoon. Do a pile more sanding to smooth out the spoon, this time entirely by hand. I alternate between holding the spoon in my hand and in a vise.
Step 5: Finish Everything


Go over everything one last time with some fine sandpaper (I used 320 grit). Clean the utensils with compressed air. Apply a coat of food-safe finish. Wait for the finish to dry, then add another coat.
Once the finish is fully cured, wash everything and start using it.


