

Introduction: Make an IOS App With Swift


Think about it. After completing this tutorial you can tell your friends you built an app. Just sayin.
In this tutorial I will take you through the process of building an iOS application. Along the way, I'll make sure to teach you about the theory and methods behind some of the concepts involved in application development that we perform, rather than just telling you to do something and hoping that you'll understand. First let's start with some background:
Swift is Apple's latest and greatest programming language. Back in 1985 when Steve Jobs founded NeXT computer after being muscled out of Apple (some say), he began to develop some frameworks for his computers in a language called Objective-C. Objective-C was created in the early 1980s by Brad Cox and Tom Love, but later licensed to NeXT. These frameworks eventually morphed into a subset of Objective-C called Cocoa. Cocoa was used for a long time in developing Macintosh applications, but when Apple opened up iOS to 3rd party non web-based apps with iOS 2.0 they had developers use Objective-C and Cocoa Touch, a touch-oriented version of Cocoa to build native iOS apps.
Objective-C has been in use all the way up to iOS 8. With the release of iOS 8, Apple also released their brand new Swift as you probably know. However, Objective-C can still be used to develop iOS apps for the time being. In fact, I still primarily use Objective-C as many libraries are written in it and Objective-C is compatible with older devices. Swift introduces some very cool new features and functionality, but for the purposes of this tutorial we'll be taking a very shallow dive into it. Let's get started.
Step 1: Download Xcode

Xcode is the name of Apple's Integrated Development Environment (IDE). Xcode can be used to develop both iOS and Macintosh applications. Apple provides this software for free, but a developer must pay $100 per year to both test their apps on physical devices, not simulators, and publish apps to the App Store. Also, Apple takes about a 30% cut on all paid app sales. I recommend reading a little about Xcode before downloading it: Xcode Link
The best way to get Xcode is to download it from the Mac app store. Here's a link. Unfortunately, Xcode is a rather large program so you'd best be prepared to wait a bit! You can read through the tutorial to make sure you understand everything while it's downloading.
Step 2: Let's Get Started!


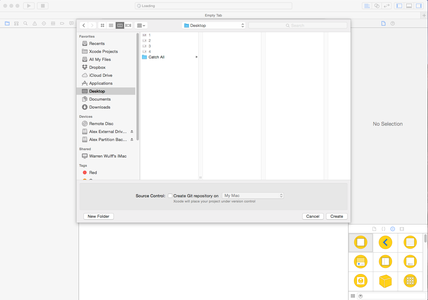
Click on the Xcode icon. You will be presented with a window, as shown in the first picture. Select "Create a New Xcode Project"
Ensure that Single View Application is selected under iOS and click next. (Image 2)
For Product Name enter "Swift iPhone App" (Image 3)
For Organization Name simply write your name. Don't worry about the bundle identifier. That's for submitting or distributing your app, which we won't worry about. (Image 3)
From the language drop down select "Swift". As you can see, Objective-C is still an option. (Image 3)
Under the Devices drop down select iPhone. (Image 4)
Click Next, and choose a location to save the project folder. (Image 5)
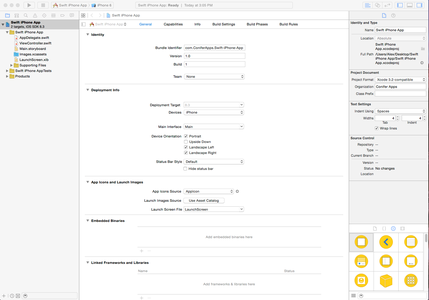
Upon doing all this you should be presented with the screen shown in image 6.
In the top toolbar at the left side you should see the words "Swift iPhone App". Next to it, there should be some more text that either says just "iOS Device" or an actual device like iPhone 6, iPhone 5, etc. Click this dropdown and select iPhone 6. The selection "iOS Device" will not work for you (that's how you upload your app to a real device for testing), but the simulators will.
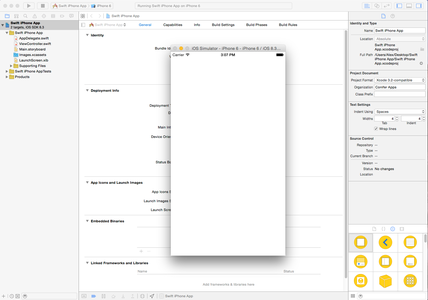
Click the play button in the top left hand corner. If all goes well, the iOS simulator should pop up and display..............a blank screen. With the status bar. Kind of anti-climactic. (Image 7) But don't worry, we'll get there. Congrats! You've created your first iOS app!
Step 3: Working on the UI.


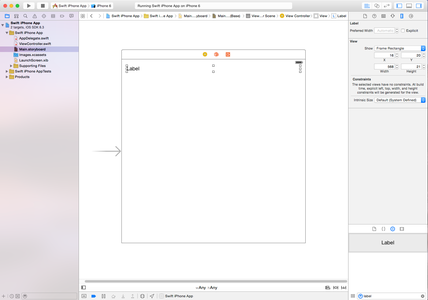


In the left hand pane you should see a list of files. Select the one that says Main.Storyboard. (Image 1)
Back a very long time ago creating the UI (User Interface) with just code was the norm, but now Apple has made it very easy to both design and program your app right from Xcode. Storyboard files comprise the UI of your app. You add UI elements into things called UIViews which manage these UI elements. You can then hook up UI elements to the actual Swift code to make them interactive. While most app developers worry about the features of the app before designing a functioning UI, for the sake of learning we'll do it in reverse. First we'll set up the UI.
In the bottom right corner of the screen you should see a text box. Above this will be a bunch of UI elements called objects. Enter the search query "label", and hit enter. You should see the UILabel object pop up. UILabels are used to display text. (Image 2)
Drag the label from the search box to the top left hand corner of the white box shown on the screen. (Image 3)
Pull the label's right boundary using the little white dots surrounding the label to the right side of the screen. (Image 4)
Now search for "Button" the same way you did label. Drag the first result that says "Button" to just below the label. No need to stretch the button's boundaries. (Images 5+6)
Lastly for this step look at image 7. See where the note is and click that. If you can't see it, read this: In the top toolbar, near the right corner you should see something that looks like lines of text selected. Next to it is a button with two overlapping circles. Click the overlapping circles.
With this being done another window side-by-side with the storyboard should pop up. By clicking that button you brought up the assistant editor. The assistant editor is used to open two files at once, and boy does it come in handy, especially when hooking up UI elements to the code. Your assistant editor will have a white background, but I changed mine to a cooler color scheme just for the heck of it.
The file open in the assistant editor is called a view controller. View controllers are files that, well, control the views in your app. Each view is a separate window in the app. For example in the Messages app the initial screen with all your chats is one view, then when you click on a name it takes you to another view where all of your messages with that person are shown.
Step 4: Hook It Up!


Left mouse click and drag or control click and drag on the label to the location shown in image 1. Ensure that the blue line is in the correct place before you let go. Is it? If so, then let go.
You should now be presented with a dialog box. Type "label" where it says name, and click connect. (Image 2)
What you did here was create an IBOutlet. This tells the compiler that you want to be able to access this UI element, and you will be referencing it as "label". You then use the term "label" to refer to it later when actually writing the program.
Do the same click and drag routine with the button, except this time note the different position to drag it to as shown in image 3. The position doesn't really matter all that much, but it looks nicer if you do it this way. Let go and another dialog box should pop up.
Before adding a name, under the Connection dropdown select action. While outlets let you access the UI element (change its text color, text, background, etc), actions are how you interface with interactive elements like buttons in the code. Essentially, they provide an interactive bridge from the user interface to the program. Inside actions you can tell the compiler that you actually want to do something. For example, when a button is tapped you can tell the compiler to change the background color to blue, but when a different button is tapped change it to red. For the name enter buttonPress, and click connect. (Images 4+5)
Notice how I capitalized the first letter in the string buttonPress, and the second word is capitalized. This is called camel case. Camel case is used because white space (the space character) is not allowed in many aspects of programming. Camel case is a way to easily differentiate between multiple words when you can't use spaces. The first letter is always not capitalized, and subsequent words are capitalized. For example, thisIsCamelCase. Don't get this confused with classes. Classes always capitalize the first letter and any subsequent letters. For example, ViewController is a class name, as is UILabel and IBOutlet.
Ok. Let's keep trudging onward. Clicking connect should insert the following code into your program:
@IBAction func buttonPress(sender: AnyObject) {
}
Step 5: Start Coding!

Inside those curly braces is where you'll be putting your code. Every time the button is clicked, the code inside those curly braces is executed.
Hit the return key a few times after the first curly brace in the IBAction to give yourself some room. Then, either type or copy and paste the following code:
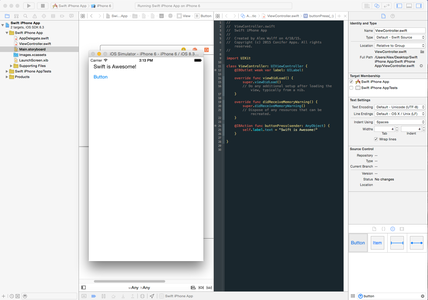
self.label.text = "Swift is Awesome!"
If you typed it, you may have noticed as you went along that a window popped up under the text with some suggestions. This is called autocomplete and it saves boat loads of time when programming. Hit the square in the upper left next to the play button to stop the current build of the app (the blank one) that we had running. Then, hit play to rebuild and run your new app. Once the iOS simulator appears and loads, try tapping the button. The text should change from boring old "label" to "Swift is Awesome!". There you have it! Now let's run through what the code is actually doing.
Things called objects are the basis of most computer programming languages. Thus, these languages are dubbed object-oriented programming languages. C#, C++. Swift, Objective-C, and Python are all object oriented languages along with hundreds of others. Objects have things called properties. A property is essentially a variable that stores a bit of information. For example, the text property of your label stores some text. The label object has many other properties, like backgroundColor and frame. You can view some of them by typing self.label. and then using the arrow keys to scroll through the autocomplete list. Properties are accessed using dot notation. The self object contains the property label, which contains many other sub-properties, which in turn have some sub-sub-properties and so on. For example the frame property of the label object controls the size of the label. You could get or set the height of the label by typing self.label.frame.size.height . Obviously it is so so so so so much more complex than this, but that's a basic summary.
When you type: self.label.text = "Swift is Awesome!" you are updating the text property to a string. The "" sequence is shorthand for making a string object, which you then set as the text property of your label. You can put whatever text you want inside the quotation marks.
Another important thing in the view controller file is this:
override func viewDidLoad() {
super.viewDidLoad()
// Do any additional setup after loading the view, typically from a nib.
}
Inside these curly braces you can add code that executes as soon as the view loads, hence viewDidLoad. Well, I think that's enough for now.
Step 6: You've Done It!
There you have it. Your very first iOS application. Now go ahead and brag about it!
From here, I strongly encourage you to play around in Xcode and get a feel for the place. Try updating the text of the label inside viewDidLoad and see what happens. See if you can figure out how to programmatically change the text color.
Thanks for reading! I really hope you enjoyed this instructable and learned something in the process. Please please please like and comment to show your support. If you have any questions whatsoever, post them in the comments and I will do my best to answer them. To check out some of the projects I have been working on you can visit My Website. Oh, and by the way, I'm only 15. What's your excuse?
Even though this tutorial was in Swift, I strongly suggest that you learn Objective-C first if you want to get into programming. In fact, you need to know Objective-C if you'll be doing iOS development. Swift is still a new language, so most of the nice repositories on GitHub and other places are not written in Swift. Swift also only targets just iOS 8, which excludes a significant portion of iOS devices from downloading or running your app. While we did actually program a few things, we didn't even scratch the surface of iOS app development. While it's not necessarily that complicated there's just so much stuff. Lots and lots of stuff.
For more stuff, Youtube has some incredibly talented programmers that publish great tutorials for free, so it might be worth your while to check some of those out. Another great resource is www.raywenderlich.com, which also has some awesome tutorials available for both beginners and advanced programmers.

Participated in the
Coded Creations


