

Introduction: Makey Makey Arcade


Hello everyone! In this guide, you will learn how to build an arcade style controller and wire it to make an arcade style gaming setup that will be able to work with most online games. It's a great activity to do for fun or with K-8 students; I did this activity with a middle school STEM club and the kids loved it.
If you like this Instructable then please consider voting for it in the contest it is entered in. Thank you for reading!
Supplies
- Makey Makey Kit
- Laptop
- Hot Glue Gun/Sticks or Tape
- Aluminum Foil
- Non-conductive Poster Board
- Permanent Marker
- Scissors
Step 1: How It Works
When you use a keyboard the computer the keyboard is connected to will register keystrokes and print what you type on your screen or if you are playing a game use those keystrokes as commands for actions. What the Makey Makey does is act like a second keyboard being plugged into a computer. So when you interact with the controller connected to the Makey Makey, a computer will interpret your actions as keystrokes and act accordingly. In order to better understand the controller you are building, let's discuss a single button instead of the entire controller. Think of the button as a part of the circuit. A single button is a circle cut out of aluminum foil and it's connected to a terminal that is mapped to register, for example, that a spacebar key has been hit every time the circuit with the button is completed. The terminal on the Makey Makey is positively charged. The person using the button must wear a wristband that is connected to the ground on the Makey Makey. This way when the person touches the button they act as the conductor that completes the circuit between the Makey Makey positive and the Makey Makey ground thereby initiating a keystroke.
Step 2: Arrows and Buttons
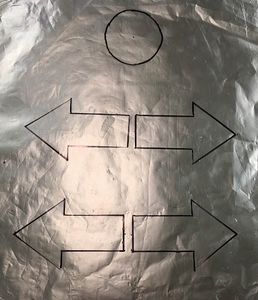
Use the permanent marker to draw 4 arrows and 1 button on the aluminum foil. Then use scissors to cut out the arrows and button.
Step 3: Wristband

Cut a strip of aluminum foil approximately 2in by 6in. Fold the aluminum foil so it becomes a 1in by 6in strip. Use a dab of glue or tape to make the strip into a wristband. The band should be very loose even though the foil needs to have contact with the skin in order for the controller to work. The idea is that although the band is loose it can be cinched through folding so it becomes tight against a users wrist, and the band can be repeatedly taken off and put onto different wrist sizes. Alternatively, the wrist band can be held in the hand or held by someone who is not using the controller but is maintaining physical contact with the user (skin to skin contact will maintain the circuit since humans are electrical conductors).
Step 4: Assembly

Use hot glue or tape to attach the aluminum foil arrows and buttons onto a piece of nonconductive poster board. You can attach the arrows and buttons to match the configuration above or make your own. When placing the arrows and button, part of the foil must touch the edge of the poster board. This is so the alligator clips that will be attached to the arrows and button in the next step can reach and make contact with the foil. This is also a good time to add any logos or designs to the poster board.
Step 5: Wiring


1. Attach one end of an alligator clip to the wristband and the other end to the ground terminal of the Makey Makey.
2. Attach one end of an alligator clip to an arrow and the other end to the corresponding terminal on the Makey Makey. For example, the arrow on the controller in the upwards orientation should be connected to the up arrow terminal on the Makey Makey.
3. Attach one end of an alligator clip to the circle button and the other end to the terminal labeled space bar on the Makey Makey.
4. Use Makey Makey's power cable (red) to connect the Makey Makey to a USB port on a computer
Step 6: Have Fun
The controller is now complete. Remember that the user must be wearing the wristband so that they complete the circuit when they play. This arcade setup will work for any game that uses the four arrow keys and spacebar and can be modified so it works with different keys by wiring it differently. If you need help feel free to ask in the comments.
Here are a few free online games that this works well on:
- Super Mario Bros*: www.uta.edu/utari/acs/ASL_site/Homepage/Misc/Mario/index.html
- Ultimate Sonic: www.allsonicgames.net/ultimate-flash-sonic.php
*remap the jump to space bar within the game

Participated in the
Classroom Science Contest


