

Introduction: Making Iron Oxide a Different Way (& Supplement)


Iron oxide is available in many forms, grades and colours. It can also be made many different ways using various processes, these include chemical - electrical and naturally occurring surface oxide from weathering. Iron as an element literally has it's own chapter of varied and unique chemistry which makes it very interesting. It's many uses include -Making Other Chemicals -Reagent in Chemical Reactions- Civil & Mechanical Engineering - Pottery - Arts & Crafts are to name but a few. - One of its notable practical uses is joining and cutting Steel-when it is combined with another metal-this process has also been highlighted on many popular science programs'
Iron is also used in it's oxide form in old Audio & Video cassette tapes.
Iron is within the centre of our Planet, in Meteors, Our Sun and our bodies blood for carrying oxygen.....
The point of my instructable is to be a practical and educational guide to making a usable small scale product. I will be demonstrating a very unique way of producing this very useful chemical.
Step 1: Gathering Materials


The most ideal form of iron for this part is an alloy of iron & carbon known as steel. Steel has many other alloying agents apart from carbon depending on it's application - whether it needs to be wear resistant - high tensile - malleable - weather proof - stain proof - tool steel etc. For this stage you will need a big handful of mild steel turnings (Medium to fine) not big course ribbons, this will not work. Coarse steel wool is excellent if you have some to hand instead. A hand full is about 200-300gms
Step 2: Necessary Tools
What You needs as follows;- Safety Gear
Leathers and Cottons only --//cotton overalls - welder a gloves - googles
Tongs / Pliers / Hammer/ Steel Block /Lump Hammer / 10+ Ton Press /Fine Sieve / Map Gas Torch/ Air-Line /75mm X100mmX 3mm Steel Pipe-Or Empty Co2 Mig Bottle Cut at Both Ends.....Fire brick or Breeze Block. Small steel plate to slightly cover cylinder. Ventilation.
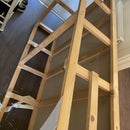
Step 3: Your Set Up


To Begin with you will need a base- this consists or one or two fire bricks or something like a breeze block then a steel block say 3/4" A4 size steel plate, which sits on top. Then you will need your Cylinder/ Pipe this will hold your Steel-Wool/ Turnings. See images above. You will then need to charge your cylinder like you would a cannon or musket! Using the tongs/ hammer - the reason is because it needs to be compact because it does condense when being heated. Now you will need a small 1/2" plate to cover allowing a small space for your air-line Blower......
Step 4: The Process Involved
This part is tricky - I stumbled upon this by accident! whilst experimenting one day!! I then did some research to find if this was a widely known process and if so who discovered it. Well I did find him, he was an American guy call William Kelly - he basically pioneered this process and called it [AIR BOILING] it is the pre-cursor of the Bessemer Process ....but like all brilliant people he fell foul of foul play!!! Bessemer was granted the patent first even though Kelly Proved he had been developing and experimenting for years. It's is known now as The [BASIC OXYGEN PROCESS] Please Google Kelly ;-)
William Kelly (inventor) - Wikipedia, the free encyclopedia
https://en.m.wikipedia.org › wiki › Willia...
Step 5: The Chemistry


Air boiling is the process we will be carrying out with our CHARGE. Basically like an industrial foundry, we shall be in a roundabout way boiling our steel wool/ turnings....... As we ignite our steel via the bottom of our cylinder using a torch or (Gas & Air) once a bright yellow portion starts to propagate - we then proceed, to gently kindle it with our air supply - the air we breathe contains 20% Oxygen - Nowadays they use up to 100%. But our 20% is ample. As we continue the temperature increases to several hundred degrees and is Self- Sustaining - Without the Gas Torch but continued with the Air-Line. The temperature increase is caused by the oxidation of the carbon and In-turn our Iron - "It Literally Starts To Boil" as the oxygen bonds to the iron Fe+O2 ---> Fe2O3 it thus becomes Fe+II/III Oxidation State ;-)
Step 6: Air Boiling Continued.


As you can see the temperature increases - my container is now orange this is where you safety gear is a necessity -as stray sparks can be quite a surprise and a good sign we are proceeding the right direction and ventilation is important too!!!! We must be gentle to regulate the air and now and then tamp down the turnings that have not sunk and boiled!!!!!
Step 7: Finishing & Processing Iron Oxide


As we approach the end of this journey we now have to process our product, which at the moment is approximately 65% iron oxide and 35% inclusion of solid Steel fragments (precipitated higher alloys and unchanged Starting materials. Now all we have to do is perform several refining steps, involving a PRESS - SIEVE - each time removing large metal fragments not converted. Repeating several times until we have a very reasonable fine powder consisting of FeO-FeO2/O3 with some slight impurities .... What we end up with is a product which can be used by the Back-Yard scientist Or home experimentalist.
>>>>>Science Supplient<<<<<< :- If the steel weighed before conversion, then weighed after the oxidation process the difference in weights will be the total amount of Oxygen that has bonded to our original starting material. Divide this by 16.0 and this is how many Moles of [O] you have or by 32.0 for moles of [O2] gas that has bonded.
Next to work out overall Yield, The solid products, (lumps of higher alloys, large Metal pieces and original starting materials left after Pressing & Sieving Several times until no more powder forms, is still unconverted metal ........By weighing and subtracting this, from the original weight you started with before the process was carried out and we end up with a percentage of conversion Example [Before Conversion, I had 545gms After Conversion, the solid Weight was 645gms which is a difference of 100gms 100/16 = 6.25Mols of Oxygen or 3.125M or Oxygen Gas as this is a diatomic molecule.
--- many thanks for watching please enjoy and comment ;-D
Step 8: Alternative to a Press


When I wrote and published this instructable I soon realised that If anyone wanted to reproduce my instructions, that they may have problems with the final stage of refining /extracting a usable product without the aid of a press. I have since thought long and hard and recently revised this process. One available alternative is a Ball Mill - if the chunk we start with is broken into simpler chunks, then added to a Ball-Mill I would expect after some time we could end up with a fine powder. However I have not tried this as I have no mill and can't be fussed with making one specially for this one use.
I have another tried and tested method which is not by any means quick but it certainly does the job All we need is:
1) An area of Hard Standing such as a concrete floor. 2) A chunk of Pallet wood, the spacer piece 5" square or there about's. 3) 2 Lump Hammers. 4) A Thick walled Metal Tube (Truck Gudgeon Pin). and 5) A Pin or 1/2" Drive extension which fits inside the G/pin).
Method: View Pictures Above:-
1) First Lay block on Hard Standing/Floor.
2) then place Lump Hammer on its side, on top of the wood.
3) Take Gudgeon Pin or Thick Walled Metal tube, vertically place on hammer face.
4) Then Fill tube half way with chunks of our product.
5) using internal Rod or 1/2" drive extension, place inside tube.
6) Using other lump hammer Hit very hard with a determined, vertical blow/ impact. Making sure to hold everything steady, and rotating the pin 90o on each impact. Next we turn the hollow pin or tube upside down and repeat, each time you will be left with a pile of powder underneath, make sure you collect this each time you invert the tube after every few impacts.
A methodology and keen eye is necessary for Removing large metal pieces and sorting through to determine if more steps are needed. As paying close attention to grain size helps with the refining process and the quality of the finished product.
This method may seem long winded, but its a tribute to patience and versatility, eventually you will have fruits from your labour.......


