

Introduction: Making a Parting Tool Out of Carbide Saw Disk


For several years a 4" circular saw disk with carbide teeth has been sitting in my drawer. A friend who finished one job with it gave it to me. I tried to used it once on my angle grinder. It was so dangerous that I put it away immediately, and all but forgotten about it.
I have recently bought a mini lathe and I find that parting is a real pain. My ground bit broke in no time, and the 2 mm HSS parting blades are difficult to mount on the tool post without a special holder. Then, I suddenly remembered my old friend and his saw disk, and thought that I could make some useful parting tools with it. Carbide is much harder than HSS, less prone to wear and tolerates higher temperatures without softening.
The idea is to cut one segment out of the saw disk with a carbide tooth on it, and secure it onto a shank made from mild steel milled to 3/8" (8 mm) square one and half inches long. This new tool can then be mounted onto the back toolpost of my Taig lathe.
Step 1: Make a Tool Bit Blank From Segment of Circular Saw Disk


First, the tool bit is prepared.
The saw disk has flat bevel blades (i.e. none of the teeth have angled cutting tips). If you have an ATB blade with beveled teeth, choose the segment with flat bevel; the angled ones are not suitable.
The carbide teeth on the saw have a narrow kerf of about 1/16", and the saw body is even thinner. This is ideal for parting because after the tooth has cut into the metal, the backing metal will not rub against the sides of the groove, otherwise friction would reduce turning torque and heat up the workpiece in the process.
I secured the small circular saw disk on my bench vise. With an abrasive metal cutting disk on the rotary tool, I cut out a 0.5" by 1.75" segment of the disk (the tool blank) with the radial edge of the carbide tooth lined up with one side. To do this, draw a line from the tip of the tooth to the centre of the disk (or where it should be because there is a mounting hole there).
Because the disk body is made of hardened steel, it would be difficult to drill through it, and ordinary twist drills are not sufficiently strong to cut the steel. I therefore put together a makeshift firebrick furnace and with a big propane torch, heated the blank to bright yellowish red. I clamped the carbide tooth end with a heavy clamp which acted as a heat sink to prevent the tooth from heating up too much. This is not because I am afraid of the carbide softening which will never happen at this temperature level, but to avoid the brazing holding the tooth to soften or melt to a point that the carbide tooth would fall out. After flaming I allowed the piece to cool to room temperature.
The tool blank is first ground or filed true on both upper and lower edges. The lower edge must line up exactly with the leading edge of the carbide tooth. If it is out of alignment, as I found out to my dismay with one of my trial pieces, the finished tool bit may not cut well, or even not work at all.
When the blank has sufficiently cooled, I selected two points, one about 3/4" from the tooth and the other 1/4" from the other end about midway along its width, marked them with a centre punch, and drilled two #10 holes through the now softened metal. It is necessary to first drill a guide hole through the punch marks with a suitable centre drill bit, but do not widen to size until the shank is made.
Step 2: Make the Shank and Assemble


The shank is a 1.5" to 1.75" long rod, 3/8" square (alternatively 8 mm square) in cross section. This can be made from a longer piece of material (structural steel) of the same cross section, or cut from a piece of mild steel and milled into a bar with the same dimensions. I don't think that there is any difference between the two.
Using the tool blank as a guide and lining up one edge of the shank with the bottom edge of the tool blank, I drilled two guide holes using the existing holes in the tool blank as guide. Then I drilled two 1/8" holes into and through the shank. I then tapped #10-32 threads in them. I can now widen the holes in the blank to #10. This way, the holes will line up perfectly and the blade will not move when in use.
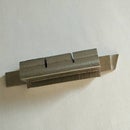
The tool blank can now be secured onto the shank with #10-32 cap screws. Tighten the screws as much as possible to avoid any loosening of the tool blank during use when high upward forces will be encountered.
The carbide tooth is then honed on a diamond file to put on a cleaner cutting edge.
The tool bit is now complete.
Step 3: Testing and Results


I made three samples of this tool bit, learning from the failure of the earlier one to make a better one later.
I put the first bit into the back toolpost on the cross-slide of the Taig lathe. I tried to part a half-inch piece of moderately tough steel rod. In this first attempt I managed to cut through reasonably quickly but the cut was jittery and the cut surface was rather rough. Worse still, the carbide was chipped in one corner. I found out that this was due to the carbide tooth not being perpendicular and lining up wtih the centre of the workpiece.
I made another bit and tried again, this time the carbide fell off midway through the cut. I did not lubricate enough and the heat from friction without adequate cooling melted the brazing.
In the third and last attempt, I made sure that the leading edge or cutting edge of the bit was perpendicular to and on dead centre of the workpiece. I lubricated the bit and workpiece generously throughout. The cut was smooth and clean.
I now have an ample supply of carbide parting tools for my lathe at no real cost.
Step 4: Epilog: Modification With Brazed on Bit


I have used this cutting tool for two years. In time, the bit got a little worn and eventually on one occasion, the friction heat caused the carbide tip to fall off. I found out also that the screws which secure the cutter cannot be totally tightened when it is heated by friction. I therefore fabricated a new tool with another section of the carbide blade, and this time brazed it onto the steel shank with silver brazing. The result is most encouraging.


