

Introduction: Massironi Style Shelving Unit


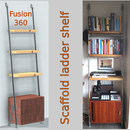

I needed a new shelving unit and remember seeing awesome looking shelves on a TV program (Grand Designs) about 10 years ago! So after some searching I found out that these are called Massironi shelves.
All the ones I have seen are wall mounted relatively small shelves but I went big and made a freestanding shelving unit. The other difference is that I wanted a greater usable area to the edges so the shelves aren't an pure arc.
Supplies
Materials
- 2 sheets of 2440mm x 1220 x 18mm (8ft x 4ft x 2/4in) plywood
- Wood filler
- Wood stain/wax
Tools
- Table saw
- Band saw
- Router with
- Sander
- Clamps
Step 1: Design the Shelves


This is one of the harder parts of the project and is much easier to use a computer aided drawing program to set out all the curves etc. than to do it my pen, paper and calculator.
I used a 2D CAD program as I have most experience with this type of program. I'm sure you can do it in say Fusion 360 and I have added a Fusion file which I created from a dxf. of the 2D drawing. The instructions of how to draw the shelves are below with a few screenshots to make things a little clearer.
The top width is a different to the bottom so to set out the shelves I did the following
- Start with a grid of the shelf layout
- Start with the drawing the middle vertical shelf (1800mm high)
- Establish the top, bottom and maximum widths of the shelf (I used 200mm, 300mm, and 250mm)
- Draw the bottom horizontal line (200mm)
- Draw the top horizontal line (250mm)
- Draw a third horizontal line (300mm) at some point below the middle
- Draw an arc between the three points
- If you want a different arc adjust the middle height and redraw arc until it looks right
- This arc will be used throughout the design
Draw positions of horizontal shelves on the shelf
Draw the arc
- Copy the arc and top line
- Draw a horizontal line through the arc center
- Mirror the top line above the center
- Draw the full arc
- Copy the horizontal shelves and determine the center widths from the shelf in step 2
- Draw the rest of the horizontal shelves
- Draw the vertical shelves
- Copy the first line from the grid along with the position of the lowest horizontal shelf
- Find the width of this line from step 5
- Copy the arc from the step 3 to the intersection of the arc and lowest shelf
- Repeat for the remaining shelves
Add some arcs to the outside of the grid to form a pleasing outline and trim shelves as appropriate
Draw 2 sheets of plywood and layout shelves to determine cutting list
- Add dimensions to each shelf


Step 2: Cutting Shelf Outlines


I had the sheets cut down to something manageable from the shop I bought them from and then cut them down to the size when I arrived home.
Starting with the largest of the horizontal shelves
I marked on the end points and the five intermediate points of the arc
I then clamped a small section of plywood along the shelf to the marked points
Marked the arc outline with a pencil and cut out with bandsaw
Step 3: Sand to Edges of Line and Repeat


I got quite close to the pencil mark with the band saw and the built a small jig so I could use a belt sander places on it's side to sand the edges.
I clamped the sander to a fence I have on my bench and fixed a piece of chipboard to a block of wood which I then clamped in a vice. This just meant that the belt would sand the whole edge.
With the sander switched constantly on it turned out fairly easy to do.
Now the arc was established this was transferred to the remainder of the shelves and the whole process repeated
Step 4: Slot Jig


As I needed multiple slots of the same width I decided to make a jig I could use with a router with guide bush.
I made a board with a slot in it that was big enough to make an 18mm (3/4") slot when the guide bush was installed.
An additional board was fixed at right angles to the slot to the underside of the main board and two additional wings so the jig could be clamped to the board and to give the router additional support.
Step 5: Cut Slots


To set up the jig I marked the center line of the slot and where the slot needed to stop.
After determining that the end of the cut was 85mm from the end of the router base I set up a stop by clamping a bit of wood to the far end.
I then cut the slot using multiple passes to each slot.
Once all the slots were cut I squared up the ends with a chisel.
Step 6: Fill, Stain and Oil


There were a few gaps to the ends of the boards so I filled them with wood filler, waited for an hour and sanded the edges flat.
I wanted the shelves to be a little darker that the ply so I first sanded them to 400 grit and stained them with dark oak wax. I only waxed the faces as I don't think the edges look very good stained.
I then oiled the edges with hard wax oil.
Step 7: Building/fitting


I wanted the shelf to be flush against the wall so I cut a series of cutouts to the bottom of the verticals accommodate the skirting board.
I started by laying the vertical boards on the floor first and slotted in the lowest horizontal. This can be done with one person it's just a bit fiddly and quite a bit of pushing down one side then the other and so on.
I then slotted in the top horizontal followed by the two internals.
The slots were fairly tight but only needed a bit of force rather than hammering,
Now it was put together I lifted it up vertical and positioned it against the wall.
To keep it safe and against the wall I added a few small brackets along the top.

Participated in the
Shelving Contest


