

Introduction: Medieval(ish) Scrap Mace || MIM-I Ep. 3


Welcome one and all to the grandest of grandly grand collaborations. I, Jake, and Brokk Hrafnsson (<- that has GOT to be a fake name) decided to do a series of projects. Medieval projects. Well, more like medieval-ish projects.
Props, fantasy weapons, armor, swords, spears, WARHAMMERS, viking shields, medieval-y accessories, and the like. Gonna be a great series.
Anywho, I'm late to the party (nothing new here), Brokk has already done a couple projects and is almost finished with a few more I believe. He hinted (very subtly) that it was my turn. As usual, I don't have all the materials I'd like for this, but with the Brokk-man breathing down my neck I have no choice.
How does a scrap metal Mace-like object (almost medieval-ishy) sound?
Yep, we're building a medieval-fantasy-apocalypse styled mace completely out of old scrap.
Step 1: Video
Sub to me on the 'Tube fella's:
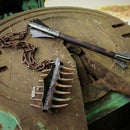
Step 2: Compile Materials

- Metal pipe (mine was electrical conduit)
- Old lawn mower blade
- Bunch'a bolts
- 2" x 1/8" mild steel bar stock
- Scraps of leather (old purse bag thing)
Ignoring the nearly uncontrollable urge to use my welder, I'm going to use the bolts to hold everything together. You should be able to build this using only a drill and an angle grinder. I'll probably use a bench grinder and some belt sanders just to make it easier, but it can all be done without too much difficulty with the angle grinder. (which ALL of you should own) (not that you do own it) (but you should)
(and ignore the giant rusty bolt in the picture. I decided not to use it)
Step 3: Measure. Mark. Cut.


If I was going to wield a mace into battle, I would want that mace to be long and light. Well, light is relative. Light for a mace is heavy for anything else, of course.
You want to be able to move that mace fast enough to easily deflect blows directed at you (of course, ideally the mace would be paired with a shield for most of the defence), yet still retain enough weight to land an effective blow on the offence. Since I do want to build an effective weapon (in case by any chance there should be an army of coconuts come and start beating down my front door some fine morning), I'll be following my own advice. Light and long.
So cut that pipe at 28".
Step 4: Gettin Rid O' the Dern Rust.....

That lawn mower blade was nearly as rusty as my neighbor's giant green tow truck.
(clearly unacceptable)
I've found the easiest way to quickly remove large amounts of rust from metal like this is to use a wire wheel attachment on the angle grinder. That sucker eats rust for breakfast.
(and second breakfast, for that matter)
Unfortunately, it also puts large amounts of rust dust into the air. I ain't no doctor, but there is no way inhaling large amounts of rust dust can help you live longer. So it's time for..............
Step 5: (waiting for Rust Dust to Dissipate) Coffee. Now.

The project is only as good as the coffee consumed in the process.
And the music. That helps too.
Step 6: Cutting Out the Lawn Mower Blades


Mark the lawn mower blades exactly in the middle, then chop em' in half with the angle grinder. That leaves us with two roughly 10"-12" half-blades, which will go one on one side of the pipe and one on the other. Perfect.
Use your creativity to come up with the best shape for these blades. I cut the corners off of the bottom end and ground the tops down to a point. Makes it look 132% better.
Step 7: Makin' De 1 End Pointy-ish.


At this point I realized that it wasn't going to look incredibly good to have the pipe just come to an abrupt end at the top of the mace. In an effort to make it look, well, less like a mace made from a pipe, I formed the top end of the pipe into a very refined point.
To do this you first mark out four triangles, spaced evenly around the circumference of the pipe. Isosceles triangles, come to think of it. (see pictures, my description is gonna be crud) You then carefully cut out those triangles, which will leave you with that rather cool looking quadruple spike looking thing. (see picture) Then you bend and hammer the four corners down until they meet, forming one not-half-bad improvised spike-point.
Not incredibly pretty, but certainly better than just straight pipe.
Step 8: Every Extra Little Bit Counts.....


The lawn mower blades look great, but not quite enough material for a well rounded mace. Time to add some more metal.
Get you that 2" x 1/8" scrap mild steel bar stock you have laying around, and cut out a couple more plates.
There we go. Much better.
Step 9: Annealing Lawn Mower Blades

As mentioned in the beginning, the whole mace is going to be held together with bolts. Which means logically, ya gonna need some holes in those lawn mower blades. Lawn mower blades are hardened steel. Not super easy stuff to drill through. At all.
Before attempting to drill through them, I first anneal the steel by heating it with a torch (or forge if you have one), and letting cool down slowly. I just let them air cool, and while it was softer afterward they were still relatively hard. The faster they cool, the harder the steel will be. If you have a bucket of sand or something you can bury them in to slow the cooling down, they will end up softer.
Step 10: Drilling Holes. Lots of Holes.


I would give you a detailed explanation, but i'd be insulting your intelligence.
Step 11: Spikify.


Everyone knows it; maces tend to have a large number of spikes. The reasoning is simple: spikes transfer all of that immense kinetic swinging energy contained in a large mace down to a few tiny points. As anyone who got half a brain knows, the smaller the surface area and the larger the force, the easier it is to cut (puncture, tear, rip, etc) through a material. Ancient medieval dudes knew this as well as folks today, so to have the best chance of getting through the armor and chain mail of the period, they put spikes or blades on just about everything.
(^^ wow, did I just do science?)
So we is gonna put us some spikes on dis hea mace.
Cut off the ends of those bolts and spikify them.
Step 12: Adding the PIZZAZ!! (as Long As Pizzaz = Copper Overlay)


At this point in the build the mace was cool. But as stepped back to admire its cool-ness, I realized I could make it even still more cool. It needed some zing! Color! Pizzaz!
So I added a copper overlay on the lawn mower blade section. Fairly simple; I cut down one end of a copper pipe lengthwise, flattened it out, and cut out two strips. Moving to my belt grinder, I cleaned them up and ground them down to the final shape I wanted.
Drill holes. Bolt on.
Now its cool.
Step 13: De' Hilt


Similar to the top of the mace, I thought it would lame to have the handle end with just straight pipe. So I cut out two more sections of the 2" x 1/8" bar stock, and bolted them onto the end of the handle to create a sort of hilt. Didn't turn out too shabby, in my humble opinion.
Step 14: Paint. 'Cause It Was Too Shiny

I didn't like the vibe that shiny pipe was giving me. It didn't fit the scrapyard/apocalyptic/fallout style medieval-ish look I was going for. So I dusted it with some flat black spray paint to kill the glare.
As you can see I didn't paint over the section which is going to be covered by the handle wrap.
Step 15: Handle Wrappin'


Ah, now to finish her off. I went and found an old leather purse-thing i'd saved away, and absolutely ruthlessly cut it into pieces. I then coated the backsides of the pieces of leather and the part of the handle which was going to be wrapped with spray-on contact cement. After letting it dry for about 10 minutes, apply the leather.
It's really as simple as that. Never having done this before, i'm not sure how well the contact cement will hold the leather on there, but so far it seems to be working well.
Step 16: Whoa!!! Dat Der Is a Mace, Me Good Fellow!


And there we are! I am extremely pleased with how it turned out, much better than I expected, certainly. Be a great piece to display on a wall, perhaps over a shield or something. I just love the look of it. Super cool.
Anyway, be sure to go check out the other projects in this series, unfortunately Instructables won't let you publish a collection until you have at least 5 instructables in it, so we don't have a collection for the MIM-I (Make It Medieval-Ish) yet. You'll have to go look at Brokk's ibles:
(More to come soon)
Thanks for reading and I'll see ya next time!
Jake
YouTube Channel: https://www.youtube.com/channel/UCszMFa_qz5weFBoQ7...


