

Introduction: Melt Down Your Aluminum Cans


People that make metalworking and metal casting their main hobby are going to find many things wrong with what I am showing you here. Ignore most of that and give this a try even if it comes out crappy. This is a low investment way to observe a lost art and to observe some things for yourself which are shrouded in mystery for most of us.
However, take my safety precautions very seriously, and any of the additional precautions that people might add in the comments. You probably want to go out and read some more safety information as well because this really is serious stuff.
What I intend to show you here is that you can rather simply and easily turn your aluminum cans into nice clean metal muffins ingots that can be used for casting projects later, or you can just end up with some cool metal muffins paperweights and move on to another hobby.
If you haven't done this before, you are going to be amazed at how many cans it takes to get a small amount of aluminum.
Supplies
- A shload of aluminum cans.
- Brick, preferably firebrick
- Hair dryer or small electric PC fan
- ~2 in metal tubing
- Charcoal
- Appropriately sized crucible (the one in the pictures is a #3 4KG one from amazon)
- Proper tongs for your crucible
- Proper PPE for high temps
Step 1: Stack the Brick
This step can't be specified to closely since it depends a lot on the size and shape of your crucible. But here is the general process:
- Stack one or two layers of firebrick on top of another fireproof surface. Be careful, spalling can occur with concrete. The experts say that for safety your entire work area should be a bed of sand.
- Stack a one layer square of bricks around your crucible, making sure that you have a little space on all sides. You should probably test and see that you will have room to reach in with your tongs and pick up the crucible.
- Adjust and fiddle.
- Start a second layer, but somewhere in this layer you want a gap that is just about the right size to fit your pipe that will be connected to some kind of blower. Don't try to use a hair dryer to directly stoke your fire; hair dryers melt! I generally use a pipe and connect the hair dryer to that, giving it distance from the heat.
- Stack further layers up until you get to a layer that goes just above the top of the crucible. If you don't make it high enough you might have trouble getting things hot enough. You might even at some point want to put something over the top (with a gap of course) to encourage things to get hotter. But your 'lid' should not touch the crucible!
This stack need not be pretty. You'll probably rebuild it each time you break down cans. If you want something more permanent, you should build a proper furnace.
Step 2: Add the Crucible and a Few Cans

Step 3: Get Things Really Hot


You need to get a good and hot fire going in the furnace. For this type of furnace and for just getting started with breaking down aluminum I think most folks should start with charcoal briquettes that you'd use for grilling. Don't try coal, oil, wood or anything else for your first try.
- I'd suggest using one of those chimney type charcoal starters and get a full chimney load of coals nice and hot.
- Dump in all those coals.
- Pack more briquettes, straight from the bag, all around the crucible.
- Fire up whatever kind of blower it is that you are going to use.
- Adjust the blower so that it really gets the fire roaring. It should literally be a roaring sound if you have it right. You will find it works best if you can get the air blowing in a bit of a circle or vortex going around the crucible. I highly recommend good personal protective equipment that covers your entire face at this point so that you don't get sparks in your eyes and hair.
- Continue to add briquettes throughout the remainder of the process so that you've always got them about 2/3 of the way up the crucible. Once you get a good melt going, you should be able to begin adding them slower, but don't slow down so much that your melt cools down below a nice liquid state for the aluminum.
There is indeed variations in the viscosity of the aluminum with temperature, you don't want to move on to the next steps if you are in a thicker state, you want it to be very liquid. But don't worry too much until you get the slag out (next step).
Step 4: Feed Me Seymour
Now you get to feed the monster!
Slowly feed one can into the crucible at a time and push it down with a metal poker of some kind until it is completely molten. Then do it again. And again. And again.
I'd say that you shouldn't fill the crucible past about half full.
Step 5: Slag Off

So, do you expect the beautiful shiny surface of melted metal at this time? No such luck. Aluminum beverage containers have a lot of other crap that comes with them. There's the paint and labels, sometimes coatings, dirt and left over beverage. Much of this actually burns away at the temperatures we are using here. But there's a lot that does not.
As your cans melt, you will get a bunch of junk that floats to the top. This is called slag, which is a metalworker's word for 'crap.' There are a lot of ways to deal with this, and of course there are lots of fancy custom tools for the job. Instead of those, I use a three foot long piece of quarter inch steal rod that I think I got from a towel rack or something. it has a j-bend in the bottom that forms a nice hook. Mine has 90 degree bends in it, so it makes a rather angular 'J'.
I use this rod to hook stir the aluminum a little, and to hook up under the collected slag. Most of it is stuff that has not melted, and it has a tendency to 'stick' to the steel rod. I lift that out of the crucible and knock it off of the rod somewhere safe where it won't cause fire or get stepped on (more on this later).
Repeat this process until you do manage to get that nice shiny surface that you expect from molten metal (it looks kind of like mercury).
Step 6: Cast Your Ingots


When you have cleaned out your slag well enough to have a nice shiny surface on the aluminum in the crucible you can take the step to cast ingots out of the aluminum you have smelted. Most folks would discourage you from casting any final products from the aluminum at this stage. There are too many unpredictable aspects to get a good cast out of it. That said, I myself have found it a good stage at which to do some very chunky, crappy casts for practice which are conveniently shaped to use as ingots later. See the gear above.
If you are using any blowers or jet burners turn them off at this point.
This is the dangerous part! Some ways to get hurt:
- Getting to close to the really hot stuff before you get it out of the furnace
- Getting the stuff out of the furnace
- Having the stuff spill on the ground. Spilled aluminum can cause spalling of many surfaces, including concrete, soil and asphalt. This is when the surface superheats and explodes in shards. Bad news. Many home metalworkers will have a bed of sand over which all of the hot work is done.
- Spilling or boiling of the metal as you pour it
- General burns from things getting where they shouldn't be. For example, I was cleaning slag out of a batch and some of the clumps dropped to the ground. I found them later about 80% melted through and embedded in my shoes.
The process:
- Use your proper pair of tongs that you got in step one to carefully remove the crucible from the furnace. Make sure you grab it in a way that will make it easy to pour.
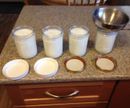
- Slowly pour the metal away from you and into your muffin tins. DO NOT OVERFILL... if you connect the dots between your aluminum muffins, they might be hard to separate later and might not fit in your casting crucible.
- Let the metal muffins (okay ingots) cool naturally. This is better than dumping them in water. Definitely don't drop them in a plastic bucket of water... this is experience speaking.
- Store the ingots until you are ready to use them for casting a serious project.
Step 7: What You Can Do Next

- Read some books. Try the Gingery series starting with The Charcoal Foundry.
- Build a propane burner you can use instead of charcoal
- Make a proper furnace
- Learn to build forms
- Use your 3D printer to make models you can cast
- Make a casting of an anthill in your neighborhood

Participated in the
Recycled Speed Challenge


