

Introduction: Metal Tank for Liquid Storage


I did this as a big build, but it could be done on a smaller or bigger scale. The methods are almost universally transferable. Also this is my first instructable so bear with me. The reason for this build was the need for a transfer tank for moving a liquid product from one place to another. So the basic needs were to have a leak-proof vessel (air-tight in this case), be sturdy enough for rough service, and not break the bank paying for someone's time. And if there's any energy and time left, make it look good.
Some of the things I used:
- Plasma cutter
- CNC Plasma cutter
- Oxyacetylene torch
- MIG welder
- Grinder
- Cutoff tool
- Wire brush
- Die grinder or rotary file
- Clamps (both c-clamps and vise grips)
- Hammers of all sizes
- Pry bars
- Tri-square and framing square
- Straight edge
- Center punch
- Markers, pencil and scribe
- HVLP paint gun
- Air compressor
- Safety glasses, ear protection
welding gloves and leathers,
and other safety gear.
- And possibly the kitchen sink
Step 1: Proper Planing Prevents Poor Perfomance

I've heard of a Bible verse that says you shouldn't start building a tower without first accounting for materials and expenses. So let's get a plan before we start. Trust me time spent here saves some huge headaches later. So break out the graph paper ( I'm a little old school) or CAD drawings (for you hip and trendy kids.) This build had some dimensional restrictions so it had to fit the space. Also I was shooting for a rough volume of my tank.
There are all sorts of easy and amazing calculators that you can find on the internet for converting one unit to another. But I still like doing it the hard way.
One gallon = 231 cubic inches
One cubic foot = roughly 7 1/2 gallons
You can do the algebra to go the other way around. I won't bother with metric conversions because that system was designed to be easy for this.
For this build I had to be within a width 47.5 inches and no more than 42 inches in length. Height was without restriction so I made like the city of New York and built up. My final dimensions were 46" x 36" x 48" for a volume just under 350 gallons.
Another consideration is what material to use. I used 3/16 inch mild steel plate. Mostly for that rough service requirement. Any material can be used but make sure it is compatible with whatever you want to put in the tank. This tank will be used for petroleum products so corrosion will not be a big factor with mild steel. Stainless steel or aluminum would work but are cost prohibitive. Not to mention the extra process time for aluminum. The material thickness determines the dimension of the sides in this build. I will lap the corners a bit so the overlap needs to be considered in order to remain in my restricted dimensions.
But that's not all! Since this is going to be a mobile tank I don't want the liquid sloshing around. And the way to avoid that is baffling. Please forgive the unintentional pun. Baffles are dividers built inside of the tank. Effectively making my big tank a cluster of inter-connected smaller tanks. Since 50 gallons moving around is better than 350 gallons. To further reduce loss of containment I curved the top piece of the tank.
The last consideration is how to get liquid product in and out of the tank. So I need bungs to fill and empty the tank. Plus I have some other goodies like a breather and level gauge. I ended up with five bungs. Two for fill, one drain, one breather and one for the level gauge. All but one will be on the same side.
Now we have a plan for what we need to do.
Step 2: Measure, Measure, Cut

It may be an oldie but it's a goodie. Measure twice cut once. Unfortunately I hew closer to measure once cut twice.
So we go back to our plan and use those measurements to layout and cut the material.
I used a plasma cutter to cut the plate. Plasma cutters are quick and clean (if properly ventilated.) You could use an Oxyacetylene torch too. Either way there will be a kerf to keep in mind when cutting. Kerf is the amount of materiel removed when cutting something. Saws and torches both remove material to cut, and that missing material can screw up your layout if you don't think ahead of it.
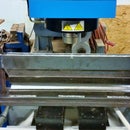
This is also where any extra forming should be done. In this build I will make the top piece curved, and that requires the extra step of forming this piece. My shop is well equipped but I don't have any way to bend a piece of 3/16" plate without ruining it. So when I ordered the steel from my local supplier I had them roll the top to my specification. See picture.
Step 3: Prepare Metal

This step is usually unnecessary for what I do with a MIG welder. But since the goal is to end up with a water tight (or air tight) container we can't have any porosity in our welds. The only way to get nice non-porous welds is to have the metal be as clean as you can manage. To achieve this I grind the mill scale off on the edges to be welded. That way there will be bare clean steel to weld free of any contaminates. Two inches is what I did for this build. A bit excessive, but it won't hurt in the long run. One other thing I did was use a solvent (acetone is my favorite) on the now clean metal to remove any oil or grease.
Like I said, any other project this would be overkill except if I was using a TIG welder. If you do a project with a TIG machine your metal MUST be clean along with your fill rod and electrode.
Step 4: Fit and Weld


Now that I have my material cut to its proper dimensions and prepared it's time to put it all together. As I've mentioned in previous steps I used a MIG welder. This happens to be the first time I've ever used the "spray welding" technique for a big project. Spray welding is achieved by cranking the amperage and feed rate up high. So instead of getting that sizzling bacon sound of metal being deposited at 60 times a second; instead there's a hissing wine as the metal is deposited at a much higher speed. But it does require a special cover gas to do it properly. I don't know if I would recommend it to a beginner. I think it works pretty slick. And makes some beautiful welds if everything is dialed in right.
But you don't have to be married to any one welding process. As long as its compatible with your material and project requirements you can use an oxy-fuel torch, TIG machine, Stick welding, or sub arc (there are so many welding processes out there I'm only going to list those I can think of off the top of my head.) Use what your comfortable with is really the the bold print here.
This tank is essentially a box so I started with the piece that would be the bottom. Because my plan put a bung in the bottom, I made sure to weld it in place first. A note for welding bungs in plate if you're going to weld them inside and out: weld half the bung on one side, half on the other, come back and finish your first side, then the last side. This method keeps the welds on each side from pulling on one another and cracking your plate (trust me I've done it before.) Then I set about fitting each side to the bottom with a half lapped corner weld (see picture.) First get the position and fit right, then a series of tack welds to hold them in place. I usually place a tack weld abut every six inches. Once I'm happy with the way everything is fitted, that everything that should be is square is, I can go about welding everything permanently. I got a little excited and have welded everything on both the inside (except the top as I cannot be inside with the top on without being trapped) and outside. Plus my tank still needs some baffles.
For those of you who have had a project squared and true only to have it be all wonky after you've welded it, I have some tips on how to keep your work warp to a minimum. Where I have seams that are almost four feet long the potential for warping is very high. So one easy way to prevent it is to only make short welds, about six to eight inches in length. There was a reason why my tack welds were as far apart as they were. Along with these shorter welds I always weld toward an existing weld. That way the draw of the contracting metal as it cools has less effect. And on long seams like this one I like to stagger my welding, so I'm not inching along on the whole length of the seam. A picture may help.
Step 5: Prepare to Be Baffled!


In the preparation step I told you how I was planning on using baffles to help keep my special liquid from sloshing around. Now I'll show you how I go about it. I doubt this is the best way, but it's my way. I used 22 gauge cold rolled steel and used it to make a pseudo-honeycomb.
There are four pieces that make up the baffles. I was trying to be really clever and made them to be interlocking. The baffle pieces that cross width-wise are slotted at the top, and the pieces that cross length-wise are slotted on the bottom. I made some nifty braces to weld the pieces together. I just used plug welds because it's such light metal, even welding them to the heavier plate of the tank walls. If I would have thought things through a little farther I would have welded the baffle unit together outside of the tank. And probably made the baffle compartments large enough for me to squeeze into so I could weld them into the tank more easily.
Step 6: Add Extras


I won't tell you how to put the top on, as it is enough like the rest. So I'll move on to the attachment of mounting and lift hardware. My end use it to have this tank be in a vehicle, and I will need to have it secured in said vehicle. So I made some mounts out of some 2" x 2" x 0.25" angle iron. They're pretty simple, and have some holes drilled in them for bolts. Again I got excited and added some reinforcing gussets around the bolt holes.
I also made some lifting eyes, since as the tank is now the best I can do is tip it on its side (the final weight is only 400 pounds.) These eyes are probably a little ambitious for me, but I have a lot of time to sit around and think about these things. So they are the strongest thing I could think of. If this tank was for anything else I would have made them so they were not standing up all the time.
Because of the way I'm welding this together I have no choice but to weld everything completely. There can be no leaks. So no seam will go un-welded. If you just need a no frills vessel then you can skip this step and head on to leak testing.
Step 7: Dress-up


I have the unfortunate disposition of requiring that all my work look good. So I have to do some finish work to my now fully welded tank. And because I'm going to paint it with a high quality industrial urethane paint, I will also have to remove the mill scale from all the plate. If I ever make something this big that I am going to paint I will use cold rolled steel to avoid the necessity of mill scale removal.
To dress my welds I will use a seven inch angle grinder to smooth my welds flush to the plate. In the hard to reach spots I may use a die grinder with carbide bur to lessen the ugliness. Then when I'm happy with the way it all looks I break out the sanding flap disc and make it silky smooth.
The mill scale removal for paint prep is a ton of work. Normally I just use the same grinder as I dressed my welds with. But after fifteen minutes of work and less than a square foot descaled I decided to find an easier method. Shot blasting is apparently the norm in industrial shops but I'm not about to go out and get that equipment. I could use the sand blaster, but that thing is filthy to use. Not to mention being hell on my air compressor. As chance would have it I ran across some concrete grinding discs (see picture) at my welding supply shop. And they work marvelously. They just wear out fast since they weren't meant for steel. I don't like how they work on my 4 1/2 inch angle grinder as they have a lot of tooth and the tool has a tendency to whip out of control. So I put them on the variable speed sander. I probably should use some sort of dust mask. In the picture you can see all the grinding dust on the floor. I shudder to think what I inhaled.
Step 8: Leak Testing


Now that I have some really pretty looking steel, I need to make sure it isn't a sieve. If you were really adventurous you could just start pouring stuff in and see what happens. But I'm not gonna take that chance. The best way I know for leak testing is to plug the various bungs, pressurize the vessel, and use soapy water to detect the leaks.
There are some safety concerns while doing this. You will be pressurizing a closed container and have the possibility for it to rupture in a spectacularly explosive fashion. Also if there is any petroleum residue you may want to be a little nervous. Diesel engines work by injecting fuel into highly compressed air, and the tank could do the same. Think of the Apollo 1 disaster too. My Dad always punctuated this speech by telling me, "Your making a bomb, be careful."
So I take some precautions. I set the regulator on my air compressor very low. About 5 psi to start. I never tighten the the plugs and fittings anymore than is needed to be a restriction. Just start 'em a bit and let 'em hiss. But make sure you have stuff tight enough that it won't come flying out, because projectiles are as bad as bombs.
Now that the tank is "safely" pressurized, all that needs to be done is to take some soapy water and rub it over the welds. The reason for doing this now instead of before grinding the welds down is because you can grind a weld down enough for it to leak. One of the better ways to apply the soapy water is to run your bare finger along through the solution over the seams. Bubbles will form just under the finger, faster and more clearly this way. Be sure and clearly mark where the leaks are so you know what to grind out and fix. And if you make your marks big enough you don't have to continually recheck everything, you can just check what you fix.
Step 9: Prep and Paint


Okay the tank is now complete and leak proof. Celebration is in order. So I will paint the tank. I know it isn't the best party, but I'll have one bad-ass looking tank when I finish. Painting isn't my strong suit, not enough patience, but I make out better than some. If you thought my welding prep was overzealous then prepare yourself. Paint prep is ridiculous.
There is a little bit of flash rust from the leak testing that needs to be sanded off. Nothing some 40-120 grit sandpaper can't fix. Once the surface is bare metal again I wipe everything down with a good tack cloth, followed by wax and grease remover twice over. Because if there is any dirt, grease, oil, or wax on the surface the paint won't stick. Oh and try not to get any fingerprints on it.
I'm using an industrial primer and urethane top coat so I have special mixing instructions for the urethane, catalyst, and hardener. That goes into a HVLP paint gun. You can use whatever you want, however you want. A few tips for painting with a HVLP gun. Use the right fluid tip, there unfortunately are different sizes. Keep the tip somewhere between 8-16 inches from the surface depending on the paint. Overlap the spray pattern either 50% or 75%, depending on the paint. The rest is a lot like welding, not to fast or risk not putting enough on. Not to slow or you could put on too much. There are some Instructables for this written by people who know much more than me on the topic.
If your wondering about the cop car color scheme, it's because I only had enough of each color for half the tank. So I improvised.
Step 10: Installation


Finally the pay-off. Nothing left to do but put it to use. I have to drop it into my truck. Drill some mounting holes and bolt it in. Fill the bungs, plumb it in, and fill it up.
Thanks for sticking it out.


