

Introduction: Minecraft Automatic Farm


A compact farm that is (semi) Automatic , your only work is to plant seeds (impossible to do automatically , isn't it ?)
To make this farm you'd need :
Any Blocks (a stack or two) I'll use iron so it'd be easier to count - but you can make it out of any material (a great way to use cobblestone )
Dirt Blocks (for this compact version maximum is 6 x amount of dispensers)
Dispensers (I'd use 3 - a small farm)
There are different gathering methods which require different blocks . You can use :
1x minecart with hopper - some powered rails - some rails (optional)
OR you could use :
Hoppers (equal to the number of dispensers) - chests (equal to the number of hoppers)
You can use lots of hoppers to take everything right inside your house in the FOOD chest OR make a rail system so the minecart-with-hopper would come to your house and you'd take its food .
Please note : Minecart-with-hopper is the most lag-generating block in minecraft , never use huge quantities of them at once .
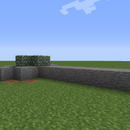
Step 1: Make the Base


You could also NOT use dirt blocks .
Next I covered the water with blocks - If you wouldn't do that , the mechanism would face problems . Note that the water IS still there but it's just covered .
Continue the base like the second picture .
Step 2: Gathering System : Hoppers


If you'd prefer the minecart-with-hopper system , skip this step .
now we have to destroy some of the blocks . If you have used expensive blocks , use the right tools to destroy it .
See picture 1 .
Now place chests . (picture 2)
Now place hoppers . hoppers have to be "connected" to the chest , so aim at the top of the chest then shift+click . If it is connected , you'd see a little tube-shaped thing from the hopper to the chest . (pic 3)
It is optional but recommended to place signs on top of the hopper (attached to the block ) for some reasons .
Step 3: Gathering System : Minecarts


This is an alternative to the hopper gathering mechanism !
Destroy blocks (pic 1)
Place rails (pic 2) Powered rails require redstone source . Place a redstone torch next to them or in the middle of the loop or just under the block they are .
now place a minecart-with-hopper on the rail . It will spin forever and gather all the vegetables ! If it doesn't start when you placed it , push it a little .
Please note , powered rails will give a 50 % speed decrease if not powered with redstone . In the next instructables I'll tell how to use this mechanism to make a cool minecart station .
Now place signs or ladders as shown . It is not optional - if you wouldn't place these , the rails will get destroyed with the power of water . Signs can stop water / lava and prevent pistons from opening . Great for defusing traps .
Step 4: Completing This

Now you will need more blocks , not mentioned in the first step . You will need water buckets (equal to the number of dispensers) , a hoe , buttons ( equal to the number of dispensers OR number of dispensers - 1 )
1- place buttons (pic 1)
2- put water buckets inside the dispensers
3- hoe the dirt
How this works ?
When you press the button or lever , water comes out of the dispenser . It "destroys" all the plants on its way and delivers all the goods to the gathering mechanism where everything is saved . When you press the button again , the water goes back inside the dispenser . The overflow of water can destroy plants and some non-physical blocks , deliver items , carry mobs and the player as well , kill the player and/or most of the mobs , stop grass from growing and change block states .
Step 5: Upgrading


Now we can upgrade our farm by adding lots of light sources so crops grow day and night (not all crops - you can only use this farm for wheat - potato - carrots)
pic 1 - add more blocks .
pic 2- add torches .
pic 3- replace blocks with glowstone / jack - o - lantern / beacon / lamps
FINISHED !
Minimum time and effort has been put on this project . Please do not vote or favorite under any circumstances . (Reverse psychology)
Thanks :D !

Participated in the
Teach It! Contest Sponsored by Dremel


