

Introduction: Miters & Bevels


This tutorial covers what experience has shown to be the most efficient way to create a Miter, or Bevel on the edge of a part. While this tutorial is written from the perspective of application to woodworking design, it should be relevant for other applications as well.
Rather than creating a sketch profile for a cross section, or defining a Cut, the 3D Chamfer tool provides options that allows quick creation of Miters and Bevels. The Equal Distance Chamfer Type is excellent for a 45 degree miter, while the Distance-Distance Chamfer Type allows creation of miters and bevels at any angle. Just select the Corner Edge you wish to remove with the chamfer, and set the appropriate parameter values. Miters and Bevels can be created on any edge, and not just on the ends of a part.
Creation of the Part with the parameter Thick defined as the part Thickness, makes specification of the dimensions for the chamfer parameters quick work. It also allows the Miter or Bevel to adjust automatically with changes in the parts thickness.
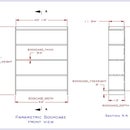
A useful application of predefined parts and miters is the BaseBoard part model shown below. The part is pre-defined with Miters for all 4 corners of the baseboard ends, so that individual miters can be “unsuppressed” to match the installation requirements. There can optionally be a miter on either the Front or Back corner for either end, as well the angle can be adjusted to suit. No need to keep creating a baseboard part and defining miters; just save the part under a new name, and adjust the miter suppression and parameters as required.
Those users with Configurations capability can also create numerous baseboard parts with varying width, lengths, and miter selection by adding a new configuration for each baseboard part required.
Step 1: 45 Degree Miter

Start with the Part that will be Mitered, and select the 3D Edge Chamfer tool.
Select the Edge(s) that will be Mitered, set the Chamfer Type to Equal Distance, and the Distance to the Thick parameter. Change the Chamfer Edge dialog label to something informative to describe the Miter.
Uncheck the Tangent Propagate box. You can check it later when working with more complex combinations of miters to see how it affects the miters. You can miter, or chamfer all the edges around and entire face by selecting the face instead of just one edge.
Select the OK button, and you have just created your first 45 degree Miter.
You can Miter more than one edge at a time, and create a miter on both ends with a single command. If you want to be able to suppress miters individually, then you will want to create each miter, or set of miters, with multiple selections of the Chamfer function.
We recommend that you use the Edit Equation Button after the distance value in order to label the Miter Distance parameter. In this case, something such as RightFront_Miter for the parameter name.
Step 2: Specified Angle Miter or Bevel

Starting with the Part to be Mitered or Beveled, select the 3D Edge Chamfer Tool.
Select the Edge(s) that will be Mitered, set the Chamfer Type to Distance-Distance, and both Distance fields to the Thick parameter. Uncheck the Tangent Propagate box, and Change the Chamfer Edge dialog label to something informative to describe the Miter.
In order to use the length of the opposite side of triangle to specify the angle, we need to use Trigonometry to specify a formula. No need to agonize over long forgotten math knowledge as the Alibre Users Guide provides the required information. We just need to multiply the Thickness parameter in one distance field by TAN( angle * pi/180), where the angle is in degrees. The pi/180 is required in order to convert the angle specified in degrees to radians so that the tangent equation function has the proper units on which to operate. The angle input has to be a value as we have not had any luck at using another parameter to specify the angle.
The only other consideration is to which Distance field should this trigonometry be added to the thickness value. It is very easy in that if the front corner has been selected, add it to the Bottom (or Front) distance field. If the back corner has been selected for the miter, add it to the Top (or Back) distance field. Just think of the bottom of the Monitor as the Front, which is also the case when working with edgebanding definitions in cutlist software.
If working with other edges and you are unsure which field to place the formula, just place it in one field and if the miter is not correct, then place it in the other distance field instead.
Select the OK button, and you have created a Miter with a user specified angle.
You can Miter more than one edge at a time, and create a miter on both ends with a single command. If you want to be able to suppress miters individually, then you will want to create each miter, or set of miters, with multiple selections of the Chamfer function.
We recommend that you use the Edit Equation Button after the distance values in order to label the Miter Distance parameters. In this case, something such as RightFrontMiter_Distance1 and RightFrontMiter_Distance2 for the parameter name. We also use “Face” and “End” in place of Distance1&2, as it is the FACE distance that contains the trigonometry formula.


