

Introduction: Model Bolt Action Sniper Rifle (new Instructions!)

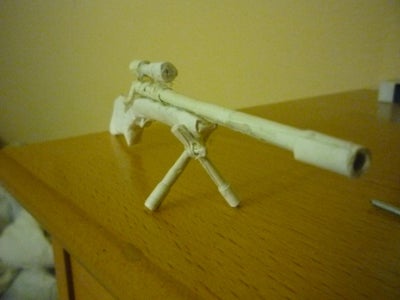


This is a mini paper replica of a modern bolt action rifle such as the M700, with a scope that is also made out of paper.
EDIT: upon popular request, I'll try to describe the steps as best I can without pictures about how to make the gun. I don't know for sure how much paper I rolled up for each piece, but it's mostly trial and error until you get the diameter of rolled paper tube or rod that you want.
Barrel and Bolt
1. The barrel: take a rectangle of paper that is about yay wide and however long the barrel is, slather stick glue over one side, and roll it up tight on that side (sticky side in), until it has the diameter you want.
2. The bolt: roll up a rectangular piece of paper (with glue on one side) to be about the diameter of the barrel, and as long as the bolt should be.
3. bolt cover section (with the opening): take a rectangle of paper (again, trial and error) that is about a millimeter or two longer than the bolt, slather glue over part of it so that it doesn't stick to the bolt itself when finished (maybe leave a half inch or so), and roll it around the bolt rod. When dry, the bolt and bolt cover should be telescoping.
4. The bolt handle: roll a small (3/4in long x 1/2inch to roll up ish) rectangular piece of paper, with glue on it, *tightly*. Once dry, add hot glue to one end of the bolt from step 2, and fold the finished bolt handle around it so that it looks like the first slideshow pic.
Assembling what we've made so far:
1. stick one end of the barrel into the bolt cover for a few millimeters, and hot glue it in there. Make sure everything is straight.
2. stick the bolt rod (the end that doesn't have the handle) into the open end of the bolt cover until it hits the barrel on the other side.
3. Cutting the opening: As shown in picture 9, there is a rectangular opening cut into the bolt cover. This was done using a xacto knife, just carefully marking the opening, and slitting it out, careful not to cut the bolt itself if it is still in there (you can leave the bolt in there for added strength while you cut it). Once all is slitted, just extract the rectangular cutout and you have an opening.
4. Muzzlebreak (on the barrel), or silencer: just roll a rectangular piece of paper around the end of the barrel until it has the thickness you want, with glue.
Scope
1. roll a tube of paper about the length of the bolt cover, a bit longer maybe, with glue, the scale diameter of the inner tube of a real scope (where you attach the scope rings).
2. roll a rectangle of paper around the rear end, as shown in the last picture, again with glue slathered on it.
3. cut a right triangle out of paper, about the same size as the piece of paper you rolled over the other end in the previous step (basically make an identical rectangle of paper to that one, and cut down one of the diagonals to create a right triangle)
4. apply glue, and apply it on the scope tube so that when you roll it around the tube, it should taper towards the middle of the tube. Then, roll it.
5. You have your scope!
6. Now, hot glue it on to the bolt cover as shown in the last picture.
Stock
The stock was made by molding paper after saturating it with water and glue (remember to leave a small groove along its length for the barrel and bolt assembly; you can make this by just putting the assembly along the length and pressing downwards until you have a shallow groove), then letting it dry a bit before gluing strips of paper over it to cover up the wrinkles. No solid instructions for this.
Trigger/trigger guard (it's helpful in this step to refer to the last picture)
1. Apply glue on the rectangle of paper, then fold a half inch square piece of paper along its length to be the width of the stock. This is your trigger guard.
2. fold a teeny tiny piece of paper to be the trigger.
3. Hot glue both pieces to the stock, as shown in the last picture.
To glue the stock to the barrel and bolt
1. Run hot glue down the groove of the stock, and press the barrel and bolt assembly, aligned so that the scope is horizontally parallel to the stock itself, you get the idea... like a real rifle. Allow the glue to dry.
Bipod
1. roll two glued tubes of paper, the same drill as before, about the diameter of the bolt or the barrel. They should be as long as you want the bolt to be when it stands up.
2. roll rectangles of paper around the tips, as shown in the last picture (the same way you did the silencer)
3. using a pin or similar object, poke a hole through the two tubes about 3/4 of the way up (opposite the end that was wrapped in the previous step) as a pilot hole, then use a toothpick to enlarge the holes.
4. roll a tiny tube of paper, the diameter of the pin, and force it through both holes. The finished product should look like the second picture.
5. for strength, simply apply hot glue to all joints of the bipod
Finally!
1. glue the bipod on.
If you've followed me throughout these instructions, you should have your own paper model sniper rifle! Congrats!
This is similar to the Sr-v1 desk topper here: www.instructables.com/id/Sr-v1-desk-topper/ by Ltcheescracker, but it was not made based upon it (I made this before seeing his 'ible). I posted this for him (and other fans of guns, of course) to see.
As can be seen from the pictures, it features a working bolt action cycling from telescoping tubes of paper, a trigger guard with a trigger, scope, and also a bipod that is glued on.
Sorry for not having a real instructable for it, but this was made long before I posted it up here and I don't think I need to make another one unless I'm going to give someone it as a gift.
If you like it, please rate it and comment!


