

Introduction: Monitor Camera and Relay Control Over Internet


Many of us have smartphones, iPads or netbooks that we take with us and it would be great to check in on the place, in a coffee shop or while traveling. Now we use the raspberry pi 2 for monitoring camera and control relay over internet. Everything is explain for the 11 step.
In addition to basic relay control you have many configuration options. For example, you can configure the units to close the contacts for a preset time and then open again, or toggle the relays whenever a voltage is applied or you can even write a custom script to close the relay five times in a certain sequence.
Step 1: Basic Equiment

1. Raspberry Pi 2 + Case
2. Micro Usb Charger 5V
3. Mouse and Keyboard
4. Cable and Screwdriver
5. Relay Module
6. 2 pcs Usb Camera
7. Micro SD card 8Gb
8. LCD monitor, Driver, HDMI cable and Power Supply 12v
Step 2: SD Card Setup With Windows XP

- Download your preferred Operating System (OS) you wish to run from the Raspberry Pi website: https://www.raspberrypi.org/downloads/raspbian/
You will need to use a program such as Win32DiskImager (search from google). This program will write the image structure required for the Raspberry Pi to boot from the SD card.
Open Win32DiskImager, Load image file “Raspbian” OS to your SD card device, then click write
Eject SD card, insert to your Raspberry Pi 2
Step 3: Resize Partitions

- Insert SD card to your Raspberry Pi 2, power up and wait until display the raspberry pi software configuration tool (raspi-config)
Choose number 1 ( Expand Filesystem ), press enter, then choose finish, raspberry will reboot
Step 4: First Boot

- Login your raspberry pi 2
- Raspberrypi login : pi
- Password : raspberry
Write “startx” and press enter
Step 5: Remove Border on Your Display Lcd ( If Not Full Screen )

- Find and open LXTerminal write “sudo nano /boot/config.txt”
Uncomment ( Remove # ) disable_overscan=1
Uncomment ( Remove # ) the following to adjust overscan, change to zero
Press Ctrl-X, write “Y” and press enter to change the config.txt
Write “sudo reboot”
Wait and the border will remove
Step 6: Solving Error “GDBus.Error.org.freedesktop.PolicyKit1.Error.Failed . . . “

- Open LXTerminal, type lxsession-edit to open Desktop Session Setting
- Uncheck LXPolKit
Reboot your Raspberry Pi 2
Step 7: Install Motion on Raspberry Pi 2


Open LXTerminal and write
sudo apt-get update
sudo apt-get upgrade
sudo apt-get install motion
Enable motion daemon
sudo nano /etc/default/motion
change line to start_motion_daemon=yes
Ctrl-X, save modified buffer Y, and press enter
Motion configuration
sudo nano /etc/motion/motion.conf
daemon = OFF to ON
webcam_localhost = ON to OFF
Check usb camera
Plug your 2 usb camera to your raspberry pi 2
Check on LXTerminal
ls /dev/vid*
Start / Stop Motion
sudo service motion start
sudo service motion stop
Test your usb camera
Make new folder “camera” on home/pi/camera
Go to LXTerminal write “cd camera”
write “sudo nano cam1.conf”
videodevice /dev/video0
webcam_port 8081
write “sudo nano cam2.conf”
- videodevice /dev/video1
webcam_port 8082
add following line to /etc/motion/motion.conf
thread /home/pi/camera/cam1.conf
thread /home/pi/camera/cam2.conf
Check your Dynamic IP using LXTerminal
Write “ifconf”, use the inet addr
Remember to restart motion “sudo service motion restart”
Test on your browser http://192.168.1.122:8081/ and http://192.168.1.122:8081/
Step 8: Download and Install Last Release Webiopi


- Download file webiopi on http://webiopi.trouch.com/DOWNLOADS.html and adapt x.y.z with the version you download. Put the file to /home/pi
- Open LXTerminal and write the step
- $tar xvzf WebIOPi-x.y.z.tar.gz
- $cd WebIOPi-x.y.z
- For only Raspberry pi 2, must change the following step
- Python/native/cpuinfo.c change 'BCM2708' to 'BCM2709'
- Python/native/gpio.c '#define BCM2708_PERI_BASE 0x20000000' to '#define BCM2708_PERI_BASE 0x3f000000'
- Then install webiopi
- $sudo ./setup.sh
- Setup may take a moment
- Run your webiopi
- $sudo webiopi -d-c /etc/webiopi/config
- You are done, and ready to enjoy WebIOPi! But the server and GPIO state will be lost when you'll stop the script (CTRL-C) or close the terminal
- Start/Stop WebIOPi
- $sudo /etc/init.d/webiopi start
- $sudo /etc/init.d/webiopi stop
- Access WebIOPi over local nettwork
- If your Raspberry Pi is connected to your network, you can open a browser to http://raspberrypi:8000/ with any device of your network. Replace raspberrypi by its IP
- Default user is 'webiopi' and password is 'raspberry'
- Begin the script
- Create a folder somewhere on your P, for instance /home/pi/myproject. This is main folder
- Create another python folder in the previously created. I will store Python script file here
- Create another html folder next to python. We will store HTML and other resources here
- Configuration
- Edit /etc/webiopi/config
- Script
- myproject =/home/pi/myproject/python/script.py
- Http
- doc-root=/home/pi/myproject/html
- Script
- Remember to start your WebIOPi
$sudo /etc/init.d/webiopi start
- Edit /etc/webiopi/config
Step 9: Python Script, Html File and Connection Raspberry Pi and Relay Module
- Inside script.py file
http://sourceforge.net/projects/script-py-file/files/script.py/download
- inside html file
http://sourceforge.net/projects/script-py-file/files/index.html/download
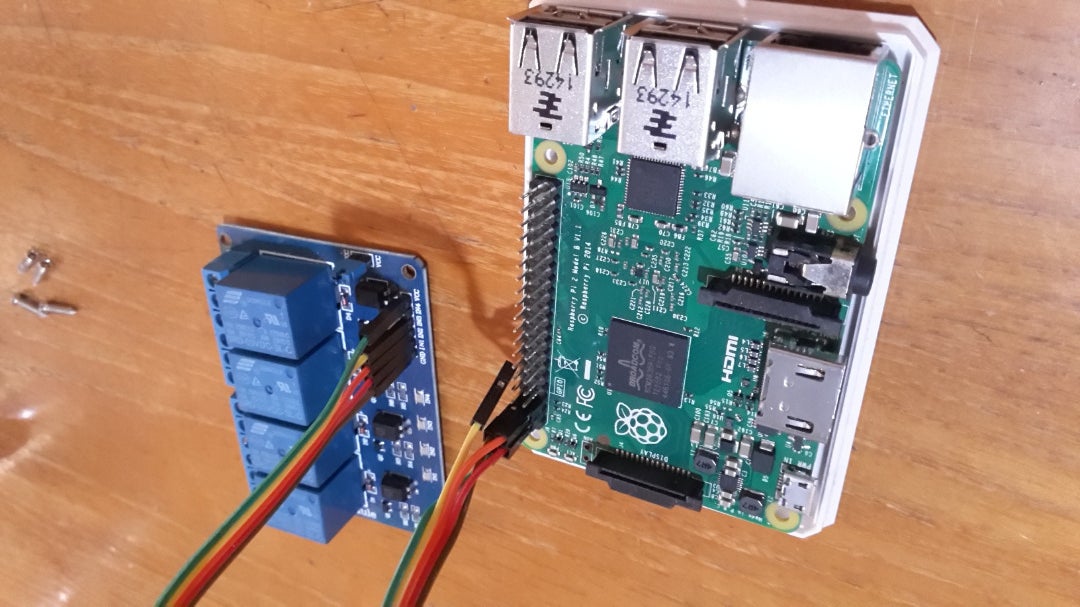
- Connection Raspberry Pi and relay module
- Raspberry pi PIN 02 (DC 5v) to relay module (VCC)
- Raspberry pi PIN 06 (Ground) to relay module (GND)
- Raspberry pi PIN 03 (GPIO 02) to relay module (IN1)
- Raspberry pi PIN 05 (GPIO 03) to relay module (IN2)
Step 10: Test Connection Over 192.168.1.122:8000


There are two camera online at 192.168.1.122:8000, two relay that can be energize by press the button. User name is 'webiopi' password 'raspberry'
Step 11: Access Over Internet the Two Camera and Relay Module


- Register on the Weaved developper portal
Go to https://developer.weaved.com/portal/ and follow instruction to create an account.
- Download Weaved for Raspberry pi
- Open LXTerminal and write 'wget https://github.com/weaved/installer/raw/master/bi...'
- Install Weaved
- chmod +x weaved-nixinstaller_1.2.13.bin
- ./weaved-nixinstaller_1.2.13.bin
- Choose Yes for raspberry pi 2 arm7
- Protocol Selection Menu, choose number 3 (Webiopi on default port 8000)
- Enter register email on weaved portal
- Provide device name, I use 'raspberry pi 2'
- Test your setup
- Login to developer.weaved.com
- Device 'Raspberry pi 2' will appear
- Klik on the device 'Raspberry pi 2'
- Open your browser on your Raspberry or your Phone, Camera and relay online over internet

Participated in the
Raspberry Pi Contest


